

With the ongoing evolution of LLM-powered workflows, the limits of what AI can do with real-time and recorded video are rapidly expanding. AI can now contribute to post-processing through contextualized parsing of video, audio, and transcription output. Some results are production-worthy while others are exploratory, benefiting from an additional human touch. In the end, it’s human intuition and ingenuity that enables LLM-powered applications to shine.
In this post, I’ll explore one use case and implementation for AI-assisted post-processing that can make video presenters’ lives a little easier. We’ll go through a small demo which lets you remove disfluencies, also known as filler words, from any MP4 file. These can include words like “um”, “uh”, and similar. I will cover:
- How the demo works from an end-user perspective
- A before and after example video
- The demo’s tech stack and architecture
- Running the demo locally
- What’s happening under the hood as filler words are being removed
How the demo works
When the user opens the filler removal web application, they’re faced with a page that lets them either upload their own MP4 file or fetch the cloud recordings from their Daily domain:
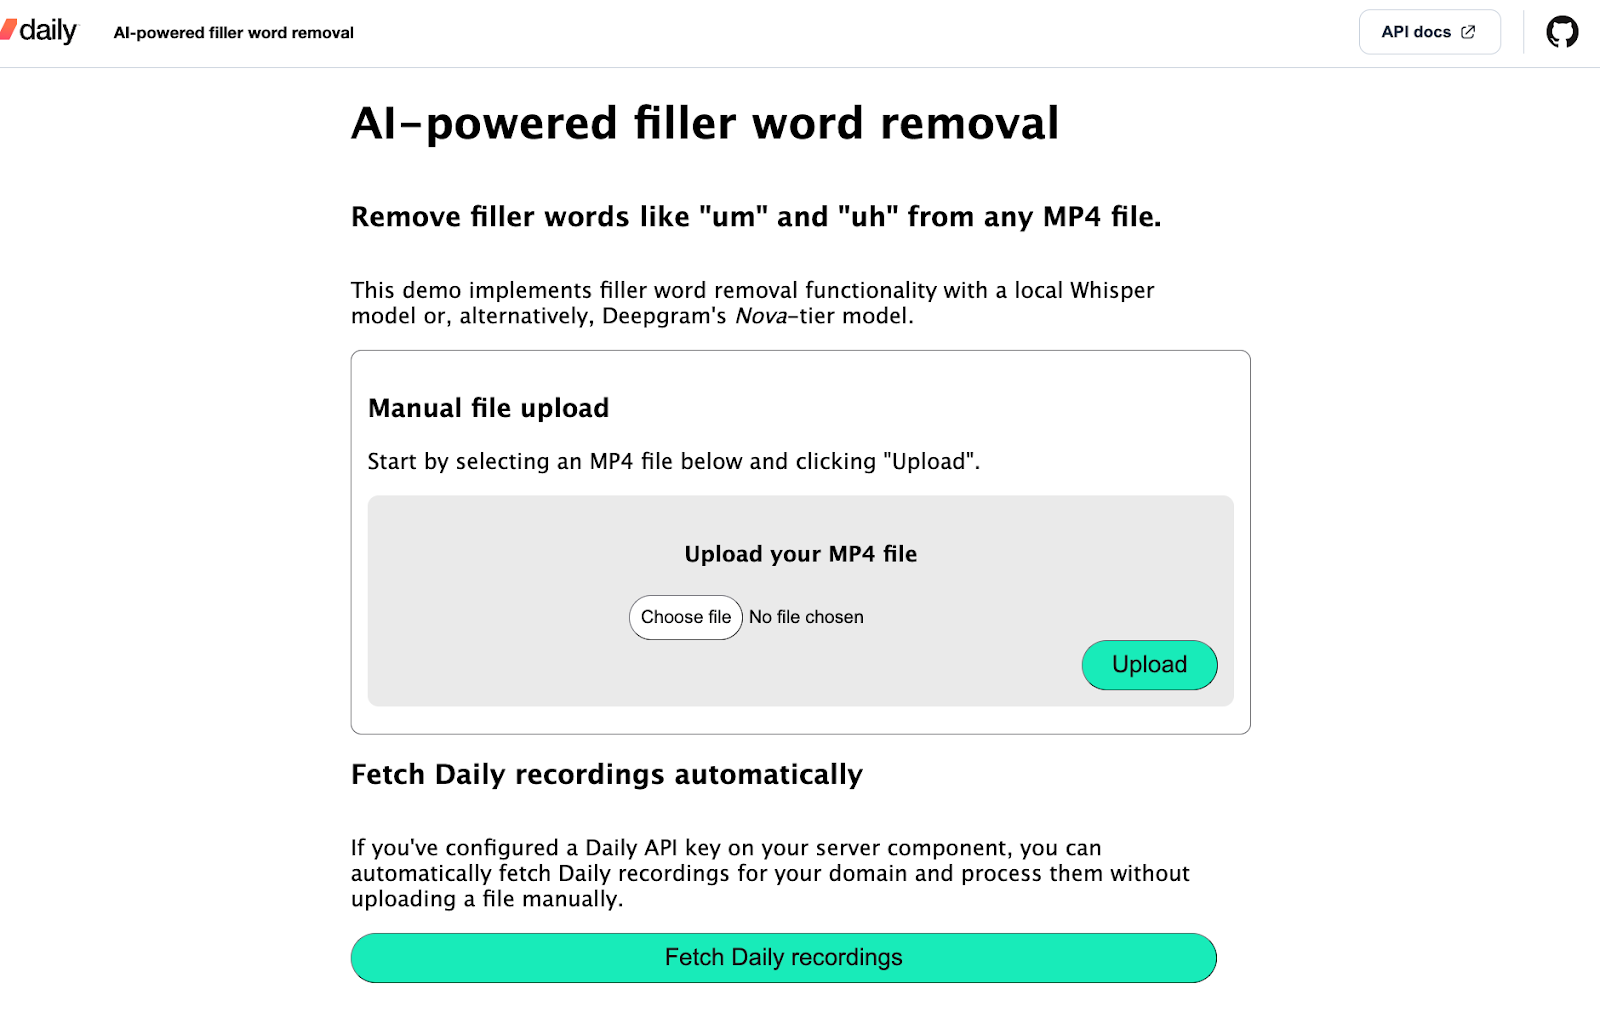
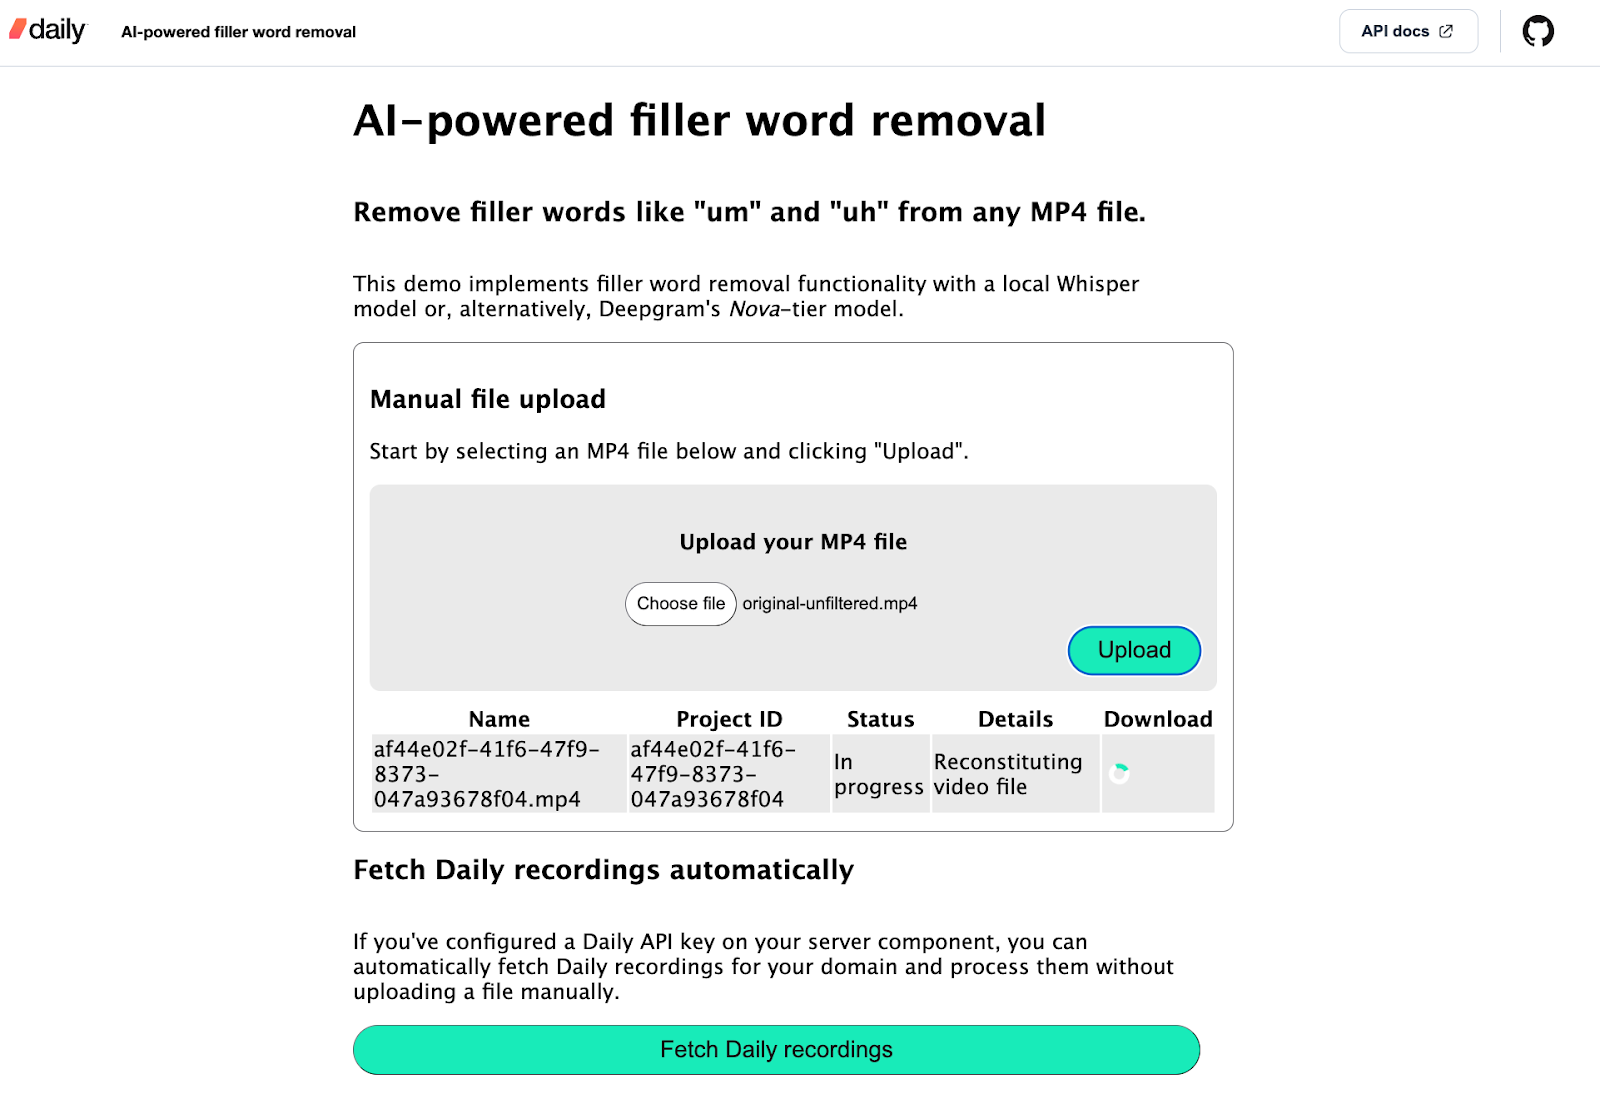
For this demo, I’ve stuck with the server framework's (Quart) default request size limit of 16MB (but feel free to configure this in your local installation). Once the user uploads an MP4 file, the back-end component of the demo starts processing the file to remove filler words. At this point, the client shows the status of the project in the app:
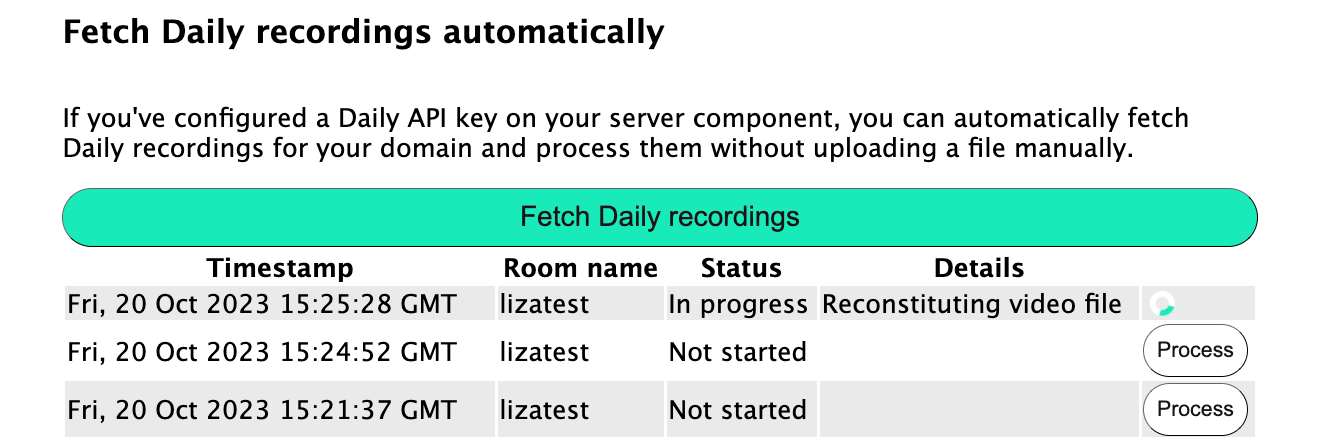
If the user clicks the “Fetch Daily recordings” button, all the Daily recordings on the configured Daily domain are displayed:

The user can then click “Process” next to any of the recordings to begin removing filler words from that file. The status of the project will be displayed:
Once a processing project is complete, a “Download Output” link is shown to the user, where they can retrieve their new, de-filler-ized video:

Here’s an example of a before and after result:
Before
Before filler word removal
After
After filler word removal
As you can see, the output is promising but not perfect–I’ll leave some final impressions of both Deepgram and Whisper results at the end of this post.
Now that we’re familiar with the user flow, let’s look into the demo tech stack and architecture.
Tech stack and architecture
This demo is built using the following:
- JavaScript for the client-side.
- Python for the server component.
- Deepgram and Whisper as two LLM transcription and filler word detection options:
- Deepgram’s Python SDK to implement Deepgram transcription with their Nova-tier model, which lets us get filler words in the transcription output. This transcriber relies on a Deepgram API key.
whisper-timestamped, which is a layer on top of the Whisper set of models enabling us to get accurate word timestamps and include filler words in transcription output. This transcriber downloads the selected Whisper model to the machine running the demo and no third-party API keys are required.
- Daily’s REST API to retrieve Daily recordings and recording access links. If a Daily API key is not specified, the demo can still be used by uploading your own MP4 file manually.
On the server-side, the key concepts are:
- Projects. The
Projectclass is defined in server/project.py. Each instance of this class represents a single video for which filler words are being removed. When a project is instantiated, it takes an optionaltranscriberparameter. - Transcribers. Transcribers are the transcription implementations that power filler word detection. As mentioned before, I’ve implemented Deepgram and Whisper transcribers for this demo. You can also add your own by placing any transcriber you’d like into a new class within the
server/transcription/directory (I’ll talk a bit more about that later).
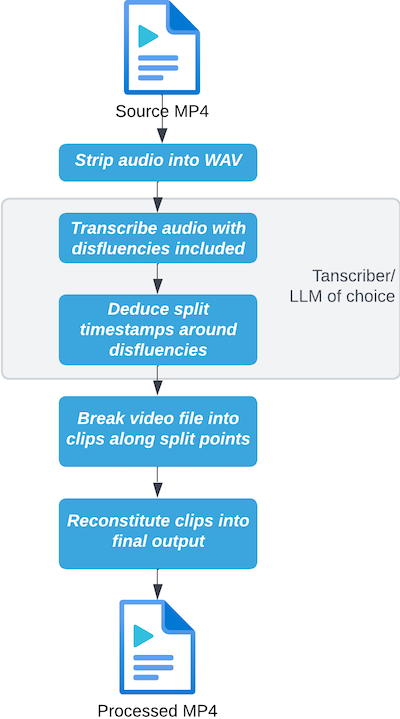
The steps an input video file goes through are as follows:
Running the demo locally
To run the demo locally, be sure to have Python 3.11 and FFmpeg installed.
Then, run the following commands (replacing the python3 and pip3 commands with your own aliases to Python and pip as needed):
# Clone the git repository
git clone https://github.com/daily-demos/filler-word-removal.git
cd filler-word-removal
git checkout v1.0

# Configure and activate a virtual environment
python3 -m venv venv
source venv/bin/activate

# Install dependencies
pip install -r requirements.txt
Optionally, copy the .env.sample file and assign your Deepgram and Daily API keys. Both of these are optional, but I think Deepgram results are usually superior to Whisper out of the box and I’d really suggest you try that out.
Now, run the following commands in two separate terminals within your virtual environment:
# Start the processing server
quart --app server/index.py --debug run
# Serve the front-end
python -m http.server --directory client
Open your web browser of choice (I suggest Chrome) to the localhost address shown in the second terminal window above. It will probably be http://localhost:8000.
Now that we’ve got the app running, let’s see what’s happening under the hood.
Under the hood of AI-powered video filler word removal
I’m going to mostly focus on the server side here, because that’s where all the magic happens. You can check out the source code for the client on GitHub to have a look at how it uses the server components below.
Server routes
All of the processing server routes are defined in server/index.py. They are:
POST /upload: Handles the manual upload of an MP4 file and begins processing the file to remove filler words.POST /process_recording/<recording_id>: Downloads a Daily cloud recording by the provided ID and begins processing the file to remove disfluencies.GET /projects/<project_id>: Reads the status file of the given filler-word-removal project and returns its contents. Enables the client to poll for status updates while processing is in progress.GET /projects/<projct_id>/download: Downloads the output file for the given filler-word-removal project ID, if one exists.GET /recordings: Retrieves a list of all Daily recordings for the configured Daily domain.
Let’s go through the manual upload flow and see how processing happens.
Processing an MP4 file with the /upload route
The /upload route looks as follows:
@app.route('/upload', methods=['POST'])
async def upload_file():
    """Saves uploaded MP4 file and starts processing.
    Returns project ID"""
    files = await request.files
    file = files["file"]
    project = Project()
    file_name = f'{project.id}.mp4'
    file_path = os.path.join(get_upload_dir_path(), file_name)
    try:
        await file.save(file_path)
        if not os.path.exists(file_path):
            raise Exception("uploaded file not saved", file_path)
    except Exception as e:
        return process_error('failed to save uploaded file', e)

    return process(project, file_path, file_name)
Above, I start by retrieving the file from the request. I then create an instance of Project(), which will generate a unique ID for itself when being instantiated as well as decide which transcriber to use. I’ll cover the Project instance setup shortly.
Next, I retrieve the path to which I’ll save the uploaded file based on the newly-created project ID. This directory can be configured in the application’s environment variables - check out the /server/config.py file for more information.
Once I have the file and the path to save it to, I save the file. If something goes wrong during this step, I return an error to the client. If the file saved successfully, I begin processing. I’ll dive into the processing step shortly. First, let’s take a quick look at the Project constructor I mentioned above:
Project setup
As mentioned above, the Project class constructor configures a unique ID for the project. It also decides which transcriber (Deepgram or Whisper) will be used:
class Project:
    """Class representing a single filler word removal project."""
    transcriber = None
    id = None

    def __init__(
            self,
            transcriber=None,
    ):
        if not transcriber:
            transcriber = Transcribers.WHISPER
            deepgram_api_key = os.getenv("DEEPGRAM_API_KEY")
            if deepgram_api_key:
                transcriber = Transcribers.DEEPGRAM
        self.transcriber = transcriber.value
        self.id = self.configure()
Above, if a transcriber argument is not passed in, Project will look for a DEEPGRAM_API_KEY environment variable. If a Deepgram API key has been configured, Deepgram will be used as the transcriber. Otherwise, it’ll fall back to a locally-downloaded Whisper model.
The project ID is a UUID generated in the configure() method, which checks for conflicts with any existing projects and sets up the temporary directory for this project instance:
def configure(self):
    """Generates a unique ID for this project and creates its temp dir"""
    proj_id = uuid.uuid4()
    temp_dir = get_project_temp_dir_path(proj_id)
    if os.path.exists(temp_dir):
        # Directory already exists, which indicates a conflict.
        # Pick a new UUID and try again
        return self.configure()
    os.makedirs(temp_dir)
    return proj_id
Now that we know how a project is configured, let’s dig into processing.
Beginning processing
The process() function in server/index.py takes the Project instance I created earlier, the path of the uploaded MP4 file, and the file name. It then processes the project in a Quart background task:
def process(project: Project, file_path: str, file_name: str) -> tuple[quart.Response, int]:
    """Runs filler-word-removal processing on given file."""
    try:
        app.add_background_task(project.process, file_path)

        response = {'project_id': project.id, 'name': file_name}
        return jsonify(response), 200
    except Exception as e:
        return process_error('failed to start processing file', e)
This way, the client’s request does not need to wait until the whole filler-word-removal process is complete, which can take a couple of minutes. The user will know right away that processing has started and receive a project ID which they can use to poll for status updates.
We’re now ready to dig into the critical part: What does project.process() do?
The processing step
The process() project instance method is responsible for all of the filler-word-removal operations and status updates on the project:
def process(self, source_video_path: str):
    """Processes the source video to remove filler words"""
    self.update_status(Status.IN_PROGRESS, '')
    try:
        self.update_status(Status.IN_PROGRESS, 'Extracting audio')
        audio_file_path = self.extract_audio(source_video_path)
    except Exception as e:
        traceback.print_exc()
        print(e, file=sys.stderr)
        self.update_status(Status.FAILED, 'failed to extract audio file')
        return

    try:
        self.update_status(Status.IN_PROGRESS, 'Transcribing audio')
        result = self.transcribe(audio_file_path)
    except Exception as e:
        traceback.print_exc()
        print(e, file=sys.stderr)
        self.update_status(Status.FAILED, 'failed to transcribe audio')
        return

    try:
        self.update_status(Status.IN_PROGRESS, 'Splitting video file')
        split_times = self.get_splits(result)
    except Exception as e:
        traceback.print_exc()
        print(e, file=sys.stderr)
        self.update_status(Status.FAILED, 'failed to get split segments')
        return

    try:
        self.update_status(Status.IN_PROGRESS, 'Reconstituting video file')
        self.resplice(source_video_path, split_times)
    except Exception as e:
        traceback.print_exc()
        print(e, file=sys.stderr)
        self.update_status(Status.FAILED, 'failed to resplice video')
        return

    self.update_status(Status.SUCCEEDED, 'Output file ready for download')
Aside from basic error handling and status updates, the primary steps being performed above are:
extract_audio(): Extracting the audio from the uploaded video file and saving it to a WAV file.transcribe(): Transcribing the audio using the configured transcriber.get_splits(): Getting the split times we’ll use to split and reconstitute the video with filler words excluded. This also uses the configured transcriber, since the data format here may be different across different transcription models or services.resplice(): Cuts up and then splices the video based on the transcriber’s specified split times.
I’ve linked to each function in GitHub above. Let’s take a look at a few of them in more detail. Specifically, let’s focus on our transcribers, because this is where the LLM-powered magic happens.
Transcribing audio with filler words included using Deepgram
I’ll use Deepgram as the primary example for this post, but I encourage you to also check out the Whisper implementation to see how it varies.
In the server/transcription/dg.py module, I start by configuring some Deepgram transcription options:
DEEPGRAM_TRANSCRIPTION_OPTIONS = {
    "model": "general",
    "tier": "nova",
    "filler_words": True,
    "language": "en",
}
The two most important settings above are "tier" and "filler_words". By default, Deepgram omits filler words from the transcription result. To enable inclusion of filler words in the output, a Nova-tier model must be used. Currently, this is only supported with the English Nova model.
Let’s take a look at the dg module transcription step:
def transcribe(audio_path: str):
    """Transcribes give audio file using Deepgram's Nova model"""
    deepgram_api_key = os.getenv("DEEPGRAM_API_KEY")
    if not deepgram_api_key:
        raise Exception("Deepgram API key is missing")
    if not os.path.exists(audio_path):
        raise Exception("Audio file could not be found", audio_path)
    try:
        deepgram = Deepgram(deepgram_api_key)
        with open(audio_path, 'rb') as audio_file:
            source = {'buffer': audio_file, 'mimetype': "audio/wav"}
            res = deepgram.transcription.sync_prerecorded(
                source, DEEPGRAM_TRANSCRIPTION_OPTIONS
            )
        return res
    except Exception as e:
        raise Exception("failed to transcribe with Deepgram") from e
Above, I start by retrieving the Deepgram API key and raising an exception if it isn’t configured. I then confirm that the provided audio file actually exists and—you guessed it—raise an exception if not. Once we’re sure the basics are in place, we’re good to go with the transcription.
I then instantiate Deepgram, open the audio file, transcribe it via Deepgram’s sync_prerecorded() SDK method, and return the result.
Once the transcription is done, the result is returned back to the Project instance. With Deepgram, the result will be a JSON object that looks like this:
{
   "metadata":{
      //… Metadata properties here, not relevant for our purposes
   },
   "results":{
      "channels":[
         {
            "alternatives":[
               {
                  "transcript":"hello",
                  "confidence":0.9951172,
                  "words":[
                     {
                        "word":"hello",
                        "start":0.79999995,
                        "end":1.3,
                        "confidence":0.796875
                     }
                  ]
               }
            ]
         }
      ]
   }
}
The next step is to process this output to find relevant split points for our video.
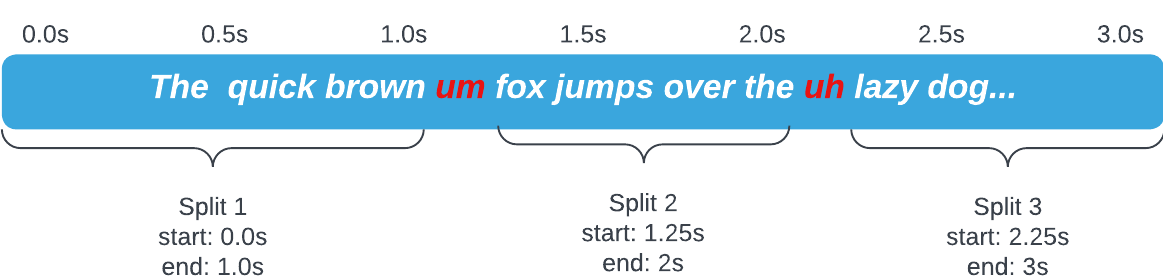
Finding filler word split points in the transcription
After producing a transcription with filler words included, the same transcriber is also responsible for parsing the output and compiling all the split points we’ll need to remove the disfluencies. So, let’s take a look at how I do this in the dg module (I’ve left some guiding comments inline):
def get_splits(transcription) -> timestamp.Timestamps:
"""Retrieves split points with detected filler words removed"""
filler_triggers = ["um", "uh", "eh", "mmhm", "mm-mm"]
words = get_words(result)
splits = timestamp.Timestamps()
first_split_start = 0
try:
   for text in words:
       word = text["word"]
       word_start = text["start"]
       word_end = text["end"]
       if word in filler_triggers:
           # If non-filler tail already exists, set the end time to the start of this filler word
           if splits.tail:
               splits.tail.end = word_start


               # If previous non-filler's start time is not the same as the start time of this filler,
               # add a new split.
               if splits.tail.start != word_start:
                   splits.add(word_end, -1)
           else:
               # If this is the very first word, be sure to start
               # the first split _after_ this one ends.
               first_split_start = word_end


       # If this is not a filler word and there are no other words
       # already registered, add the first split.
       elif splits.count == 0:
           splits.add(first_split_start, -1)
   splits.tail.end = words[-1]["end"]
   return splits
    except Exception as e:
        raise Exception("failed to split at filler words") from e
Above, I retrieve all the words from Deepgram’s transcription output by parsing the transcription JSON (check out the get_words() function source if you’re curious about that object structure).
I then iterate over each word and retrieve its ”text”, ”start”, and ”end” properties. If the ”text” indicates a filler word, I end the previous split at the beginning of the filler. I then add a new split at the end of the filler.
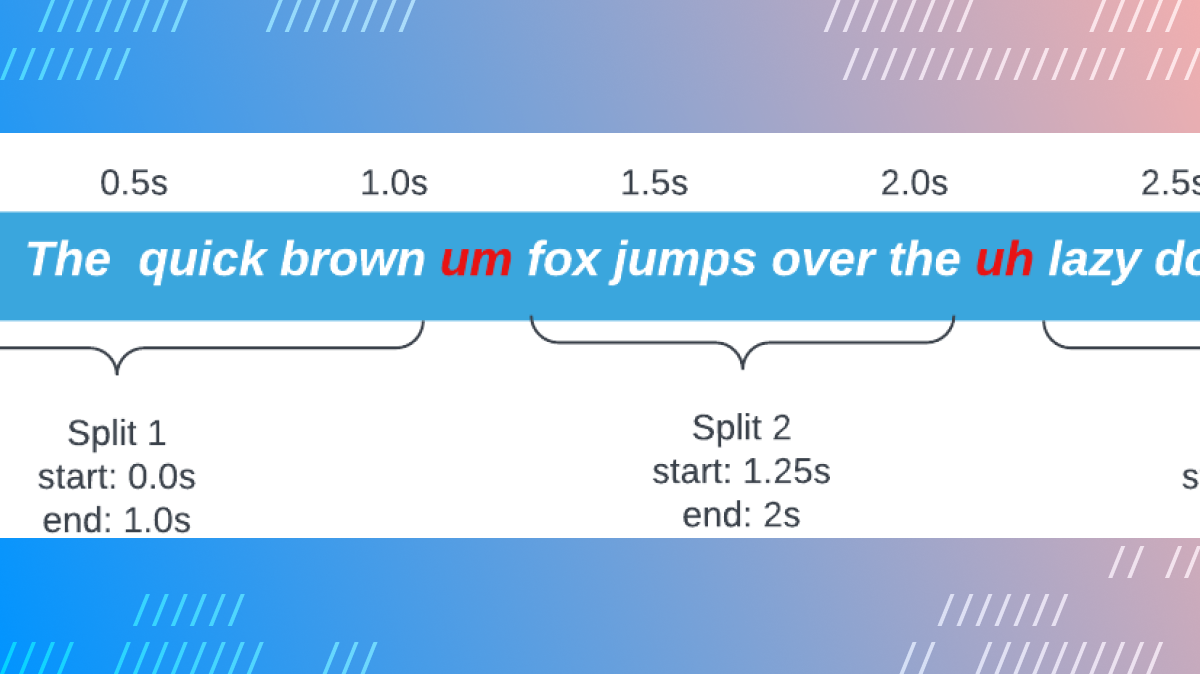
The resulting splits could be visualized as follows:
The collection of split points is then returned back to the Project class instance, where the original video gets cut and diced.
Cutting and reconstituting the original video
The remainder of the work happens entirely in the Project class, because none of it is specific to the chosen transcription API. Once we get the split points as a collection of Timestamp nodes, the project knows what to do with them in the resplice() function:
def resplice(self, source_video_path: str, splits: Timestamps):
    """Splits and then reconstitutes given video file at provided split points"""
    tmp = get_project_temp_dir_path(self.id)

    clips = []
    current_split = splits.head
    idx = 0

   # The rest of the function below...
Above, I start by getting the temp directory path for the project based on its ID. This is where all the individual clips will be stored.
I then initialize an array of clips and define a current_split variable pointing to the head node of the timestamp collection.
Finally, I define a starting index for our upcoming loop. The next step is to split up the video:
def resplice(self, source_video_path: str, splits: Timestamps):
	# ...Previously-covered logic above...

    try:
        while current_split:
            start = current_split.start
            end = current_split.en
            # Overarching safeguard against 0-duration and nonsensical splits
            if start >= end:
                current_split = current_split.next
                continue
            clip_file_path = os.path.join(tmp, f"{str(idx)}.mp4")
            ffmpeg_extract_subclip(source_video_path, start, end,
                                   targetname=clip_file_path)
            clips.append(VideoFileClip(clip_file_path))
            current_split = current_split.next
            idx += 1
    except Exception as e:
        raise Exception('failed to split clips') from e

	# The rest of the function below...
Above, I traverse through every split timestamp we have. For each timestamp, I extract a subclip and save it to the project’s temp directory. I append the clip to the previously-defined clips collection. I then move on to the next split point and do the same, until we’re at the end of the list of timestamps.
Now that we’ve got all the relevant subclips extracted, it’s time to put them back together:
def resplice(self, source_video_path: str, splits: Timestamps):
	# ...Previously-covered logic above...
	try:
    	final_clip = concatenate_videoclips(clips)
    	output_file_path = get_project_output_file_path(self.id)
    	final_clip.write_videofile(
        	output_file_path,
        	codec='libx264',
        	audio_codec='aac',
        	fps=60,
    	)
	except Exception as e:
    	raise Exception('failed to reconcatenate clips') from e

	# Remove temp directory for this project
	shutil.rmtree(tmp)
Above, I concatenate every clip I stored while splitting them and write them to the final output path. Feel free to play around with the codec, audio_codec, and fps parameters above.

Finally, I remove the temp directory associated with this project to avoid clutter.
And we’re done! We now have a shiny new video file with all detected filler words removed.
The client can now use the routes we covered earlier to upload a new file, fetch Daily recordings and start processing them, and fetch the latest project status from the server.
Final thoughts
Impressions of Deepgram and Whisper
I found that Whisper output seemed more aggressive than Deepgram’s in cutting out parts of valid words that aren’t disfluencies. I am confident that with some further tweaking and maybe selection of a different Whisper sub-model, the output could be refined.
Deepgram worked better out of the box in terms of not cutting out valid words, but also seemed to skip more filler words in the process. Both models ended up letting some disfluencies through.
Used out of the box, I’d suggest going with Deepgram to start with. If you want more configuration or to try out models from HuggingFace, play around with Whisper instead.
Plugging in another transcriber
If you want to try another transcription method, you can do so by adding a new module to server/transcription. Just make sure to implement two functions:
transcribe(), which takes a path to an audio file.get_splits(), which takes the output fromtranscribe()and returns an instance oftimestamp.Timestamps().
With those two in place, the Project class will know what to do! You can add your new transcriber to the Transcribers enum and specify it when instantiating your project.
Caveats for production use
Storage
This demo utilizes the file system to store uploads, temporary clip files, and output. No space monitoring or cleanup is implemented here (aside from removing temporary directories once a project is done). To use this in a production environment, be sure to implement appropriate monitoring measures and use a robust storage solution.
Security
This demo contains no authentication features. Processed videos are placed into a public folder that anyone can reach, associated with a UUID. Should a malicious actor guess or brute-force a valid project UUID, they can download processed output associated with that ID. For a production use case, access to output files should be gated.
Conclusion
Implementing powerful post-processing effects with AI has never been easier. Coupled with Daily’s comprehensive REST API, developers can easily fetch their recordings for further refinement with the help of an LLM. Disfluency removal is just one example of what’s possible. Keep an eye out for more demos and blog posts featuring video and audio recording enhancements with the help of AI workflows.
If you have any questions, don’t hesitate to reach out to our support team. Alternatively, hop over to our Discord community to chat about this demo.
Never miss a story
Get the latest direct to your inbox.