


At Daily, we're always excited to explore new and creative uses for our video API. In this tutorial, we'll show you how to automatically summarize Daily meetings using OpenAI's Whisper and ChatGPT APIs. Automating your meeting summaries allows you to fully engage and be present during sessions, save time, and reduce communication errors. You can use this technology for:
- Team meetings: consolidate discussed topics into a single, unbiased point of truth
- Sales calls: provide accurate summaries of the call for all stakeholders.
- Training sessions: Provide detailed summaries of training sessions to help employees retain and apply the knowledge learned during the session.
These are just a few examples, but the possibilities are endless. So let's dive in and see how you can start automating your meeting summaries today!
Game plan
Our app requires Daily’s paid recording feature, which you can enable by adding your credit card to your account. When you add your credit card for the first time, you’ll receive $15 in free credit, more than enough for this demo!
Our app also uses OpenAI’s APIs. While OpenAI doesn’t currently use API data to train its models, it’s a good idea to keep an eye on their API usage policy and monitor any changes if incorporating this approach into production workflows.
Here's how the app will work:
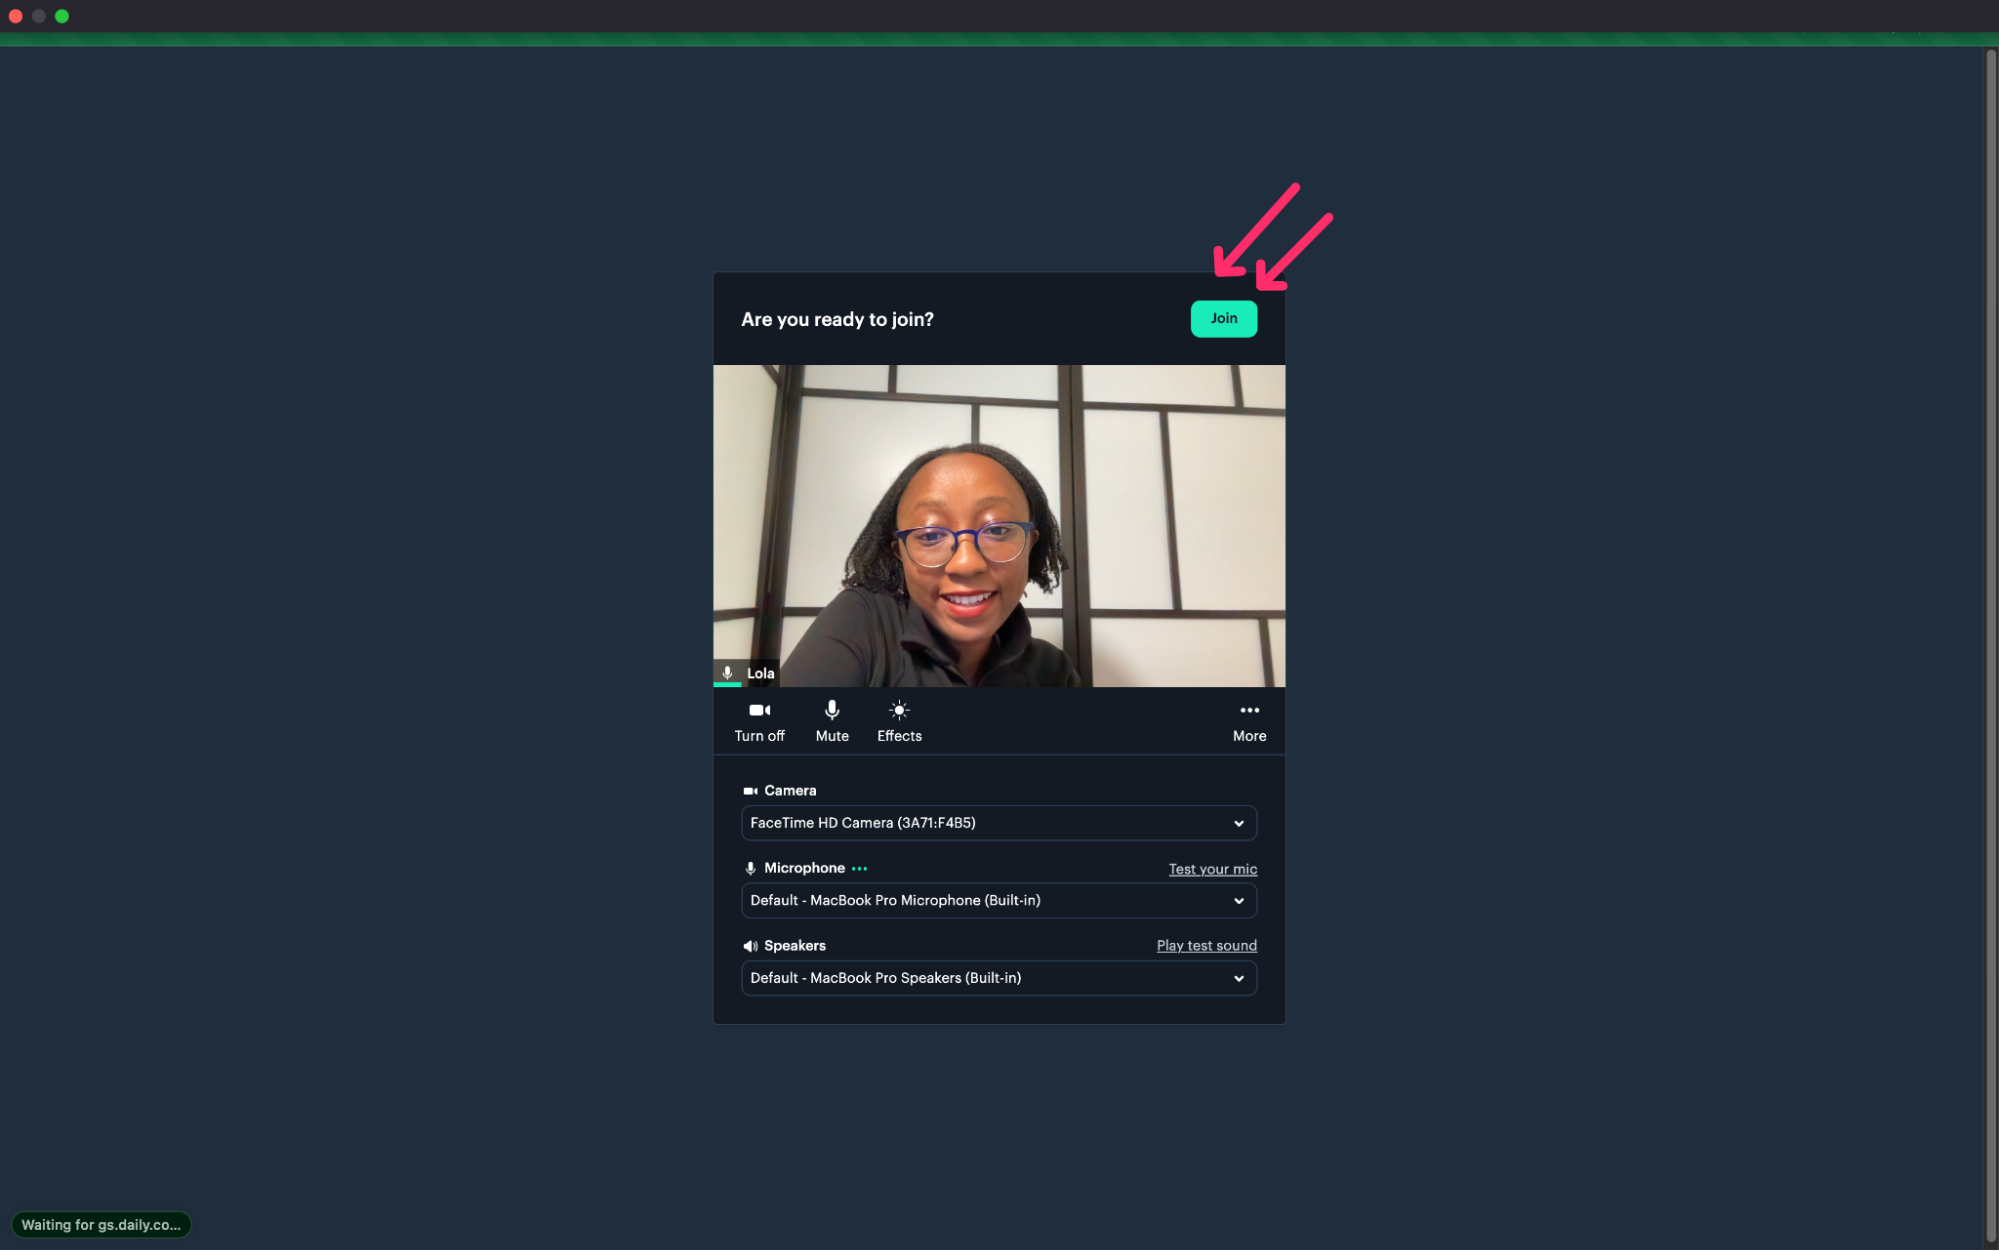
Users will click "Join" on the call pre-join screen to enter the video call.
Once in the call, any user can begin recording by clicking the "Start recording" button.
Users can select "Stop recording" when the meeting is over, and our app will automatically generate a meeting summary. This process may take a few minutes. Users can navigate away from the page during processing if email summaries are enabled. However, they should keep the app running in the background! If email summaries are not enabled, users should stay on the page to view the summary in the console.
After processing finishes, our app will email the meeting summary if email summaries are enabled.
If email summaries aren't enabled, users can still view the summary in the console log of their browser's developer tools.
Follow along with the demo repository
Access the demo repository to follow along with the creation of our app. Throughout the tutorial, we will explain the app step-by-step and provide links to the relevant code in the repository!
If you'd prefer to skip ahead and run the finished demo, clone the demo repository and follow the setup locally. Here's how to do it:
Clone the repository and navigate to the directory:
git clone https://github.com/daily-demos/daily-whisper-chatgpt.git
cd daily-whisper-chatgpt
Install dependencies (especially FFmpeg!)
Run the demo with the below commands:
yarn
yarn dev
Tools we'll use
Now that we have a clearer understanding of what we’re building, let’s explore the tools we’ll use to record, transcribe, and summarize video meetings.
Daily’s video call API
We'll use Daily's REST API to create and record our video call. Daily is a leading provider of video and audio APIs that empower developers to build unique experiences. With Daily's Prebuilt video interface, we'll have everything we need to seamlessly embed video calls into our apps, including grid and participant views, screen sharing, and other essential features. We'll also use Daily's REST API to retrieve recordings. Make sure to sign up if you still need a Daily account!
FFmpeg for file compression
We'll use FFmpeg and the Fluent-FFmpeg module to compress the recording files from Daily's REST API. OpenAI has a file size limit of 25 MB, so compressing our files allows us to summarize longer meetings without breaking them up first (we won't go over slicing much longer calls in this demo).
FFmpeg is a powerful command-line tool for manipulating and converting audio and video files. Fluent-FFmpeg is a module for Node.js that makes it easier to use FFmpeg programmatically. You can download it if you still need to install FFmpeg.
OpenAI’s Whisper and ChatGPT APIs
We'll use OpenAI's Whisper API to transcribe our recorded audio. Whisper is a new API from OpenAI that provides highly accurate speech recognition and transcription. Then we'll use OpenAI's ChatGPT API to summarize our transcribed audio. ChatGPT is a powerful language model that can quickly summarize large amounts of text with high accuracy. To access these APIs, sign up for OpenAI credentials if you still need to do so.
(Optional) Email summary with Nodemailer and Sendinblue
If you prefer not to set up email, don't worry–emailing is an optional part of this demo. The demo code will automatically log the generated meeting summary to your browser console by default.
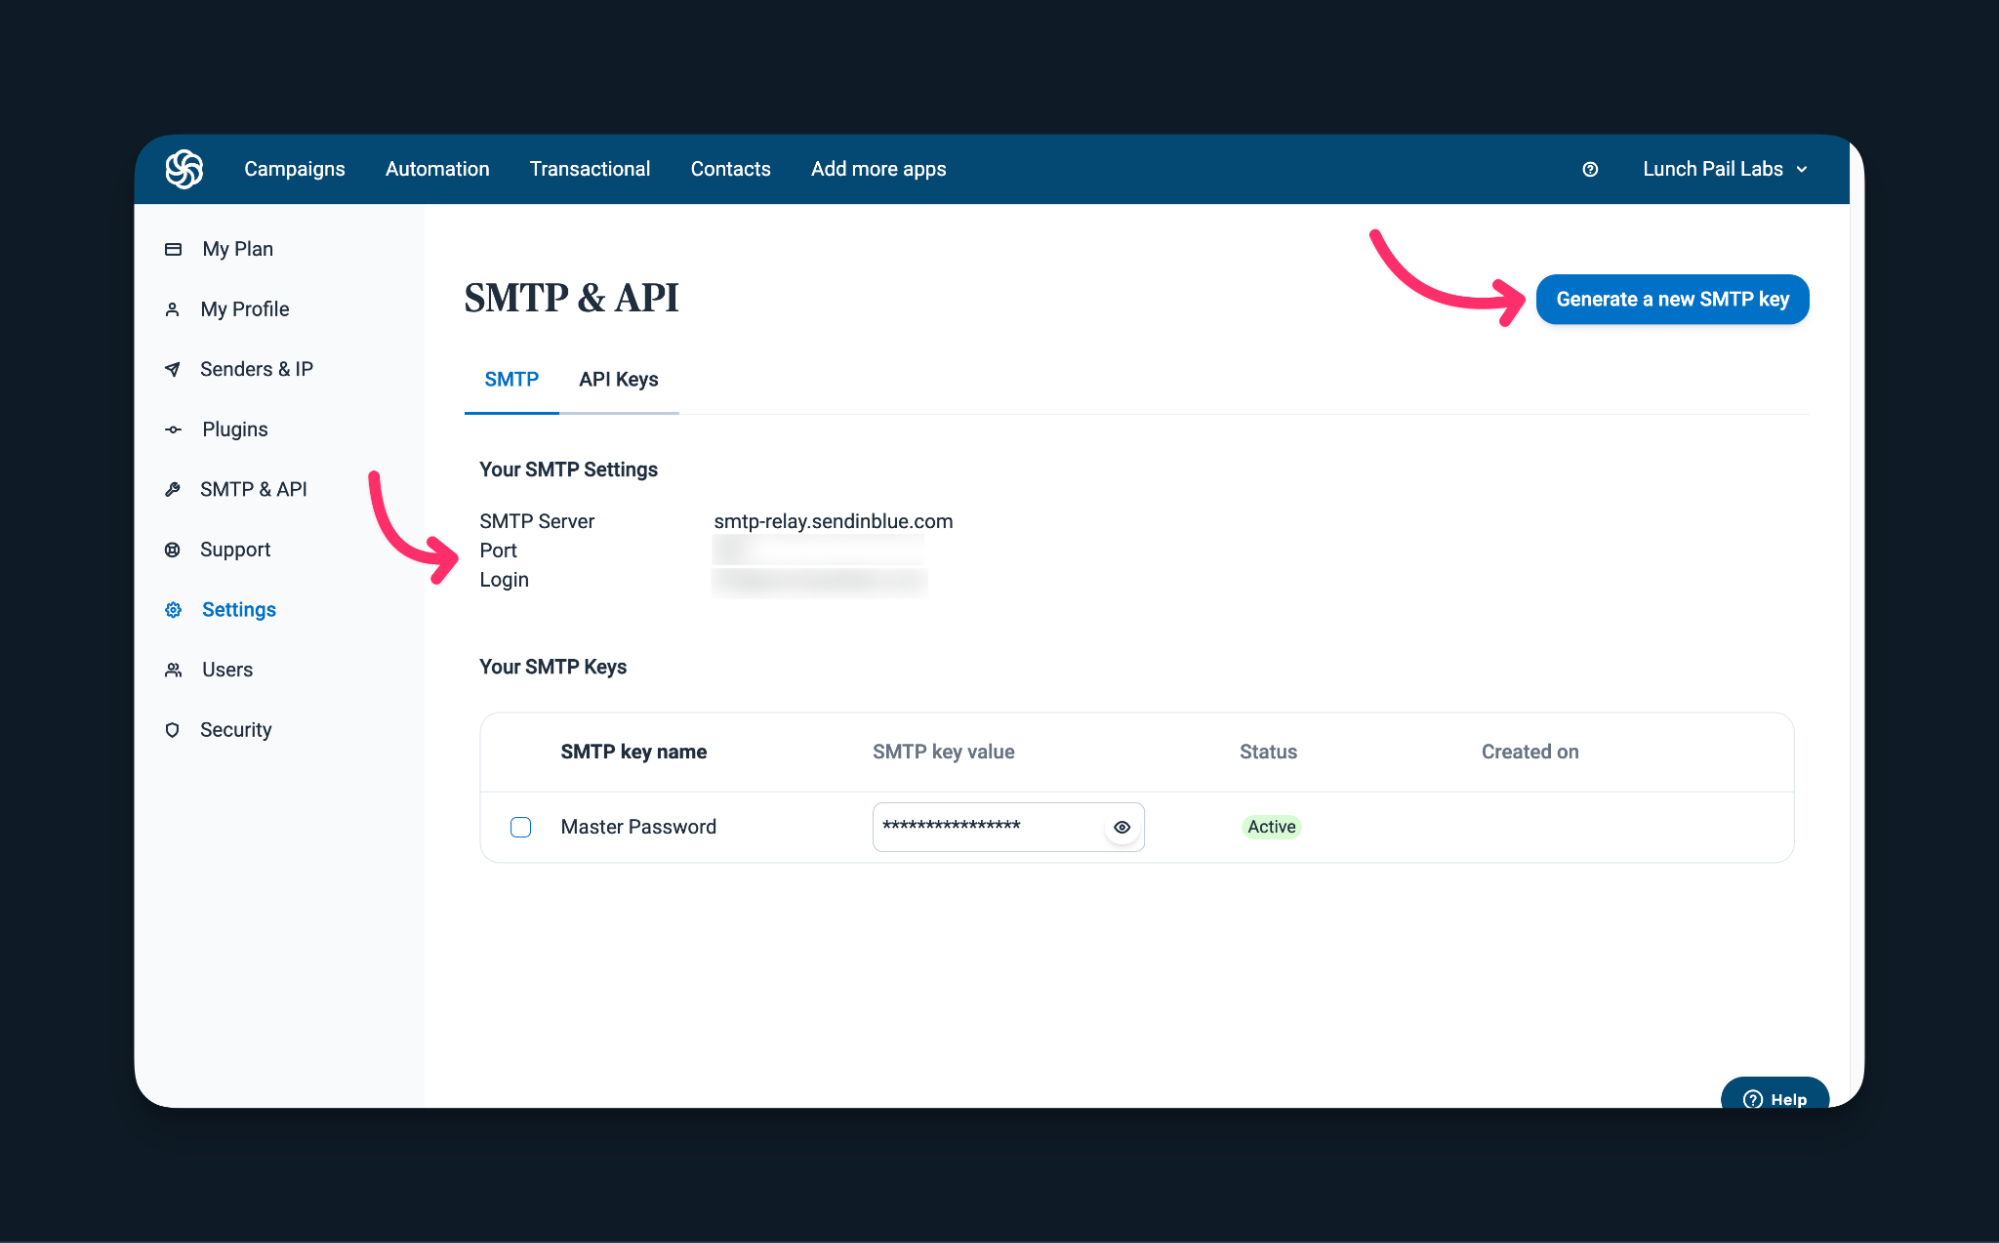
But, if you'd like to email yourself the generated meeting summary, we will use Nodemailer, a module for Node.js that makes it easy to send email messages. You'll need Simple Mail Transfer Protocol (SMTP) credentials to set it up. We can use Sendinblue, a popular SMTP service with a free plan. To do this, create an account, log in, and access the SMTP & API keys.
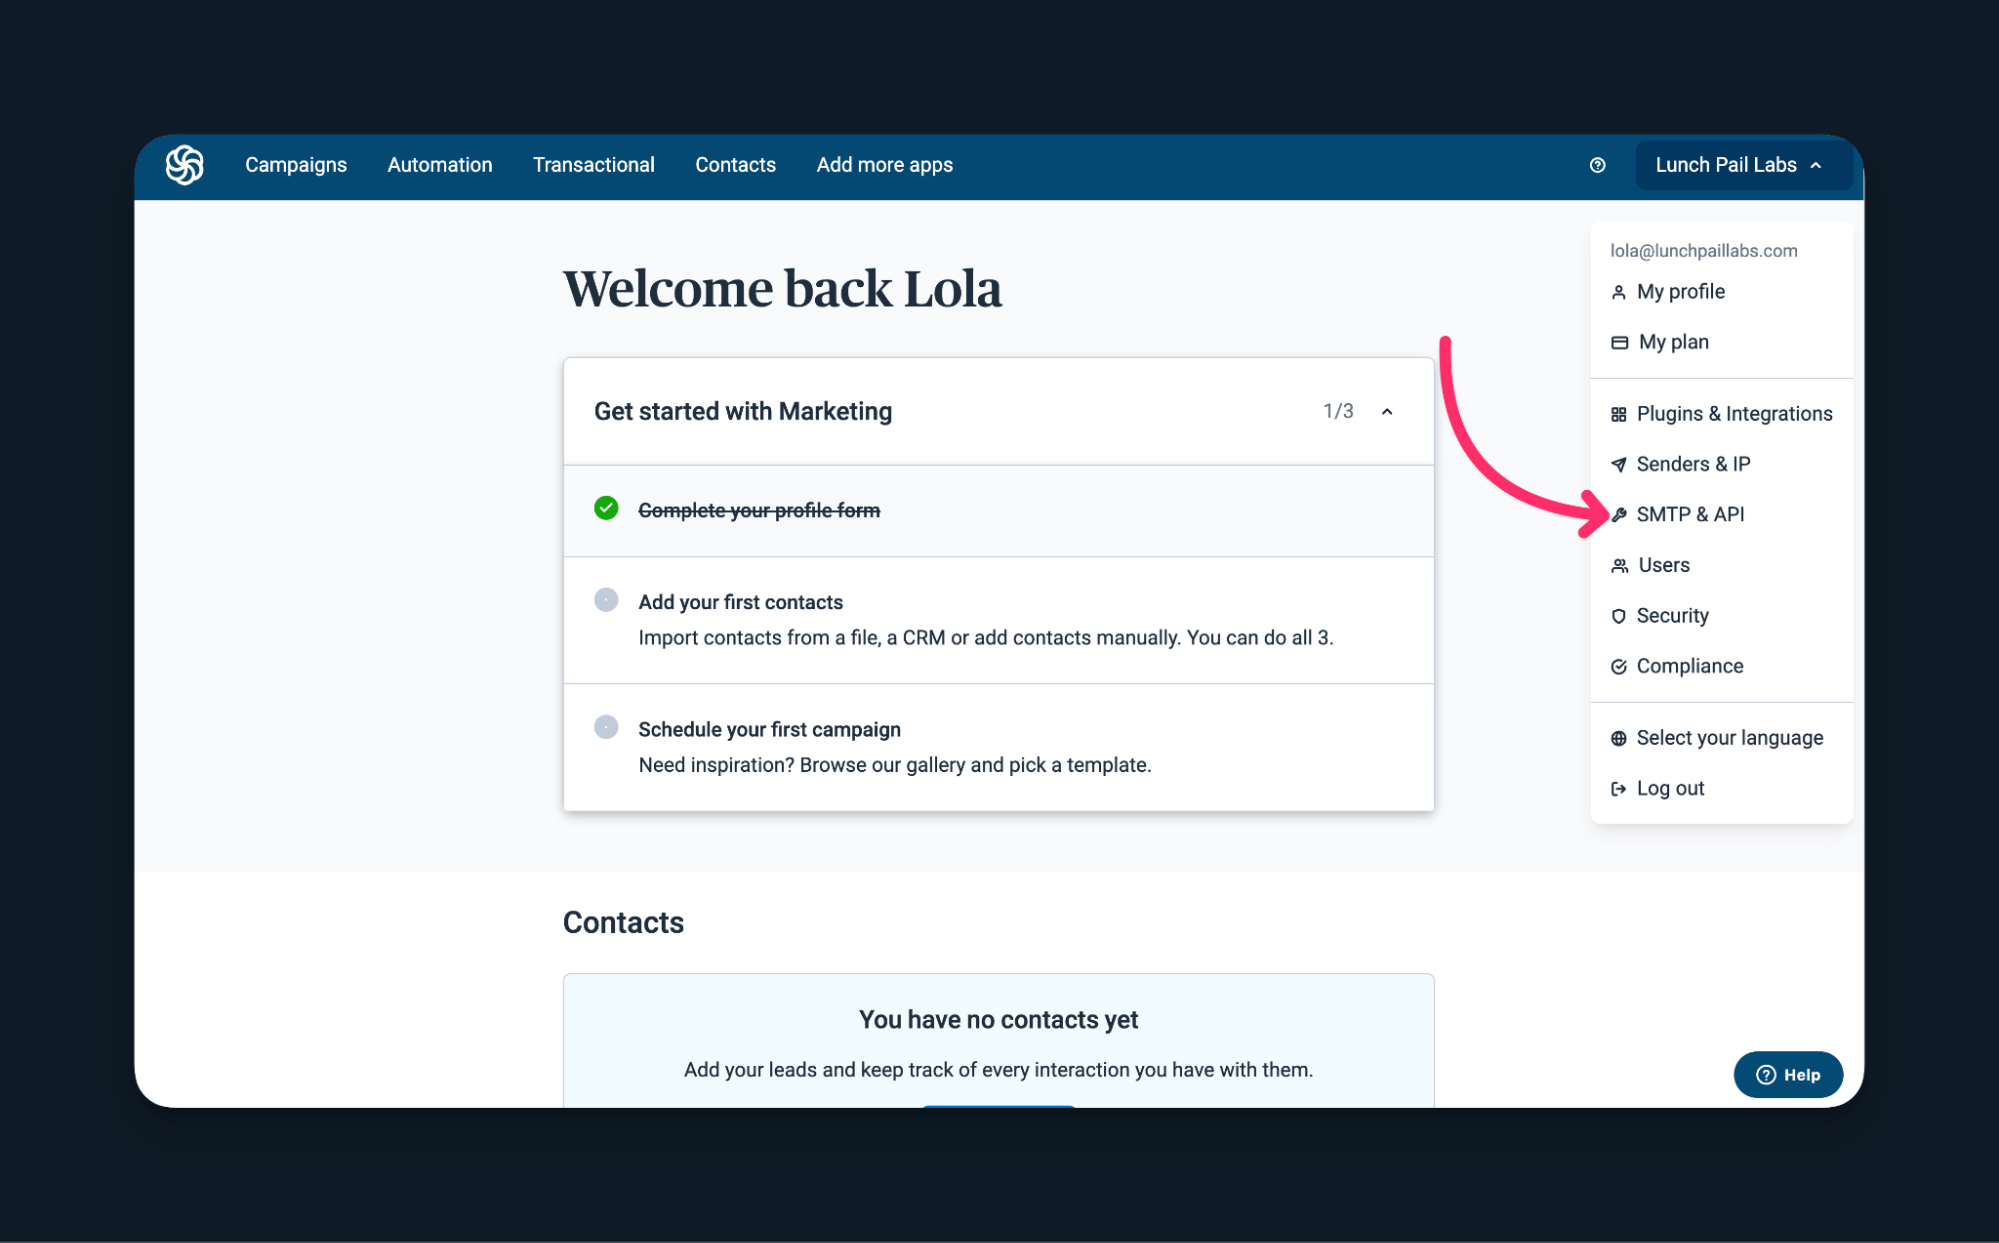
Click `Generate an STMP key` if necessary to retrieve your credentials. We will copy these credentials into our demo's environment variables shortly!
With these tools, we can automatically summarize video meetings and create accurate and concise summaries to share with anyone. And to bring it all together, we'll build this project using Next.js, a popular React-based framework for building server-side rendered applications. So now, let's jump into creating our application.
1. Create and record a Daily video call
Initial setup and the Daily room
Now we'll embed a Daily video call in a Next.js app. Start by creating a new Next.js app using the yarn create next-app command and following the prompts. We’ll use TypeScript in this tutorial.
After creating the app, log into the Daily dashboard and create a room with cloud recording enabled.
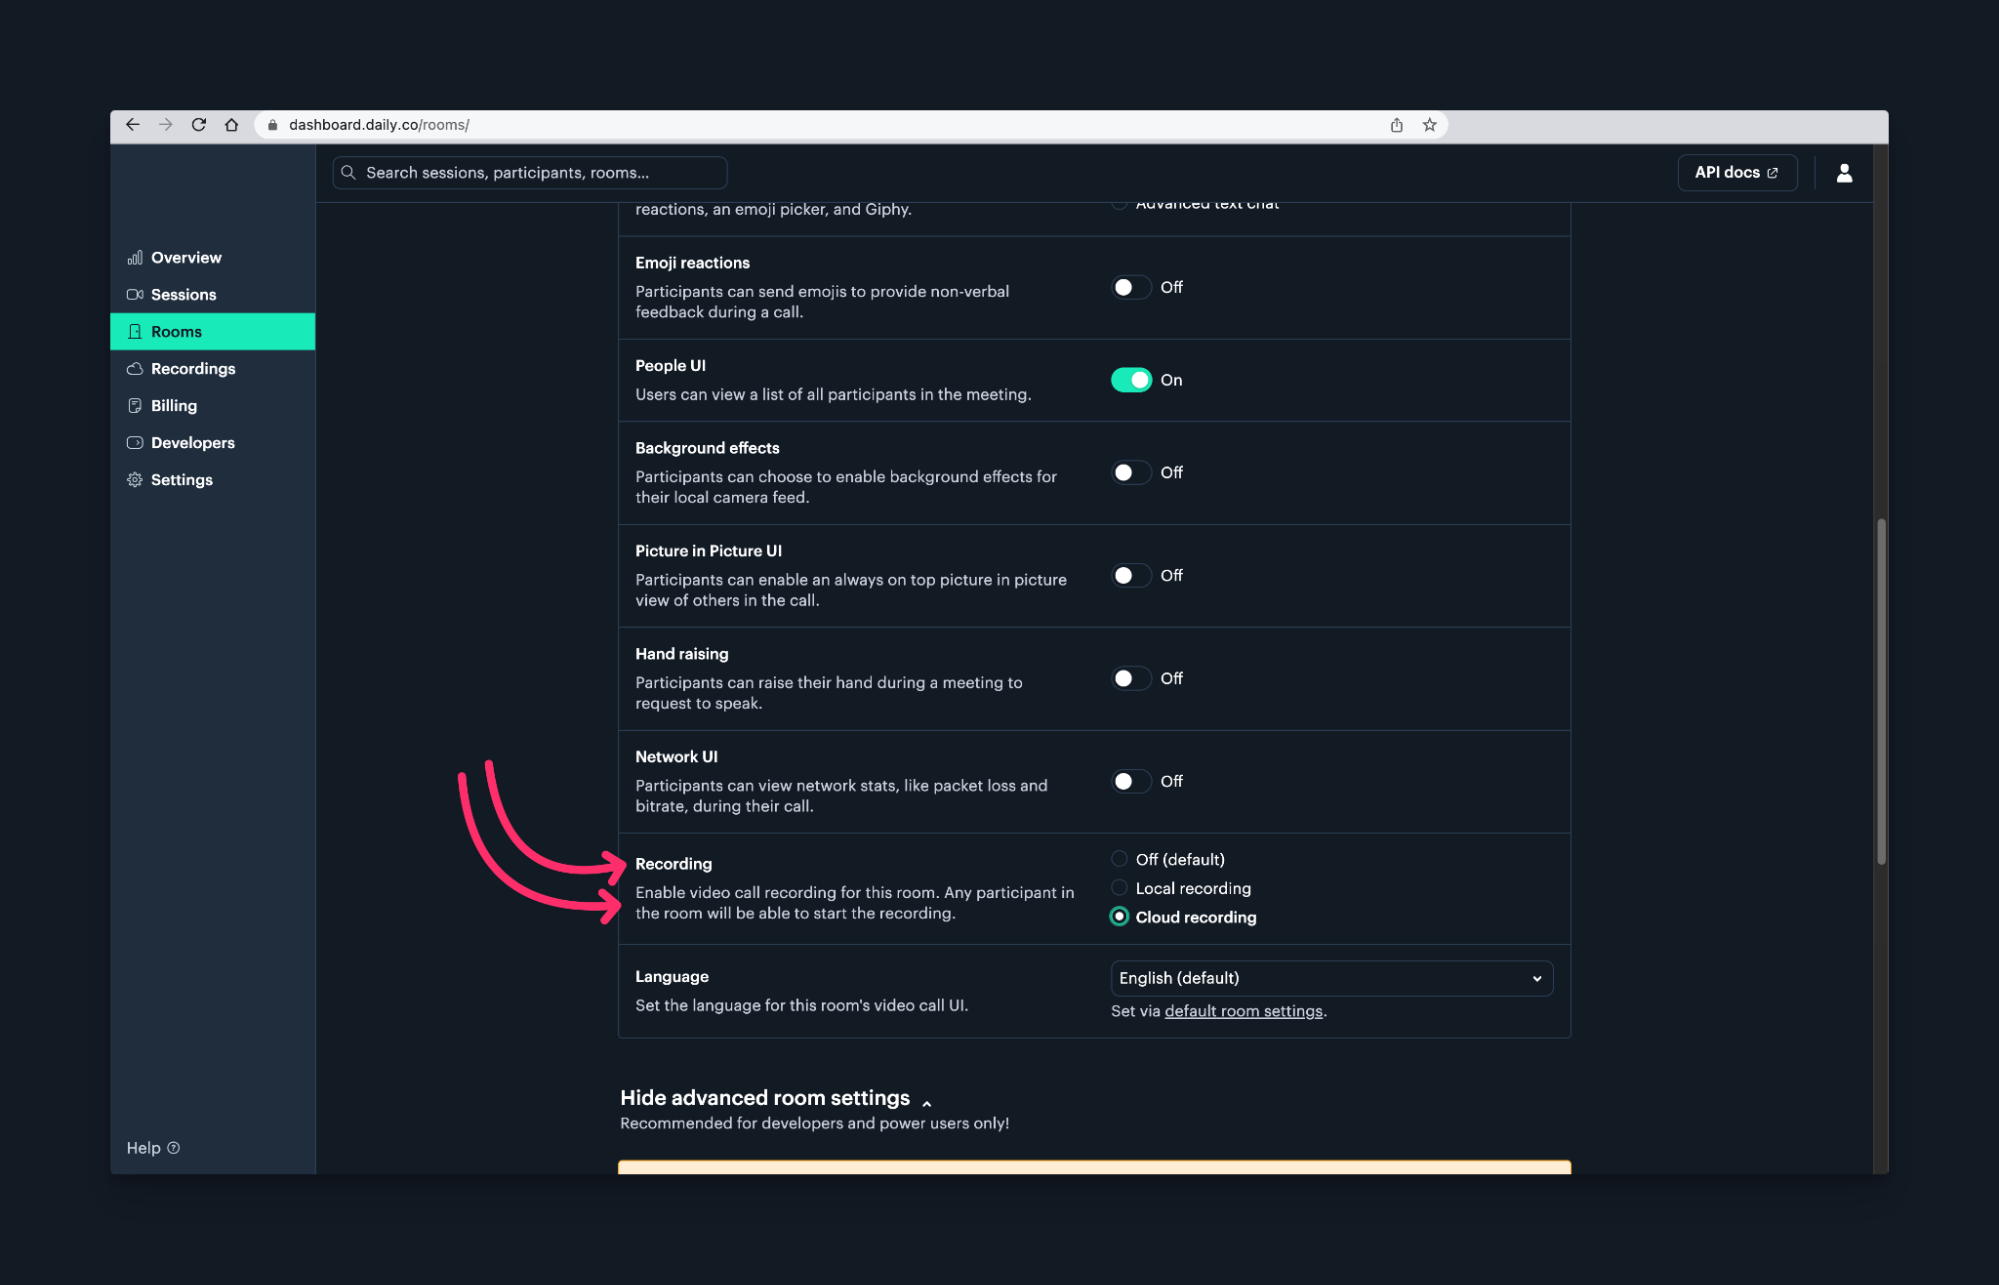
If you prefer to create rooms programmatically, check out the room docs and the recording guide.
To ensure our app can access the necessary resources, copy the sample.env into .env.local. The required variables include:
DAILY_API_KEY: This is your API key for the Daily API, which you can find in the developer's tab of the Daily dashboard.NEXT_PUBLIC_DAILY_ROOM_URL: This is the URL for the Daily room that you want to embed. Ensure it's public for all to join!OPENAI_API_KEY: This is your OpenAI API key, which you can retrieve from your OpenAI account.
If you want to send emails, add the following variables:
SMTP_SERVER: The SMTP server from your email serviceSMTP_PORT: The SMTP port from your email serviceSMTP_LOGIN: The SMTP login from your email serviceSMTP_PASSWORD: The SMTP password from your email serviceEMAIL_SUMMARY: This is the email address that you'll send your summary to once it's generated.
Be careful not to commit .env.local when committing your repository, as it contains secret information!
2. Set up the video call component
Next, install Daily's Client SDK for JavaScript by running the command yarn add @daily-co/daily-js in the main directory.
Create a new file called video-call.tsx for the video call component in a components folder. In video-call.tsx, we will define a functional component called VideoCall() for joining the video call. To view the full implementation of the video call component, check out the demo repository. At this stage, we will only add the pieces of the code that enable us to join a video call when the app loads. Here are the notable highlights:
- Import key functionality from React and the
daily-jslibrary, includinguseEffect,useRef,useState,Head,DailyIframe, andDailyCall. (🖥️ See code) - Import
axios. we’ll use this later in the tutorial to make a post request. (🖥️ See code) - Initialize a state variable and a reference to null to ensure only one instance of the Daily call frame generates. Multiple call instances will result in errors! (🖥️ See code)
  const [callFrame, setCallFrame] = useState<DailyCall | null>(null);
  const callFrameRef = useRef<DailyCall | null>(null);
const roomUrl = process.env.NEXT_PUBLIC_ROOM_URL;- Import the Daily room URL from environment variables and create the call frame. Learn more about DailyIframe properties in the docs. (🖥️ See code)
  const roomUrl = process.env.NEXT_PUBLIC_ROOM_URL;
  useEffect(() => {
    if (!callFrameRef.current) {
      const newCallFrame = DailyIframe.createFrame({
        showLeaveButton: true,
        iframeStyle: {
          top: '0',
          left: '0',
          width: '100VW',
          height: '100VH',
          border: 'none',
        },
      });
      setCallFrame(newCallFrame);
      callFrameRef.current = newCallFrame;
    }
}, []);- If the
callFrameexists, join the video call and clean up thecallFramewhen the component unmounts. (🖥️ See code)
We’ll cover transcribing the recording and creating the summary later in the tutorial, so we don’t have to worry about that. At this stage, the code for joining a room should look like the below:
useEffect(() => {
  if (callFrame) {
    callFrame.join({ url: roomUrl });
  }

  return () => {
    callFrame?.destroy();
  };

}, [callFrame, roomUrl]);

return (
  <>
    <Head>
      <title>Video Call</title>
    </Head>
  </>
);
Finally, add the VideoCall component to index.tsx and render it inside the Home functional component. (🖥️ See code)
import VideoCall from '../components/video-call';

export default function Home() {
  return (
    <div>
      <VideoCall />
    </div>
  );
}
That's all for creating our video call. Now try it out! Run the app, join a meeting, and hit record. The following section will use the recording to continue building the app.
3. Create a server component file to call the APIs
We need to call several APIs (OpenAI's Whisper and ChatGPT APIs, Daily's REST API, and, optionally, Nodemailer) from the demo application server to retrieve, transcribe, and summarize recordings. First, let's create a server endpoint we'll reach from our client-side video-call.tsx file.
Create an api folder in the pages directory. Then, create a new file in that folder called generate-summary.ts. To set up the server component:
- Import necessary modules
NextApiRequest,NextApiResponse, andaxiosfor handling HTTP requests,form-data,stream, andfluent-ffmpeg(don't forget to install FFmpeg!) for processing our recording before we send it to OpenAI and optionallynodemailerfor sending emails. (🖥️ See code) - Destructure
process.envto access the necessary environment variables. (🖥️ See code) - Define a
handler()function to call the functions which will serve as an entry point to all the other server-side operations. (🖥️ See code)
That completes the setup! Moving on to the next section, we'll create a function to access the Daily recording.
4. Access the Daily recording
Next, we'll create an asynchronous function, getRecordingLink(), in generate-summary.ts that will retrieve the download link for the recording. Check out the full implementation in the demo repository.
Here are the high-level steps:
- Retrieve the ID of the single most recent recording for the room with Daily's
recordingsREST API endpoint. (🖥️ See code)
    const roomName = getRoomName(NEXT_PUBLIC_ROOM_URL);

    const dailyRecordingsURL = `https://api.daily.co/v1/recordings`;

    // Get the last recording in for the given Daily room
    const recordingUrl = `${dailyRecordingsURL}?room_name=${roomName}&limit=1`;
    const authConfig = {
      headers: {
        Authorization: `Bearer ${DAILY_API_KEY}`,
      },
    };
    const recordingsResponse = await axios.get(recordingUrl, authConfig);

    // Retrieving recording data
    const recordingsData = recordingsResponse?.data;
    const recordings = recordingsData?.data;

    // Check if recordings was retrieved successfully
    if (!recordings || recordings.length === 0) {
      throw new Error('Could not fetch access link');
    }
    const firstRecording = recordings[0];
const recordingId = firstRecording.id;- Download the link to the recording file itself and return it to the caller with
/recordings/{RecordingID}/access_linkREST API endpoint. (🖥️ See code)
    // Get the Daily recording access link
    const accessLinkURL = `${dailyRecordingsURL}/${recordingId}/access-link`;
    const accessLinkResponse = await axios.get(accessLinkURL, authConfig);
    // Check if access link was retrieved successfully
    if (!accessLinkResponse.data || !accessLinkResponse.data.download_link) {
      throw new Error('Could not fetch access link');
    }
    // Extract the download link from the response data
    const recordingLink = accessLinkResponse.data.download_link;
return recordingLink;- Call
getRecordingLink()in thehandlerfunction we created earlier. (🖥️ See code)
const recordingLink = await getRecordingLink();Congratulations–you've retrieved the recording! Next, we'll transcribe the recording using OpenAI's Whisper API.
5. Transcribe the Daily recording with Whisper
In this section, we will create an asynchronous function called transcribeAudio() that takes a recording link argument. In transcribeAudio(), we compress the file and send it as FormData to OpenAI. For the fully-implemented code, check out the demo repository.
The high-level steps are:
- Download the recording link as an array buffer since OpenAI requires binary data from the server. (🖥️ See code)
async function transcribeAudio(recordingLink: string): Promise<any> {
  try {
    const audioData = await axios
      .get(recordingLink, { responseType: 'arraybuffer' })
      .then((recordingRes) => recordingRes.data);

  // The rest of the transcription function below...
}- Use
fluent-ffmpegto compress and remove the video from the audio. Return the compressed audio as a stream for use directly in the form data. (🖥️ See code)
    // Compress audio and remove video
    const audioBitrate = '64k';

    const audioStream = Readable.from(audioData);
    const ffmpegStream = ffmpeg(audioStream)
      .noVideo()
      .audioBitrate(audioBitrate)
      .audioCodec('libmp3lame')
      .format('mp3')
.pipe();- Construct a
FormDataobject that includes the compressed audio stream and specifies the transcription model to use. (🖥️ See code)
    // Create the form data and send to Open AI
    const formData = new FormData();
    formData.append('file', ffmpegStream, { filename: 'audio.mp3' });
formData.append('model', 'whisper-1');- Make a POST request to OpenAI’s
/audio/transcriptionsendpoint and extract the transcription result from the response to return to the caller. (🖥️ See code)
    const result = await axios
      .post('https://api.openai.com/v1/audio/transcriptions', formData, {
        headers: {
          Authorization: `Bearer ${OPENAI_API_KEY}`,
          'Content-Type': 'multipart/form-data',
          ...formData.getHeaders(),
        },
      })
      .then((transcriptionRes) => transcriptionRes.data);

return { transcription: result };- Call
transcribeAudio()withrecordingLinkas the parameter in thehandler()function to initiate transcription of the recording. (🖥️ See code)
    // Transcribe the recording
    const transcriptResponse = await transcribeAudio(recordingLink);
    const {
      transcription: { text: transcription },
    } = transcriptResponse;
That covers transcription! Next, we'll summarize the video transcript we obtained from Whisper using ChatGPT!
6. Summarize the transcript with ChatGPT
Still, ingenerate-summary.ts, we’ll create a function summarizeTranscript() that takes a transcript and generates a summary (here’s the full implementation).
In this function:
- Take a transcript and send a POST request to OpenAI’s
/chat/completions. The heart of the instruction is in thecontentparameter. Feel free to play with this to see how transcript summaries vary! (🖥️ See code)
    const summaryResponse = await axios.post(
      'https://api.openai.com/v1/chat/completions',
      {
        model: 'gpt-3.5-turbo',
        messages: [
          {
            role: 'user',
            content: `Summarize the following text. Provide a short summary of the meeting and a bulleted list of the main meeting highlights : ${transcription}`,
          },
        ],
      },
      {
        headers: {
          Authorization: `Bearer ${OPENAI_API_KEY}`,
          'Content-Type': 'application/json',
        },
      }
);- Destructure the summary from the response to return to the caller. (🖥️ See code)
    // Destructure the summary from the response
    const {
      message: { content: summary },
    } = summaryResponse.data.choices[0];
return { summary };- Call
summarizeTranscript()withtranscriptionas the parameter in thehandler()function to initiate the summary of the transcription. (🖥️ See code)
    // Summarize the transcript
    const summaryResponse = await summarizeTranscript(transcription);
    const { summary } = summaryResponse;
That’s it for creating the summary. In the next section, we will go over emailing it.
7. Email the summary
Our last asynchronous function, emailSummary(), uses nodemailer to send an email containing the meeting summary. Again, feel free to skip over the specifics here if you're not interested in email.
Here's the entire implementation of this function. The high-level steps are:
- Create a
transporter, which sends the email via SMTP. (🖥️ See code) - Send mail with the defined transporter object. (🖥️ See code)
- Call
emailSummary()in thehandler()function if SMTP environment variables are defined. (🖥️ See code) - Return the
emailResponseandsummaryto the client. (🖥️ See code)
That's all for generating the meeting summary! The complete code for generate-summary.ts is in the demo repository. The following section will trigger the summary generation process from our VideoCallcomponent when a recording stops.
8. Putting it all together
Next, we’ll trigger the server component from the client and add some notifications to display to the user during the transcription and summary generation process. For notifications, copy the NotificationBar component in notifications.tsx of the demo repository.
Now, we’ll make a few last modifications to video-call.tsx:
- Add two states to
VideoCall()to manage the notification message and type. (🖥️ See code)
export default function VideoCall() {
  const [notificationMessage, setNotificationMessage] = useState('');
  const [notificationType, setNotificationType] = useState<'success' | 'error'>(
    'success'
  );

   // The rest of the component definition below...
}- Call out to our server component with a POST request to
/api/generate-summaryfrom a"recording-stopped"event. (🖥️ See code)
      callFrame.on('recording-stopped', async () => {
        try {
          setNotificationMessage(
            'Transcribing and generating meeting summary. Please leave app running.'
          );
          const generateSummaryResponse = await axios.post(
            `/api/generate-summary`
          );

        // The rest of the event handler below...
});- In the
"recording-stopped"handler, destructure the summary and email responses from the response and send appropriate notifications. (🖥️ See code)
          // Destructure the summary and email responses
          const { summary } = generateSummaryResponse.data;
          const { emailResponse } = generateSummaryResponse.data;

          // Send appropriate notifications and console the summary.
          console.log('Call Summary', summary);
          if (Object.keys(emailResponse).length > 0) {
            setNotificationMessage(`Meeting summary has been emailed`);
          } else if (summary) {
            setNotificationMessage(
              `Meeting summary has been generated check the browser console`
            );
}- Display the
NotificationBarto make it visible to users. (🖥️ See code)
<NotificationBar message={notificationMessage} type={notificationType} />
Note that this demo broadcasts notification messages to all participants. If you want to limit messages to the user who initiated the recording, use meeting tokens. For more information on meeting tokens and recording permissions, visit Daily’s guide to meeting tokens and the recording guide.
Woohoo! We’re ready to have meetings and generate summaries with this code. Find the completed video-call.tsx in the demo repository.
Conclusion
This tutorial taught us how to automatically summarize a Daily video meeting using OpenAI and Daily's REST APIs. We walked through creating and recording a Daily video call, accessing the recording, transcribing the meeting with OpenAI's Whisper, and generating a summary using OpenAI's ChatGPT API.
To take this demo further, you could add more features, such as allowing users to edit the generated summary, supporting summaries in multiple languages, or experimenting with different prompts for creating summaries.
We hope you found this tutorial informative and helpful. We'd love to hear from you if you have any questions, ideas, or feedback. Join the conversation on Daily's WebRTC community, and let us know what you think. Thanks for reading!
Never miss a story
Get the latest direct to your inbox.