
Integrating video calls into a Webflow project is very simple with our video chat API.
As we shared in a previous post, you can easily embed video calls on your own custom domains.
- Reminder! As that blog post notes, embed using 'https' or you'll get an error.
With a Webflow project, much of the same logic applies. To see what we are building you can open the demo for yourself here, or feel free to check out a read-only version of the Webflow project we designed.
Here's a screen cast of the demo.
Follow this step-by-step guide to learn how to add video calls directly to your Webflow project.
What you'll need to get started
This post assumes that you're familiar with building websites in Webflow. You should also be comfortable editing code. While we've worked hard to carry the weight, you should be comfortable with the following tools.
If you need any help, just contact us. Or reach out to your web developer.
- Daily.co: First be sure to sign up for your free Daily.co account. You'll choose a subdomain, like you.daily.co. Please choose whatever name best suits you or your company.
- Webflow: You'll need a paid Webflow account as well. Paid accounts are required for adding custom code to a Webflow project.
- Zapier: As we highlight in this separate post, if you'd like to get notified when anyone but a meeting owner joins.
About this tutorial
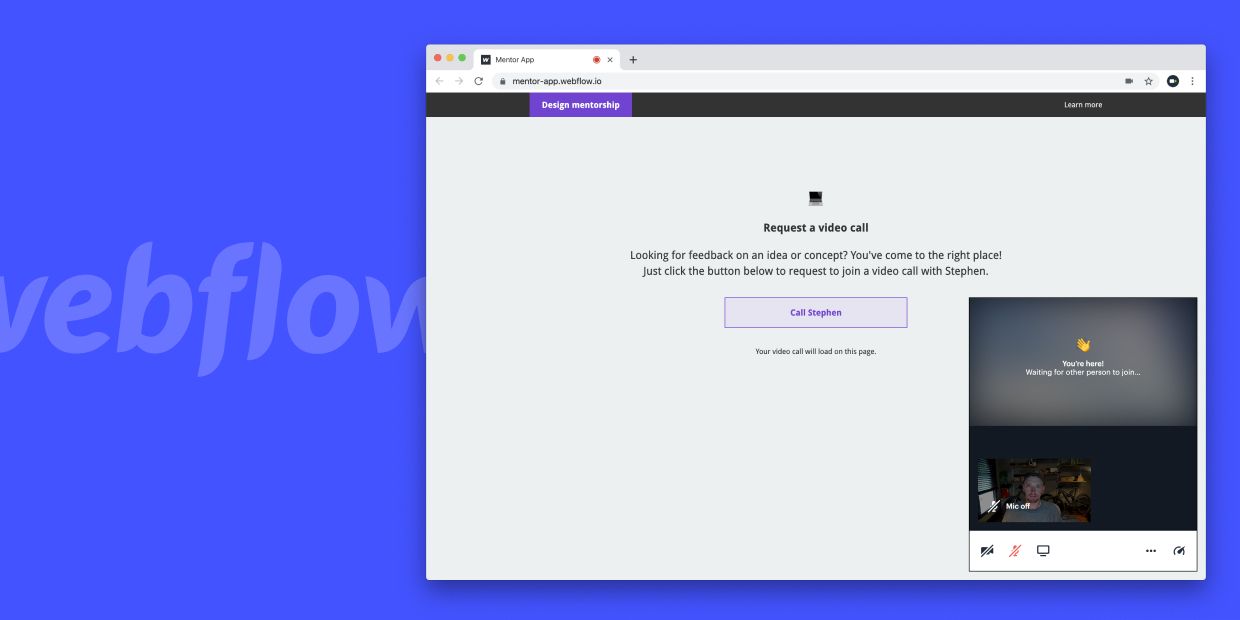
In this tutorial we are building the mock tutor app shown at the top of the post. Our students will visit a webpage (built in Webflow) and request to join a video call with their tutor.
As mentioned in the video above, to instantly notify our mentor when a student is requesting to join their meeting link we will use Zapier create a Zap. There are a few steps to create a Zap, so we wrote a second blog post.
All told, this tutorial uses some of the following Daily.co features:
- Daily.co accounts
- Dashboard-created rooms
- Room privacy and knocking / knocking approval
- API
meeting_join_hookroom property for a room - API
userNamefront-end library property
Let's get started!
1. Create a Daily.co dashboard room
After signing up for Daily.co we are able to create rooms in our dashboard. A room — or meeting link — is a URL like, your-team.daily.co/hello. Where hello is the room name.
In our video call embed we can use rooms that were manually created in the dashboard. Or, we can use rooms created with the /rooms API endpoint. For the purpose of this tutorial we'll use a room that we've manually created. Which is design.daily.co/mentor-app.
Here is a quick video tutorial that shows how to create and manage dashboard created rooms.
What to do: In your Daily.co dashboard, create a room. Be sure to confirm that the room type is set to "team only" or "private" by hovering over your room and clicking settings. This means that anyone — who is not an owner — must request to join.
You'll need the room link you've created, in a moment.
2. Embed the call
We've already designed a page in Webflow that our users will request a video call from. Now we just need to add our custom code to the page that will trigger the video call.
The page includes a dynamic Webflow form that has an ID of "name" set. By using our userName property we can pass this name through to Zapier so that our mentor knows who would like to join them in a video call.
What to do: Under page settings, paste the following code into the "Before </body> tag" section. Note: you must have a paid Webflow plan in order to add custom code.
<script crossorigin src="https://unpkg.com/@daily-co/daily-js"></script>
<script>
  async function createFrameAndJoinRoom() {
    window.callFrame = window.DailyIframe.createFrame();
    let username = document.getElementById('name').value;
    await callFrame.join({ url: 'https://your-team.daily.co/hello', showLeaveButton: true, userName: username });
}
</script>
Now, change https://your-team.daily.co/hello with the room link you created in your dashboard — in the previous step.
We also have a button with an onclick event, so you'll need to add an HTML embed component to your design with a similar function. For example <button onclick="createFrameAndJoinRoom() style="…">Join call</button>. Without this button the call will not load!
Tip: You can publish your site to test the video call embed. You must publish in order to test as custom code does not run until a site is published.
3. Use Zapier to get notified via Slack
To instantly notify our mentor when a student is requesting to join their meeting link we will need to create a Zap, with Zapier. There are a few steps involved in creating a Zap, so we wrote a second tutorial.
Click here to learn how to create a Zap!
4. Publishing and testing everything out!
Now we just need to publish our Webflow site and test it all out.
- In Webflow, we will publish our site
- To test joining as a guest we will open our Webflow URL in a browser where we are not logged into our Daily.co dashboard.
- We'll click the "Call Stephen" button
- And now we should get an SMS notification via Zapier!
We are really excited to see what you might build with our API. And we are especially big fans of Webflow. Actually, we've used Webflow to build this site…and this demo. All this said, here are some more things to think about when adding video calls to any site — be it on Webflow, or your own servers.
Dynamic rooms
This tutorial shows you how easy it is to embed a video call on a Webflow site. We used a Daily.co room that was manually created, for simplicity. This means there's only one room link, for all the tutoring students. On one hand, of course this isn't ideal — multiple students may end up in the same meeting! However, we did use a workaround, by setting the room to "team only" (so that a student has to request to be admitted).
Having said that, if you're a developer or can work with one, you can use our API for more flexibility, power and programmatic control. You'll want to build some functionality specific to your use case. For instance, if you're building a 1-on-1 app only the owner and one guest should be able to join. You can accomplish all of this with our API!
Reach out to us with any questions. Or share our docs with your engineering team and/or web developer.
Layout control
By default, our video call embed will display in the bottom right of the browser. With more code you can customize the layout and design of your video call UI.
Check out this post to learn how to create a full screen embed. Or learn how to use CSS Grid Layout to create a custom UI.
Never miss a story
Get the latest direct to your inbox.