


Creating friendly, welcoming spaces is a common consideration when building collaborative applications. End users can often manually moderate their sessions, but that’s largely a reactive process that can leave much to be desired. How can we as developers build applications that empower end users to better deal with this issue?
In this post, we’ll explore just one of many automated text chat moderation options in Daily-powered video applications by using TensorFlow.js. We’ll be extending the chat interface of Daily’s Vue demo app to show an example of such an implementation.
Note that the approach taken in this article is just one exploratory option for aided moderation to give developers some ideas for what is possible. There is no totally foolproof way to implement this feature: human interaction is hard!
Getting started
First, create a free Daily account and a room.
Next, clone the Vue starter app from GitHub and change your working directory to the root of the demo:
git clone https://github.com/daily-demos/vue-call-object.git
cd vue-call-object
Install the package dependencies and run the app:
npm install
npm run dev
Open the app on your browser at the server port shown in your terminal (e.g., http://localhost:5173/). The start script watches any changes you make in your code and updates the browser once you save the file.
If you would like to see the finished version of this demo extension, you can go directly to the feat/chat-moderation-with-tensorflow-js branch on GitHub.
What is TensorFlow.js?
Machine learning is a field of computer science that gives computers learning capabilities. The ability to learn paves the way for computers to “understand” written text and spoken words. Computers can run models or programs that identify patterns based on previous data and thus detect things like potentially toxic speech.
TensorFlow.js is a JavaScript library developers can use to run pre-trained machine-learning models in the browser. The library has a variety of models for tasks such as object identification and language processing. One of these models is the text toxicity detection model.
As per the README, toxicity is a model that detects whether a piece of text contains threatening language, insults, obscenities, identity-based hate, or sexually explicit language. We’ll use this model in our code to perform client-side moderation of chat messages.
What are we building?
We are extending the chat feature found in the existing Vue demo’s ChatTile.vue component. We will add a function to examine a user's chat text input for offensive content when the "Send" button is clicked. If the input text is deemed problematic, the message won't be transmitted to other participants. We’ll also alert the user that we flagged their message and why.
The ChatTile component
The ChatTile.vue component is a single file component that contains the following:
- a button for opening the chat screen
- a div for listing out chat messages
- a form consisting of an input field for the user to type a message and a submit button
The <script> section of this component contains a submitForm() function that handles the form submission. Our goal is to modify this function. If you want to learn more about implementing chat applications in Daily, Jess’s article on adding a custom chat widget with Daily’s sendAppMessage() is a great resource.
Installing the package and loading the model
To install TensorFlow.js in our project, run the following command in your terminal:
npm install @tensorflow/tfjs @tensorflow-models/toxicity
Next, import the toxicity model package in the ChatTile component:
import { load } from '@tensorflow-models/toxicity'
Above, we import the load() function from the toxicity detection model. When called, this function retrieves the pre-trained model so web applications can use it.
You’ll also want to add a null model property to the data object:
export default {
  name: "ChatTile",
  props: ["sendMessage", "messages"],
  data() {
    return {
      chatIsOpen: false,
      close,
      chat,
      send,
      text: "",
      model: null,
    };
  },
Then, retrieve the model within Vue's beforeCreate() hook in the ChatTile.vue component:
export default {
  name: "ChatTile",
  props: ["sendMessage", "messages"],
  data() { //... },
  beforeCreate() {
    const threshold = 0.9
     load(threshold)
       .then((model) => {
         this.model = Object.freeze(model);
       })
       .catch((e) => {
         console.error("failed to load toxicity model", e);
       });
  },
}
Above, we load the TensorFlow.js toxicity model when the component instance is initialized. We then store the retrieved model in the model property within the data object.
You will also see that we called the Object.freeze method on the retrieved model. We did this to prevent Vue from modifying the model object to make it reactive.
Finally, you can save the file, run the application, and observe the browser console to see the model contents:

Ensuring the model is loaded before chat is available
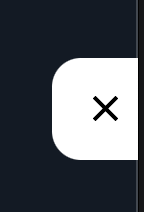
The TensorFlow.js model load operation above is asynchronous, so we have no guarantee that the model will be loaded by the time the user joins a Daily video call and tries to chat. Therefore, we won’t activate the in-app chat button until model load is complete. To do so, update the button definition in ChatTile.vue to disable the button if the model is falsy:
      <button class="chat" @click="handleChatClick" :disabled="!model">
         <template v-if="!model">
           <img class="icon" :src="close" alt="" />
         </template>
         <template v-else-if="chatIsOpen">
           <img class="icon" :src="close" alt="" />
         </template>
         <template v-else>
          <img class="icon" :src="chat" alt="" />
        </template>
      </button>
The above results in the application chat button being disabled with an “X” icon until the model loads:
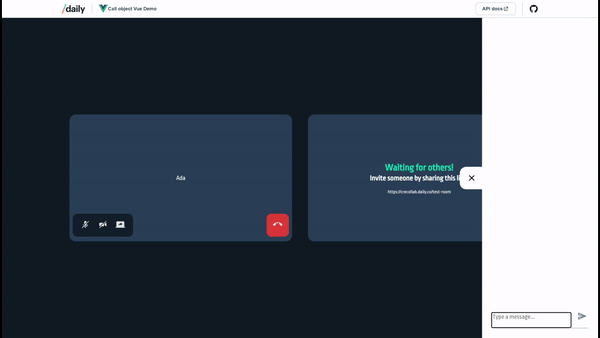
Once the TensorFlow.js model has loaded, the chat button is enabled automatically:

Analyzing input text using the toxicity model
With the toxicity model loaded and stored, we can perform end-user input text analysis. We start by adding a function called analyzeInputText() to the methods object in the ChatTile component:
export default {
  name: "ChatTile",
  props: ["sendMessage", "messages"],
  data() {//...},
  beforeCreate() {//...},
  methods: {
    // Toggle chat's view (open/closed)
    //...

    // Send chat message using prop method from CallTile.vue
    submitForm(e) {//...},
    async analyzeInputText(text) {
      const predictions = await this.model.classify(text);
      const containsToxicContent = predictions.some(prediction => prediction.results[0].match)
      return containsToxicContent
    },
  },
}
Let’s take a closer look at what’s happening in the function above.
analyzeInputText() is an asynchronous function which takes one argument called text. Within this function, the provided text is passed into a call to the TensorFlow.js model’s classify() method. The classify() method returns a Promise, which we await and store in a variable called predictions.
The predictions promise resolves with an array of prediction objects. Each prediction object contains prediction results for what TensorFlow calls a label.
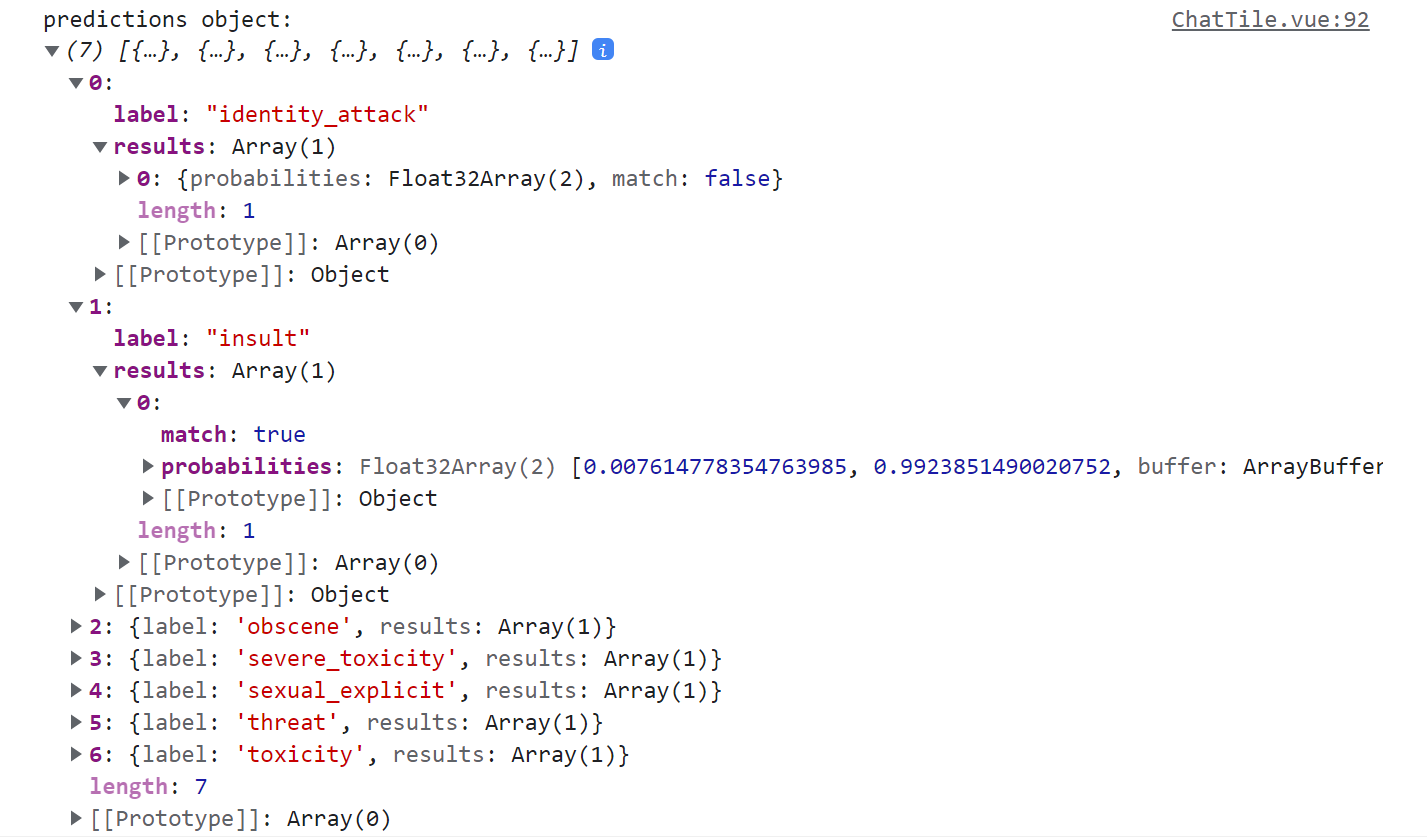
Labels are categories for the kind of toxic speech that TensorFlow can predict. A label can be one of the following:
"identity_attack""insult""obscene""severe_toxicity""sexual_explicit""threat""toxicity"
Each prediction object has a results array. The results array contains prediction results data for each string passed to the classify() method.
We pass a single string to classify(), so our results array has only one object. That object has two keys: match and probabilities. The match key is a boolean that tells us whether or not the model classified the text under a given category.
The containsToxicContent variable we define above is a boolean representing whether any of the labels has a truthy match value. Finally, we return containsToxicContent.
Now that we know what analyzeInput() does, the next step is to call it from the submitForm handler function and retrieve the result:
export default {
  name: "ChatTile",
  props: ["sendMessage", "messages"],
  data() { //... },
  beforeCreate() {//...},
  methods: {
    // Send chat message using prop method from CallTile.vue
    async submitForm(e) {
      e.preventDefault();

      const hasToxicContent = await this.analyzeInputText(this.text)
      console.log(hasToxicContent)

      // ...Logic to handle the result of the toxicity check via warning or sending an app message below (covered in subsequent section)
      this.text = ""
    },
    async analyzeInputText(text) {//...},
  },
}
Above, when the chat input form is submitted, we call analyzeInputText() with the message string the user is intending to send. Now, let’s take a look at how the result of this call is actually handled.
Displaying a warning if the message was flagged
We have the analysis result, but are not doing anything useful with it yet. We want to use the value of hasToxicContent to either display a warning or send the provided chat message to other call participants.
First, let’s add a displayWarning boolean to the data object:
data() {
    return {
      chatIsOpen: false,
      close,
      chat,
      send,
      text: "",
      model: null,
      displayWarning: false,
    }
}
Next, update the form submission handler to set the new displayWarning boolean to true when toxic content is detected. If hasToxicContent is false, we send the message as usual. The final form submission handler should look as follows:
async submitForm(e) {
    e.preventDefault();
    this.displayWarning = false;

    const hasToxicContent = await this.analyzeInputText(this.text);
    hasToxicContent ? this.displayWarning = true : this.sendMessage(this.text);
    this.text = "";
},
Additionally, we need an element to hold our warning message. Create one in the chat-container element:
<template>
  <div :class="chatIsOpen ? 'chat-wrapper open' : 'chat-wrapper'">
    <!-- other elements -->

    <div class="chat-container">
      <!-- messages container -->

      <p v-if="displayWarning" class="warning-message">
        Oops! The message you're trying to send was flagged as potentially offensive.
        If you think this was flagged in error, please contact us!
      </p>

      <!-- form -->
    </div>
  </div>
</template>
Above, we’ve added a p tag with a v-if directive and set it to displayWarning so that if the value of hasToxicContent is false, the message is removed from the DOM.
Let’s also style the warning message so that it stands out:
<style scoped>
  .warning-message {
    color: red;
  }
</style>
Finally, we can save the file and observe the behavior in the browser.
You will notice that the warning message does not disappear if we send a non-toxic message. Let’s fix that by resetting the displayWarning data property when the form is submitted:
async submitForm(e) {
	// prevent default handler
      this.displayWarning = false

      // ...
      hasToxicContent ? this.displayWarning = true : this.sendMessage(this.text)
      this.text = ""
}
By resetting displayWarning before proceeding to the rest of the handler logic, we hide any warning message associated with previously flagged input.
Save the file and test in the browser again to see that the old error message gets removed as expected.
A word of caution
Machine learning is not infallible. Models can fail to understand certain contexts and flag (or miss!) certain messages. Be sure to consider these issues and edge cases when architecting chat moderation for your application. This demo is not intended to be used in production–it is an experimental project providing an example of how to implement a feature like this with Daily.
Additionally, this article features a client-side implementation of chat moderation. There is always the risk of a knowledgeable malicious actor bypassing the checks we built on the client.
Conclusion
In this article, we learned about TensorFlow.js, the toxicity detection model, and how it can provide us with one option to add chat moderation capabilities to our Daily apps.
We used a pre-trained model and it is a way to get started if you decide to go this route. Visit the TensorFlow.js documentation to learn more about the library, ways to extend what we’ve built so far, and other features.
Have you had to implement aided content moderation in your applications? We’d love to hear more about your experiences, and any thoughts you might have about our TensorFlow.js example above, over at our Discord community.
Never miss a story
Get the latest direct to your inbox.