

Lately at Daily, we’ve been spending more time working with Vue.js and seeing how the development experience differs compared to building with some other available frontend frameworks, like React and Next.js. We started by building a demo to embed Daily Prebuilt in a Vue app. Next, we set our sights on more custom goals.
In a recent Daily blog post, we took a look at how to create a fully custom video chat app with Daily’s call object in a Vue app.
We reviewed:
- Joining and leaving calls
- Rendering optional video and audio on multi-participant calls
- Toggling media devices via the app UI
- Displaying error messages based on Daily error events
- Screen sharing with others in the call
One topic we didn’t get to was how to build a custom chat widget. One reason for discussing chat separately is that custom chat can be added to any Daily app, not just ones using Daily’s call object. In both custom (i.e. call object) and Daily Prebuilt use cases, we can take advantage of the same Daily method to build our own chat: sendAppMessage.
In today’s tutorial, we take a look at how to build a chat widget in a Vue app. We’ll use our custom Daily Vue demo as an example, but keep in mind that you can apply this approach to Daily Prebuilt apps, as well.
Note: For React devs, we've also looked at how to add custom chat to a React Daily Prebuilt app in a previous post from our webinar series.
Running our demo app locally
To demonstrate how to build a custom chat widget, we’ll be using sample code from the Vue call object demo app. To run this app locally, clone the repo and run the following commands:
npm i
npm run serve
Once the server has started, you can view the app at localhost:8080.
A note on state management
To keep track of chat messages, we’ll be taking advantage of Vue’s data object available in each Vue component — in this case, it will be in our Call component.
That means we will not be using any state management library in this sample code. It also means the chat history will not persist once the Call component unmounts. For example, when the page is refreshed or the call is left.
Note: We’ll discuss how to add chat history in an upcoming blog post. Keep an eye on Daily’s Twitter for updates!! 👀
Adding chat to your app in 3 steps
To add chat, we need the local participant to be able to do three main things:
- Send messages to every call participant
- Receive messages that have been sent from any other call participants
- Display messages that have been received since joining the call
First things first: let’s take a look at how we can send chat messages in our custom Vue app.
1. Sending messages with sendAppMessage()
Daily’s instance method sendAppMessage() allows us to send a message to anyone in the call. (You can also send direct messages to specific call participants but, for now, we’ll focus on broadcast messages that go to everyone.)
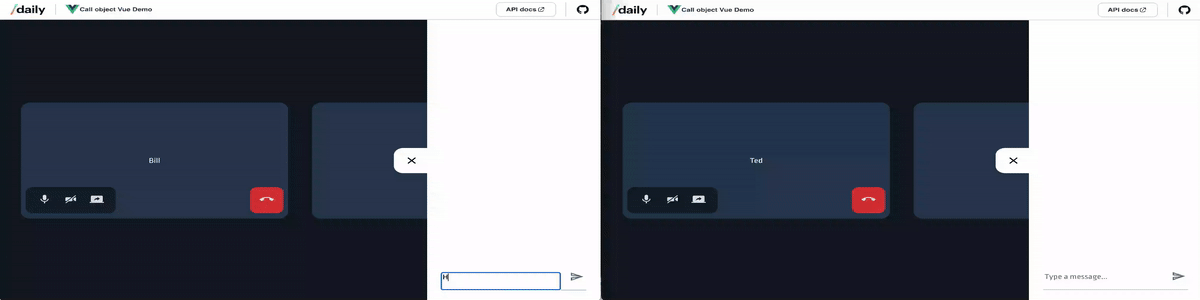
To start, we’ll look at our chat form, found in the Chat component.
<form @submit="submitForm">
    <div class="input">
        <label for="message">Type a message...</label>
        <textarea
            id="message"
            type="text"
            @keydown.enter="submitForm"
            v-model="text"
            placeholder="Type a message..."
        />
    </div>

	<button class="submit-button" type="submit">
    	<img :src="send" alt="" />
    </button>
</form>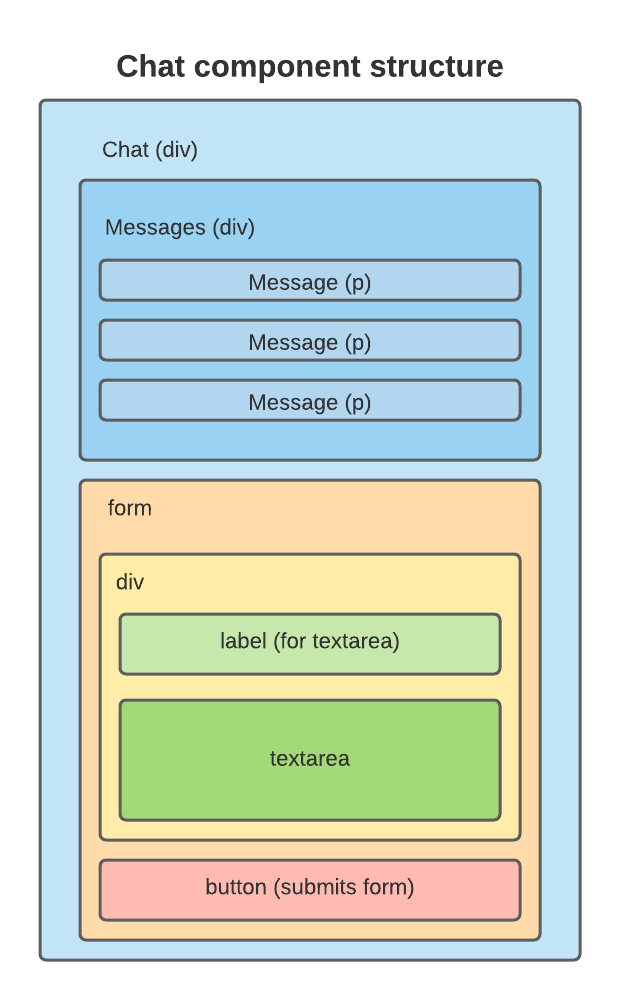
Here, we have a <form> element with the submit event handler submitForm.
We also have a labelled <textarea> where the chat message is entered by the local participant. Notice that it has the v-model attribute on it, which will update the text value on Chat’s data object anytime the <textarea>’s value changes.
 data() {
   return {
     chatIsOpen: false,
     text: "", // automatically updates when the textarea changes
   };
 },
In submitForm, we get the message that is stored in the text value. We then pass it to the method this.sendMessage, a prop passed down from Chat’s parent component, Call.
   sendMessage(text) {
     const local = this.callObject.participants().local;
     const name = local?.user_name || "Guest"

     const message = { message: text, name };
     this.messages.push(message);
     this.callObject.sendAppMessage(message, "*");
   },
sendMessage is where we actually interact with the local instance of the Daily call (this.callObject) to get our message sent.
We first get our local participant’s details by retrieving the participants list with the participants() instance method and then select the local participant.
The message we send will require two pieces of information:
- The text submitted in the form
- The username of the participant who wrote it
const message = { message: text, name: local?.user_name || "Guest" };
Once we have the message object ready, we first add the message to our own local messages array on the data object. This is because message senders don’t receive a Daily event when their own messages are sent out, so we need to manually add it to the list ourselves.
this.messages.push(message);
(This array is what will be iterated over to display the message list in our Chat component.)
Finally, we send our message with sendAppMessage. The first parameter is our message and the second, the wildcard *, indicates everyone should receive the message.
this.callObject.sendAppMessage(message, "*");
Once this step is complete, the message is ready to be received.
2. Receiving Daily app messages
Anytime sendAppMessage is used, remote participants will asynchronously receive an app-message event from Daily. If you recall from our previous post on this demo, we added an event handler after the call object instance was created to listen for app-message events:
co.on("app-message", this.updateMessages);
This attaches the updateMessages callback to our app-message event, which means updateMessages will get called anytime the app-message event is fired.
updateMessages(e) {
    this.messages.push(e?.data);
},
updateMessage updates our messages array by adding the message that was just received, similar to how we did above locally right before sending the message.
3. Displaying app messages
Now that we’ve sent and received our message, the final step is displaying the messages array in the Chat UI. We can pass our messages array as a prop from Call to Chat like so:
<chat :sendMessage="sendMessage" :messages="messages" />
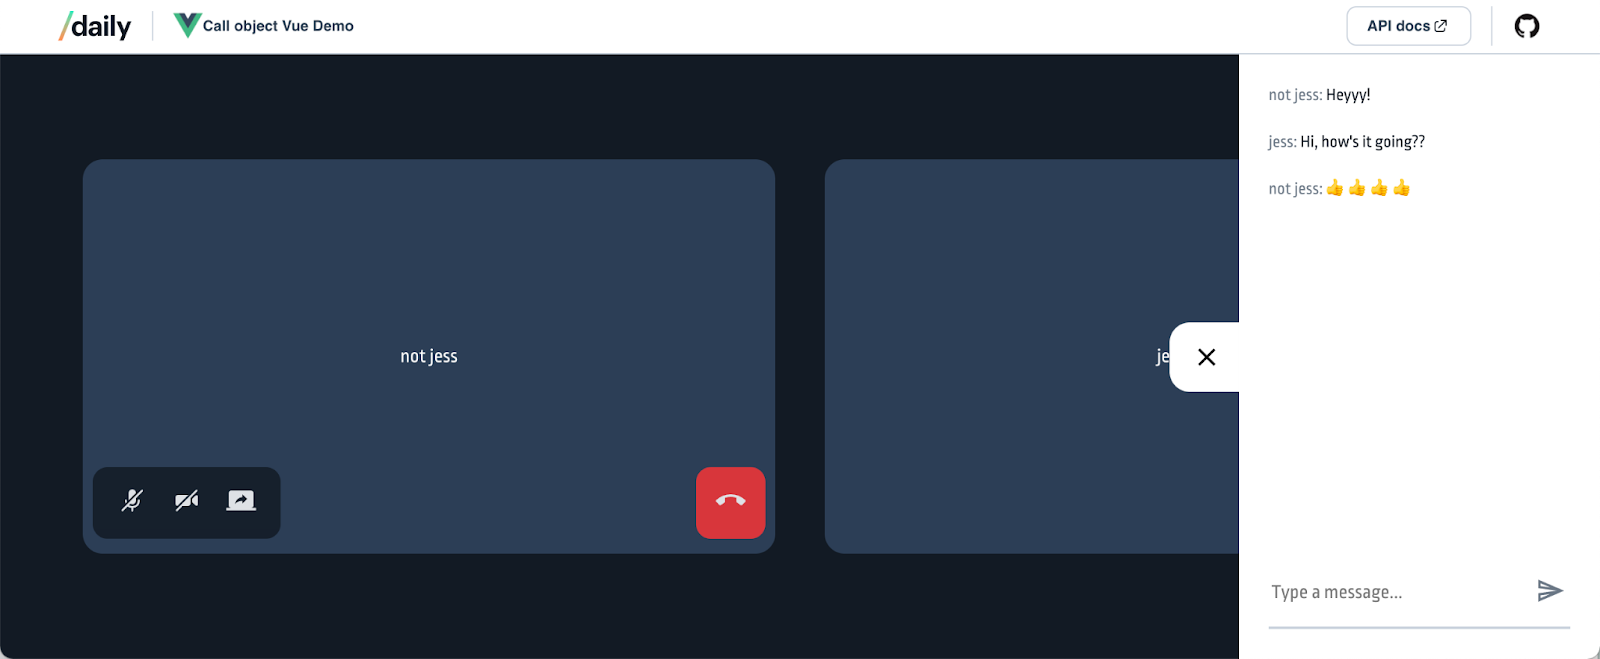
Next, in Chat’s template, we can render a <p> for each message — including both the username of the sender and the message text:
<div class="messages">
	<p v-for="(chat, i) in messages" :key="i" class="chat-message">
    	<span class="chat-name">
            {{ chat?.name }}:
        </span> {{ chat?.message }}
    </p>
</div>Doing so completes our chat widget, which can now send, receive, and display all messages.
Are app messages only for chat?
The nice thing about sendAppMessage is it is the perfect tool for building a chat widget, but you don’t necessarily need to do all three steps of sending, receiving, and displaying messages. For example, you could use app messages to send information to other participants that doesn’t necessarily need to trigger a UI update. It’s also a great way to add other features like the ability to “raise” your hand, if you want to keep your calls more organized. 😉
Wrapping up
Implementing custom chat is something we’ve talked about on the blog before, but each framework will have its own unique approach for building it. If you’re curious to read more about building chat functionality in frameworks other than Vue, check out:
- Our overview on adding chat to Daily React apps
- How to switch between direct and broadcast messages by building a custom chat input in React that lets you pick who to message
- Connecting a third-party chat API, like TalkJs, to a Daily app
And finally, if you’d like to expand this example, you could try adding a timestamp to your messages as well and sorting them by the time they were sent before displaying them. This will help to make sure those asynchronous messages never get out of order! ⏰
Never miss a story
Get the latest direct to your inbox.