


This post is part of Daily's webinar blog series on how to build your own webinar platform using Daily Prebuilt and a custom chat widget.
If you’ve ever had to add chat to your app before, you’ll know what we’ve personally encountered at Daily: it can get complicated. Recently, we decided to build our own webinar app to help introduce more people to our products faster. We used our prebuilt video UI in “owner only broadcast” mode and added a chat box next to it so attendees can ask questions during the discussion.
Adding chat to the webinar ended up bringing up some interesting feature requirements. Thankfully, we were able to cover all our own use cases with Daily’s own instance method: sendAppMessage.
For this next tutorial in our webinar series, we’ll be looking at how to build a flexible chat input React component that will go next to your app’s Daily video call.
To start from the beginning of our webinar app series, check out the first few posts where we:
- Define our app requirements.
- Embed the prebuilt UI in a React app.
- Handle meeting validation using Daily meeting tokens.
This tutorial can be followed as a standalone guide, too, so please keep reading if you want to skip straight to the chat component. 🙌
A little privacy, please
Let’s start by reviewing our circumstances and requirements:
- We have a Daily video embedded in our React app. In this case, it’s the prebuilt UI in our webinar app but you could be using call object mode as well.
- We want to have a custom chat box next to the video to handle all of the following cases
- A webinar host can message all participants (“broadcast” messages).
- A webinar host can message individual participants (direct messages).
- Webinar participants can only message the webinar host directly.
- Webinar participants only see messages from admins; not each other.
This tutorial will focus on the actual chat input component we built for our webinar app. We'll briefly look at Daily’s instance method sendAppMessage but most of those details have already been covered in a previous tutorial.
If you prefer to jump right to the source code, our full webinar app Chat component is available here.
sendAppMessage FTW
Now that we know the person sending the chat message and the person(s) receiving the message can vary, we’ll need to build a chat input that lets the message sender choose their audience. To do this, we can use Daily’s sendAppMessage.
sendAppMessage accepts two parameters:
- A data object, which is where you can include any information you want to share in the message.
- A recipient ID, which can be either a participant’s
session_idor a wildcard (*) flag to send the message to all call participants.
For example, sending a broadcast message could look like:
callFrame.sendAppMessage({ message: "Hello, World!" }, '*');
sendAppMessage will then trigger a Daily event (app-message) for receiving participants in the call. The receiving participants can listen for this event like so:
callFrame.on("app-message", functionToHandleNewMesages);
Note: The message sender will not receive the message via app-message. This means the sender will need to update their local state as part of the sending process.
Adding your input
Now that we know how the messages are being sent, let’s build our chat component.
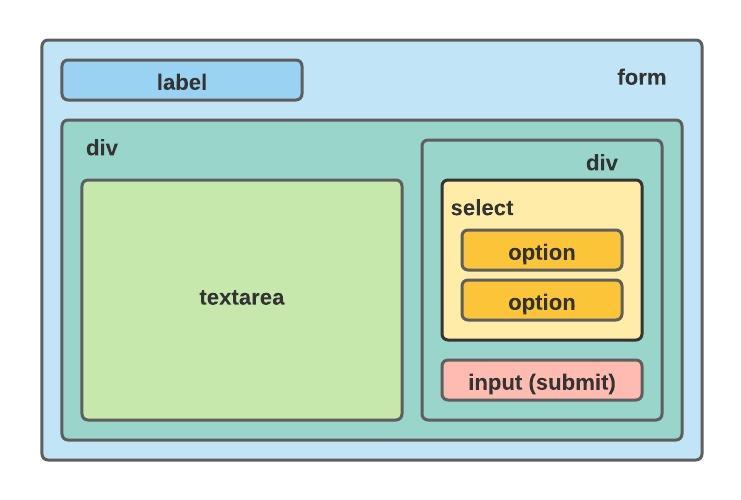
Following this diagram, our chat component will be structured as follows:
- The container will be a
formthat can be submitted with a button orEnterkey. This helps make the input more accessible too. - A labelled
textareais used to enter the chat message. We’re using atextareainstead of aninputto accommodate multiline messages but you could use aninputas well. - The webinar hosts will also see a
selectelement so they can choose who to send their message to. The firstoptionwill beEveryone(*), and the additionaloptions will be for each attending participant. Regular attendees won’t see thisselectsince they can only message the webinar host. - We’ll add an
inputwith thetype=”submit”attribute to handle submitting the form. - We’ll structure the form with a couple
divs styled with flexbox to keep everything in place. This tutorial won’t look at styling, but keep in mind that’s why they're there.
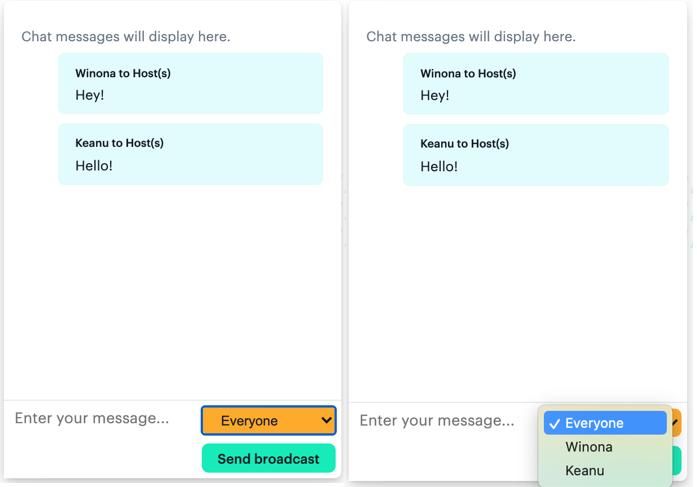
The styled and complete version will look like this for the webinar hosts, who can use the select menu to choose a recipient.
Chat, but make it React
Using this HTML structure, we can now add this form to our webinar app.
Note: If you’re following the webinar code directly, you’ll notice the following is a simplified version. The styled components have also been converted to their HTML elements for readability.
const Chat = ({ callFrame, accountType }) => {
  const textareaRef = useRef(null);
  const [recipient, setRecipient] = useState('*');

  ...

  return (
    ...
    <form onSubmit={submitMessage}>
      <label htmlFor="messageInput">Message</label>
      <div>
        <textarea
          ref={textareaRef}
          id="messageInput"
          placeholder="Enter your message..."
          onKeyDown={onTextAreaEnterPress} // submit form when Enter key is pressed
        />
        <div>
          {/* only show our webinar admins the select,
          since regular attendees can only message the host */}
          {accountType === ADMIN && callFrame?.participants() && (
            // store the selection in local state
            <select onChange={(type) => setRecipient(type)}>
              {/* include the broadcast option for everyone */}
              <option value="*">Everyone</option>
              {/* convert the participants object into an array
              and create an option element for each participant. */}
              {Object.values(callFrame.participants()).map(
                (p: DailyParticipant, i) => {
                  // don’t include an option for the local
                  // participant (the sender!) unless these
                  // hosts like to talk to themselves
                  if (!p.local) {
                    // only show participants for direct messages
                    return (
                      // set the participant’s session_id as the
                      // value since that is the value sendAppMessage
                      // requires to get the message to them
                      <option key={`participant-${i}`} value={p.session_id}>
                        {p.user_name}
                      </option>
                    );
                  }
                  return null;
                }
              )}
            </select>
          )}
          <input value="Send" type="submit" />
        </div>
      </div>
    </form>

    ...
  );
};
Let’s step through what is happening here:
- We’ve added the HTML element structure as described above.
- The
formcallssubmitMessagewhen submitted, which is wheresendAppMessagewill be used. - The
textareawill also submit the form if it is focused and Enter is pressed. - The
selectis only shown for admins. - The
selectrenders an option for “Everyone” by default. - Within the
select, we get the participants list from the DailycallFramewith theparticipants()method. We then convert it to an array, iterate over each participant, and render an option for every participant other than the local one (that’s you!).
Message sent
So far we know how to send the message with sendAppMessage and what our component should look like, but we still need to put it together. Let’s look at our submitMessage method now to handle the actual sending.
  const submitMessage = useCallback(
    (e) => {
      // wait until the ref is rendered to access its value
      if (!textareaRef?.current) return;

      // prevent the form submit from causing the page to reload #ReactThings
      e.preventDefault();

      // access the message from the textarea
      const message = textareaRef?.current?.value;

      // pass the chat message (as an object) and the recipient
      callFrame.sendAppMessage({ message }, recipient);
    },
    [recipient, callFrame] // add any additional dependencies used in this function
  );
In submitMessage we access two pieces of information:
- The recipient, which is stored in the state. As a reminder, this can be either
*for broadcast messages or the participant’ssession_idfor direct messages. - The message itself. Since the
textareaelement has a Reactref(or reference), we can access its value directly. You could also store it in the component’s state. It’s up to you!
Once we have these two pieces of data, we can send the message and the recipient(s) will receive it by listening for the app-message Daily event.
Psst… as a reminder, that will look something like this:
callFrame.on("app-message", functionToHandleNewMesages);
Once the message is received, you can add the message to your chat history (e.g. an array in local state) and display the message wherever you’re iterating over that array.
Getting chatty
The end result of this will be a flexible chat component that can be used to select a specific audience.
In the gif above, the attendees on the right can message the webinar host seen on the left. Conversely, the webinar can message them both or just one attendee at a time. 💅
Upgrading your chat input
To expand this component even more, you could:
- Send attendee messages to multiple hosts.
- CC all admins about direct messages that other admins have sent to an attendee, which we did in the webinar app. This is useful if an attendee asks a question and you want to know if another host has already answered it.
- Show a local error message if there are no other participants to receive your message.
- Convert the select to a menu so the message sender can pick multiple people to message directly.
We hope this helps you keep your discussions flowing. As always, let us know if you have any questions. ✨
Never miss a story
Get the latest direct to your inbox.