


At Daily, we provide multiple ways to use our video and audio APIs to accommodate the broadest number of use cases. We always try to balance implementations that do most of the work for our customers (like Daily Prebuilt), as well as options that let customers use our APIs as building blocks to customize their apps as much as possible. And basically everything in between.
We often notice this balance when looking at adding text chat to video calls. It’s a common feature that can have quite a bit of a variation in specific needs between customers. In a Daily-powered video call, you can enable a prebuilt chat widget in Daily Prebuilt, use our sendAppMessage method to build your own chat widget, or use a completely separate tool to handle chat for you.
As much as we love our own daily-js chat options, we know sometimes our customers already have a preferred solution. With that in mind, we’ll be looking at a few chat integration APIs over the next weeks and see how they work with Daily video calls.
In today’s tutorial, we’ll be taking a look at TalkJS, a chat API with prebuilt chat UI for web and mobile apps.
Daily chat, you say…
We’re always happy to support our customers with building exactly the app they need. That said, using fewer tools for the job can often reduce app complexity.
- If you’re curious to learn more about Daily chat options, take a look at the following tutorials:
Three ways to add chat to your video calls with the Daily API - From our webinar series: Build a flexible React chat input using Daily's sendAppMessage
Okay, now that we’ve gotten our shameless plug out of the way—in fairness, it is our blog 👼—let’s take a look at TalkJS’s chat API and how to use it with a Daily Prebuilt call.
Defining our demo features
Before we get started, let’s decide what we are going to build. The main intention behind this demo is to show how to use daily-js with TalkJS, so the focus will be how the two interact.
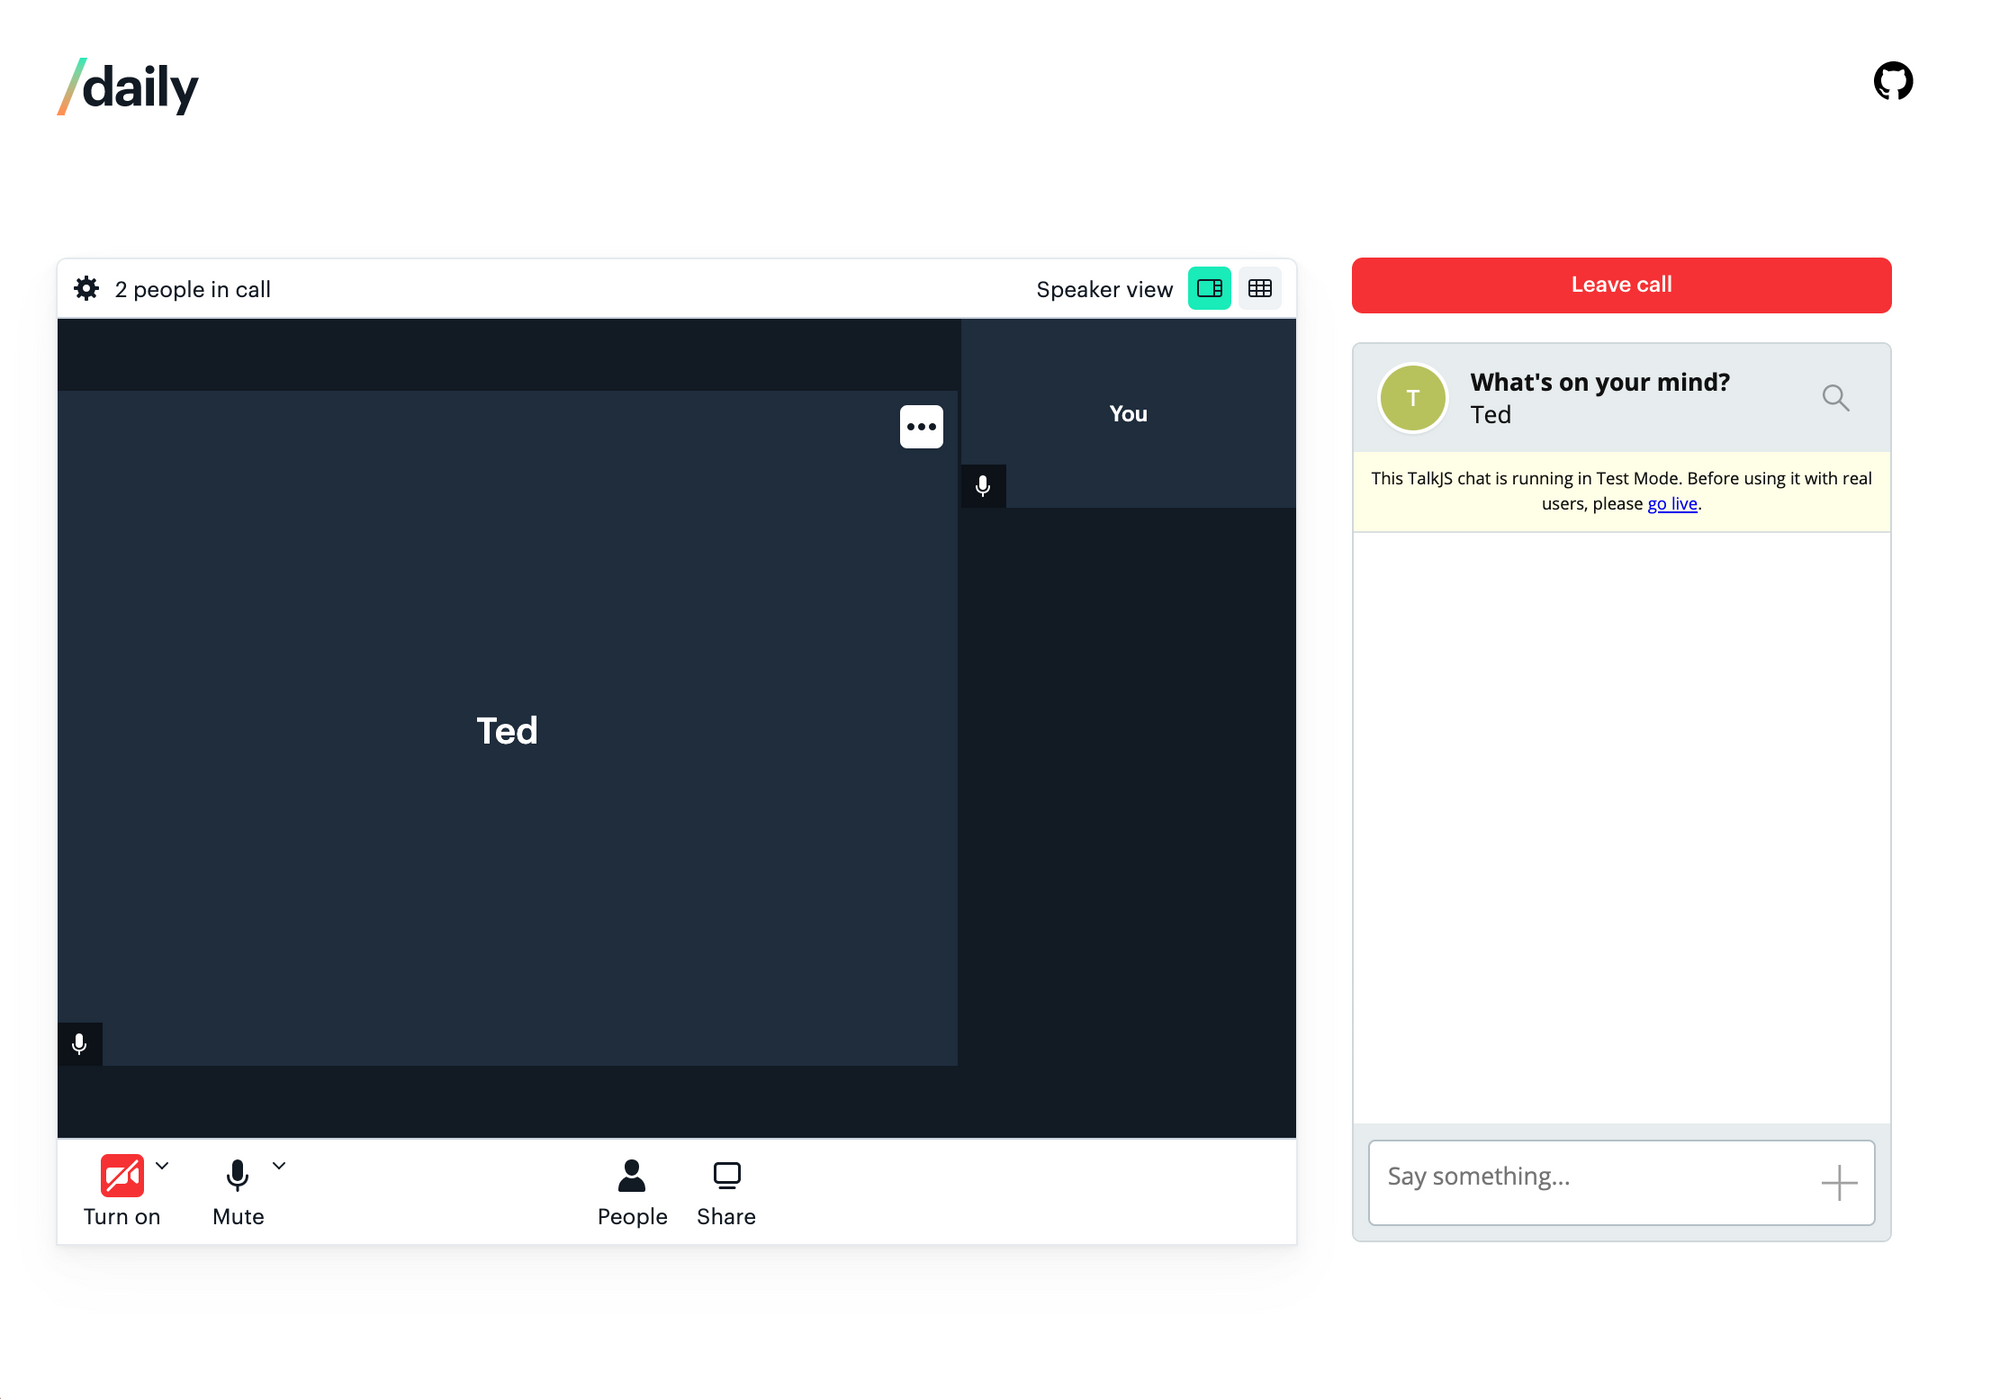
Our ultimate goal is to have a Daily Prebuilt video call with a TalkJS chat widget next to it, and a “leave” button that will leave the Daily call and leave the chat. We can break this goal down into four main features:
- Video UI: To keep the video side of things simple, we’ll use Daily Prebuilt. We don’t need anything custom for this.
- Text chat UI: TalkJS offers several options in terms of what the chat UI will look like, but we’re going to use the “ChatBox”.
- Chat roles: TalkJS also offers different options for how many people are in the chat, and chat participant roles. We’ll use the group chat option and give everyone in the chat the role “participant”.
Tip: If you wanted to add a TalkJS chat widget to our webinar demo, you could use the “roles” option to differentiate between admin and attendees. - Exiting: We’ll also assume leaving the Daily call means the participant wants to leave the chat too, so we’ll use TalkJS’
leaveendpoint to remove them from the chat.
We’ll use React for this tutorial, but you could also build it in any other frontend framework, or plain Javascript. ✨
Setting up required accounts
To use this demo, you will need a Daily account and a TalkJS account.
Creating a Daily account
To create a Daily account, sign up through the Dashboard.
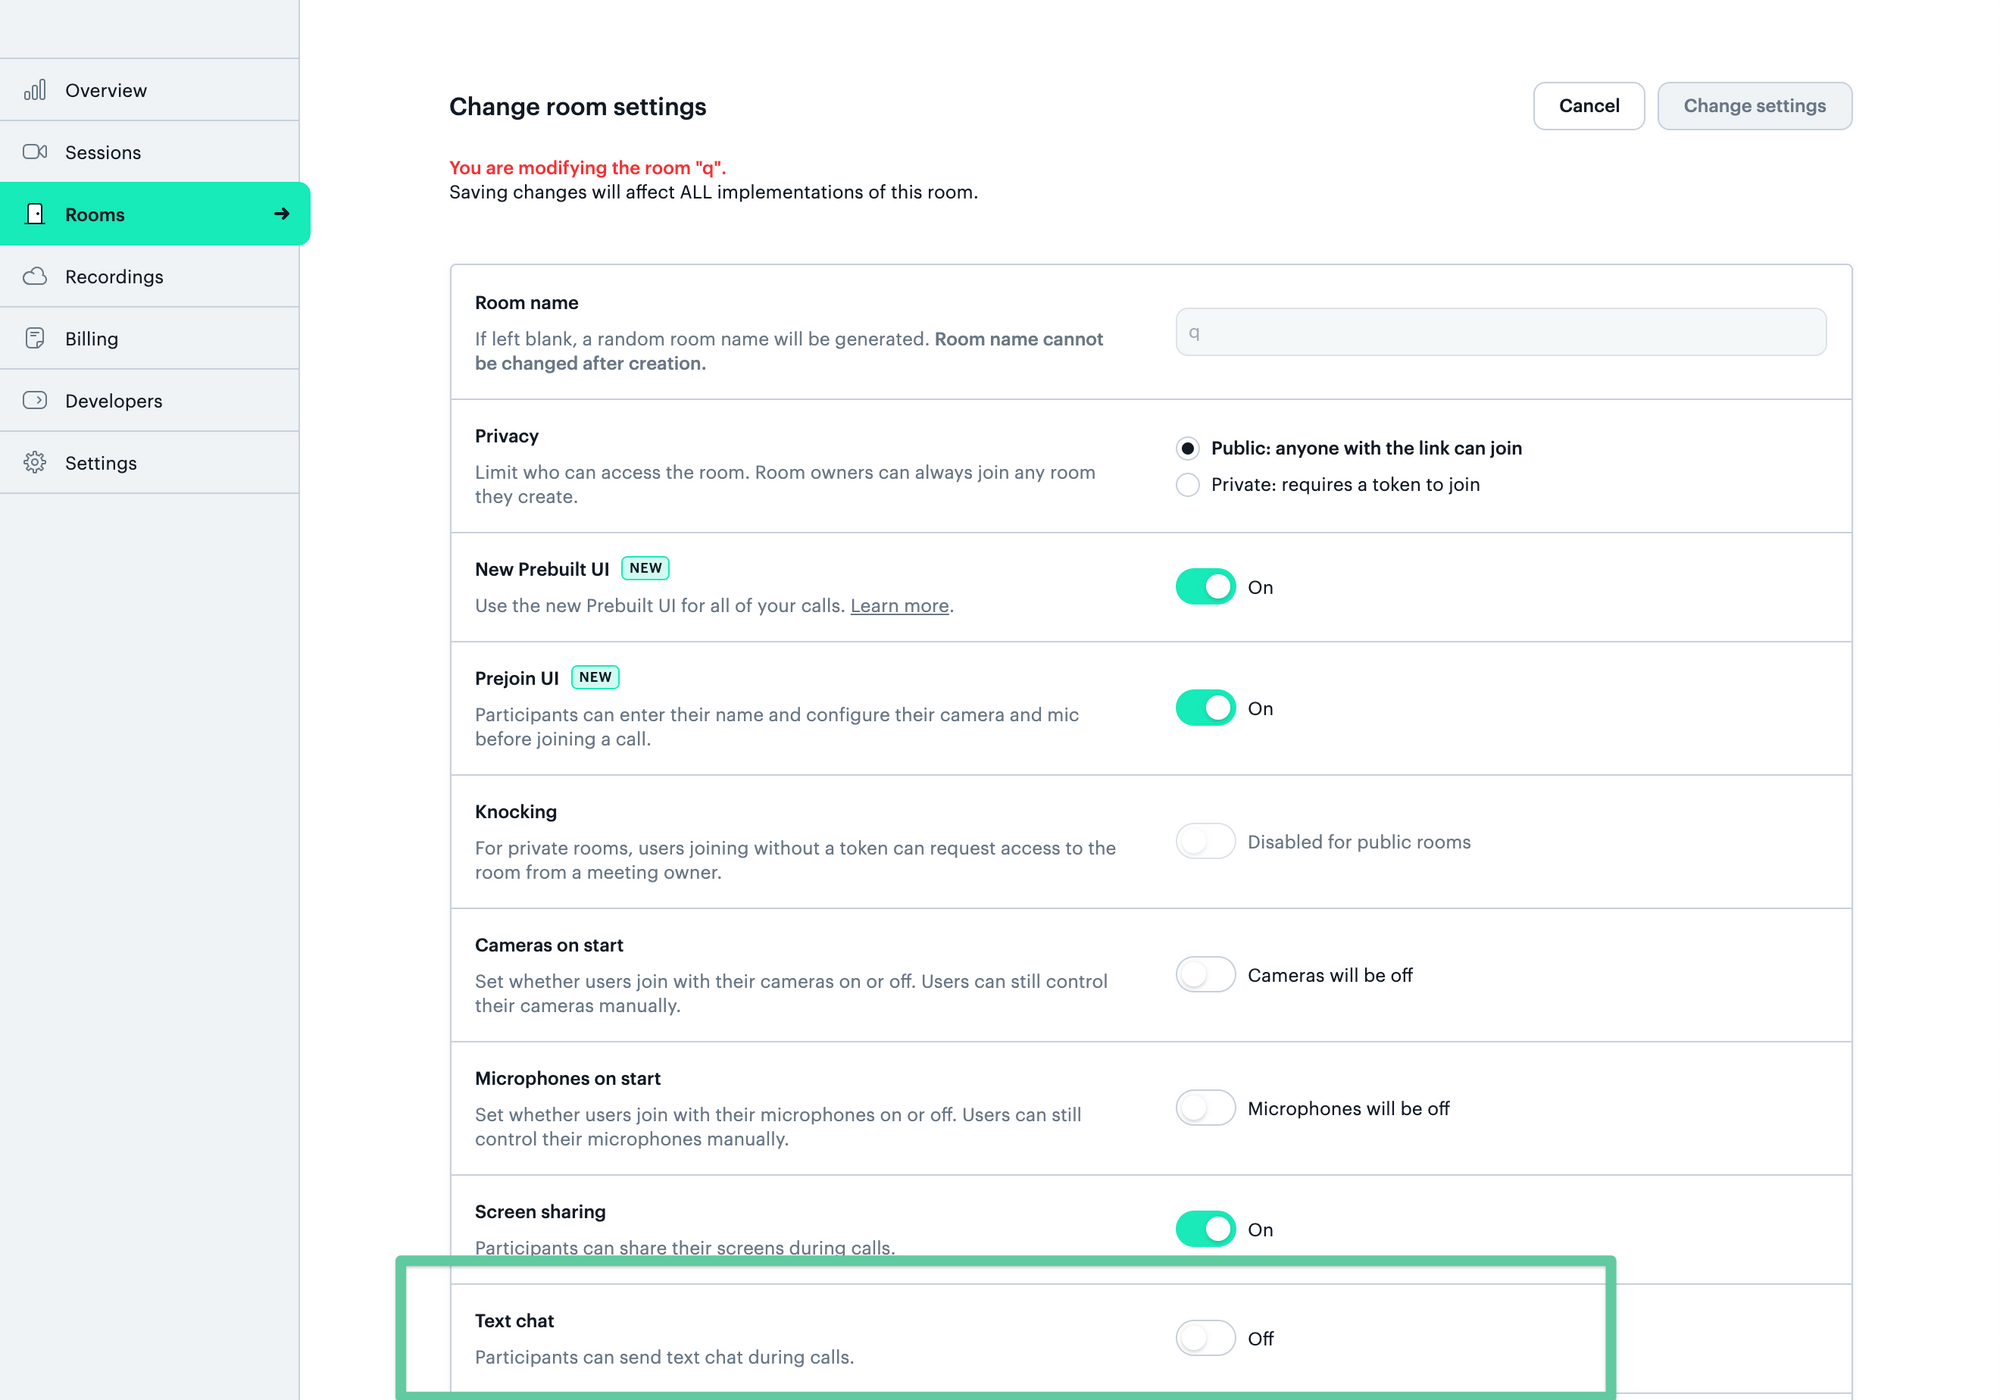
While you’re in the Dashboard, you can also create a Daily room. (You’ll use the room URL in a bit.)
In terms of the room settings, make sure it’s public and turn off Daily’s Text chat. Since everyone is an equal participant in this demo, we will make it public to avoid handling room owners. We also don’t need Daily’s text chat option since we’re using TalkJS’ chat widget.
Creating a TalkJS account
To create a TalkJS account, signup through their dashboard. Once logged in, you’ll need to create a new role called “participant” under the Roles tab.
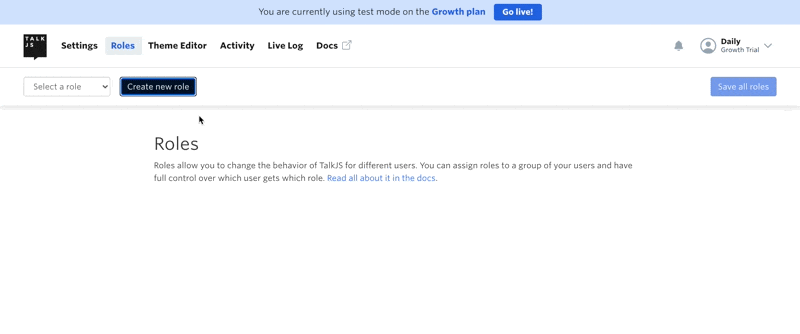
You will also need to copy the Test App ID, found under the Settings tab.
Getting started
Before diving into the code, let’s get set up locally. To run the finished demo on your machine, clone this Daily demos repo.
Next, create a .env file with the following keys. Replace the values with your TalkJS Test App ID copied from the TalkJS dashboard above, and your Daily API key from the Daily Dashboard.
REACT_APP_TALK_JS_APP_ID="Test App ID"
REACT_APP_DAILY_API_KEY="Daily API key"
Once those have been added, run the following commands to install dependencies and start the server:
yarn
yarn start
Navigating this project
There are 4 main components to be aware of in this project:
App.jsx: This is the parent component that loads either the default view (the join form) or the call, depending on the app’s current state.JoinForm.jsx: This is the default view when you first load the demo that lets you enter a Daily room URL and your username before joining a call.Call.jsx: Once the join form has been submitted, this call view shows instead and contains the Daily call and TalkJS chat widget.Chat.jsx: This component loads the TalkJS widget and manages all state related to the chat.
We won’t worry about the other components for now, since they’re mostly static content unrelated to the demo’s functionality.
First things first: Joining a Daily call
Before we can hook the chat widget up to a call, we need to actually join a Daily call.
To do this, we need to track two pieces of information:
- The Daily room URL, which is where the call will happen
- The name of the local user (that’s you!)
Let’s start by looking at our App.jsx component:
function App() {
 const [room, setRoom] = useState(null);
 const [localUsername, setLocalUsername] = useState(null);
 const [token, setToken] = useState(null);
 const [callFrame, setCallFrame] = useState(null);

 return (
   <div className="app-container">
     <Header />
     <main>
       {room ? (
         <Call
           room={room}
           setCallFrame={setCallFrame}
           callFrame={callFrame}
           setRoom={setRoom}
           localUsername={localUsername}
           token={token}
         />
       ) : (
         <JoinForm
           setRoom={setRoom}
           setToken={setToken}
           setLocalUsername={setLocalUsername}
         />
         <JoinForm setRoom={setRoom} setLocalUsername={setLocalUsername} />
       )}
     </main>
     <Footer />
   </div>
 );
}
In the return statement, there’s a ternary that will return the Call component if room is defined, and the JoinForm if it’s not. (room is a value stored in the local state.)
room and localUsername are both set when the join form has been submitted, so if room is set, it means a Daily room URL has been provided and the call can be started.
Since the join form shows by default, let’s start by seeing how that works:
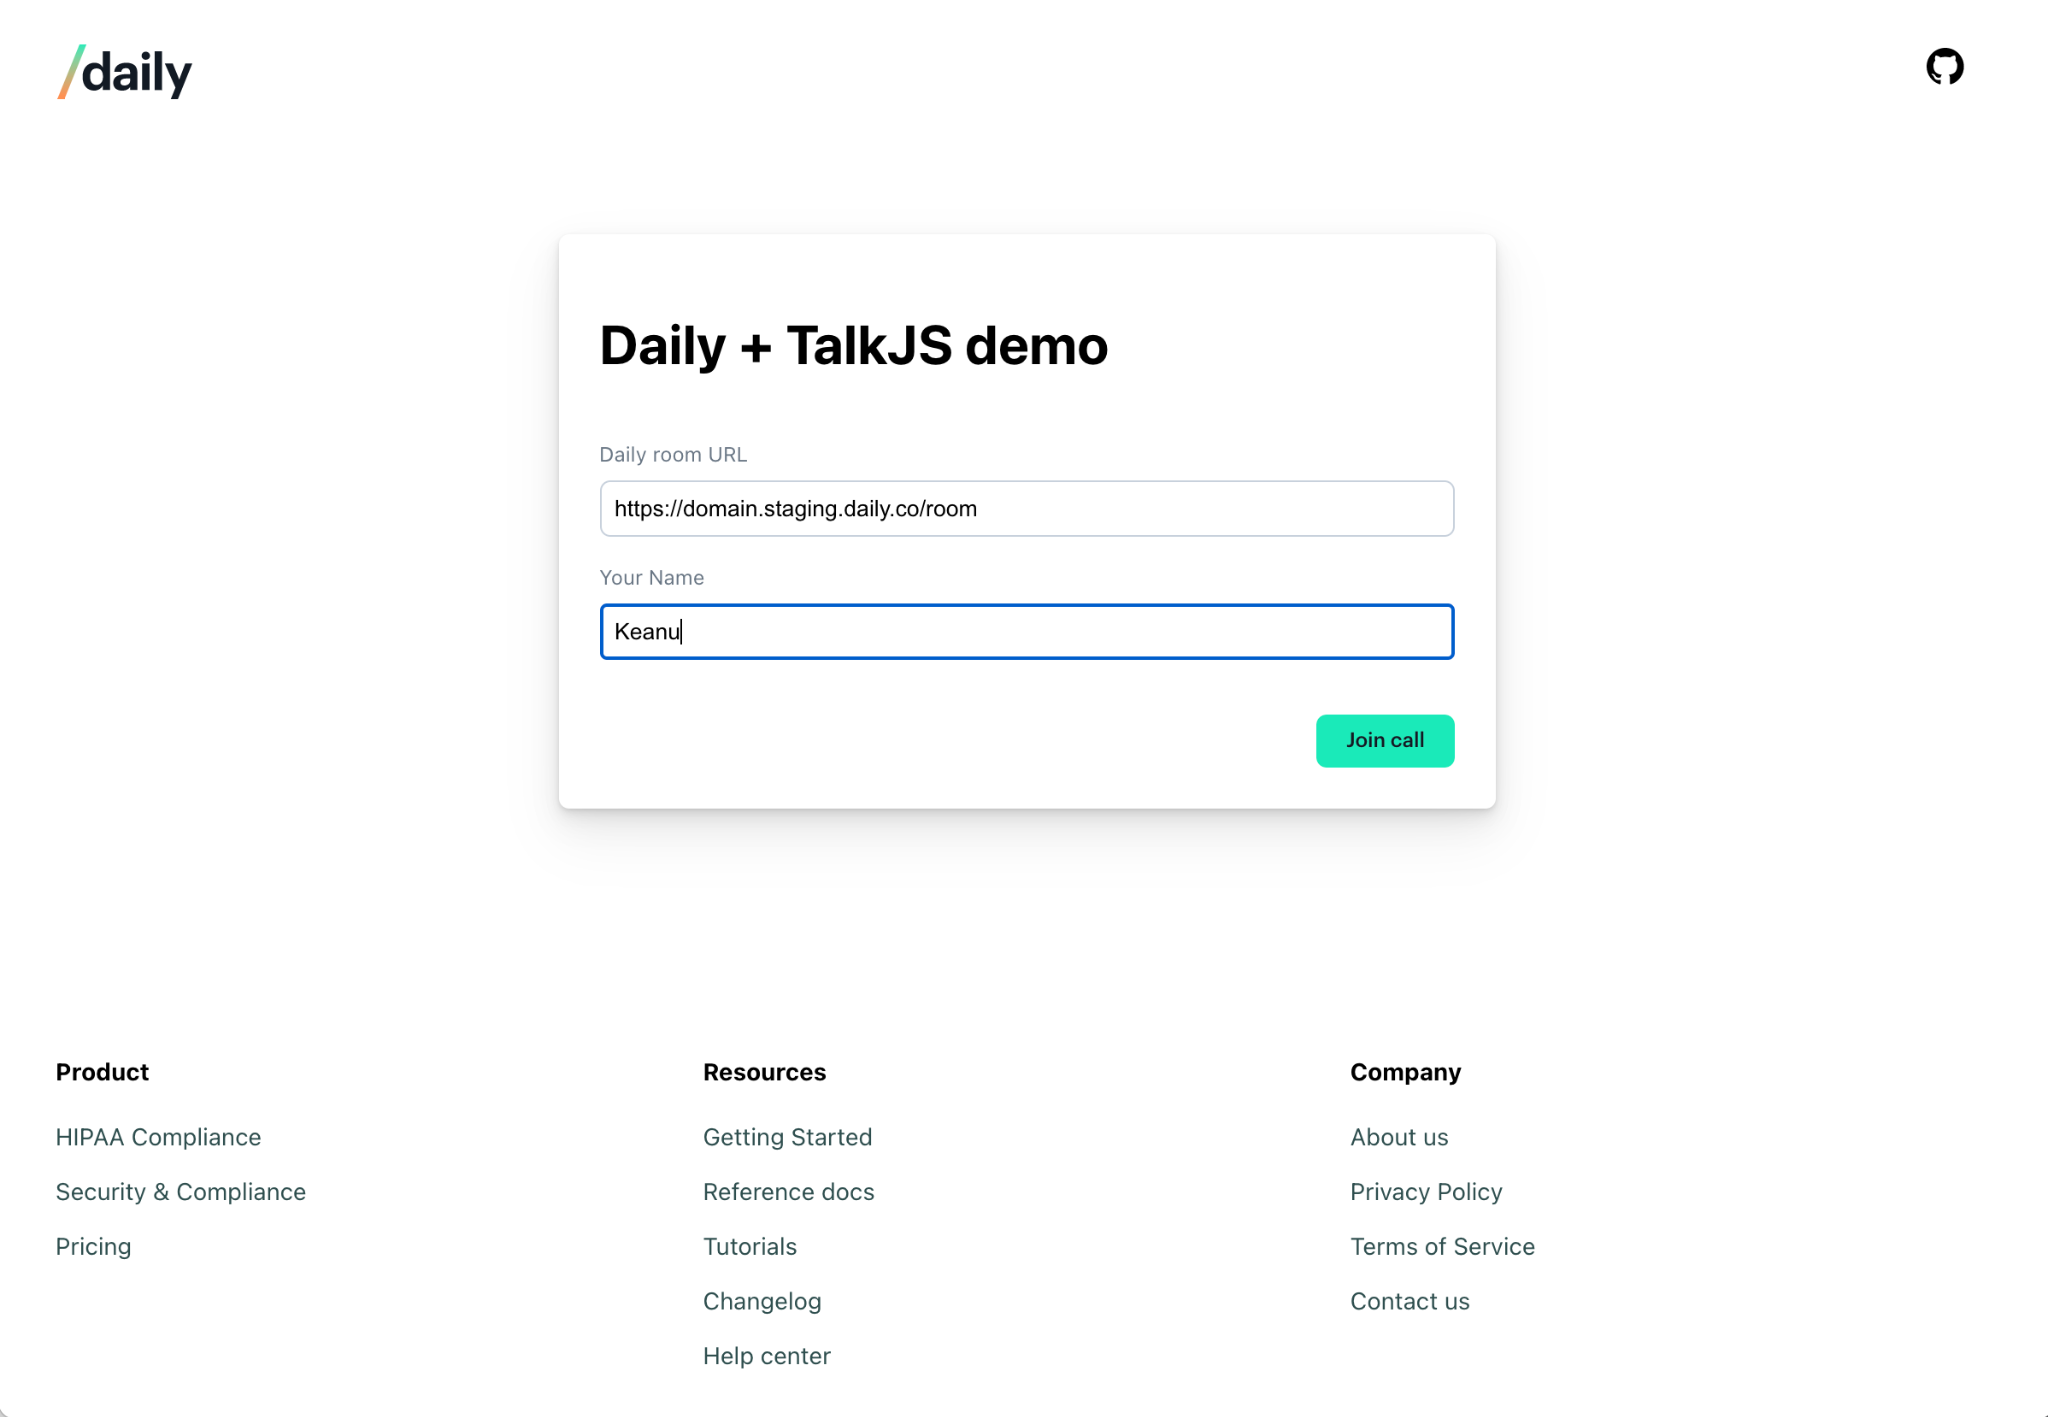
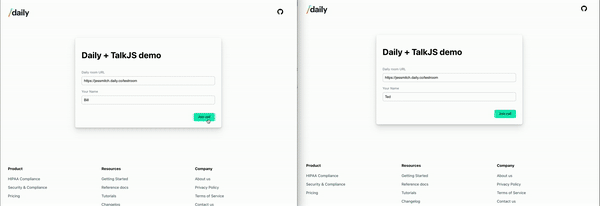
function JoinForm({ setRoom, setLocalUsername }) {
 const roomRef = useRef(null);
 const usernameRef = useRef(null);

 /**
  * Set roomUrl in local state on submit to trigger Daily
  * iframe being created in Call component
  */
 const joinCall = async (e) => {
   e.preventDefault();
   const roomUrl = roomRef?.current?.value;
   const name = usernameRef?.current?.value;
   if (!roomUrl) return; //TODO: handle error

   // Get the room name from the URL
   // https://DOMAIN.daily.co/ROOM_NAME
   const roomName = roomUrl.split("/").at(-1);

   const res = await api.createDailyToken(roomName, name);
   if (res.token) {
     setToken(res.token);
     setLocalUsername(name);
     setRoom(roomUrl);
   }
 };


 return (
   <form onSubmit={joinCall}>
     <h1>Daily + TalkJS demo</h1>
     <div className="input-container">
       <label htmlFor="room">Daily room URL</label>
       <input id="room" type="text" ref={roomRef} required />
     </div>
     <div className="input-container">
       <label htmlFor="username">Your Name</label>
      <input id="username" type="text" ref={usernameRef} required />
     </div>
     <input type="submit" value="Join call" />
   </form>
 );
}
The form has two inputs:
- One for the Daily room URL
- One for the local username
Submitting the form calls joinCall(). This will trigger a POST request to create a new Daily meeting token, which is used to set the username on join. If that request is successful, the room value, the username, and the token will all be set in the local state. Once submitted and room is set, App.jsx will instead render the Call.jsx component, as described above.
Note: You can set the user_name in the join() without a Daily meeting token. We are using that here to skip Daily Prebuilt’s name form, which will show if it’s the participant’s first Daily call. We only want the participant to use our demo’s web form.
The Call is coming from inside the App
Call.jsx is where most of the app’s logic happens. Let’s step through what’s going on in here:
function Call({room, setCallFrame, callFrame, setRoom, localUsername, token }) {
 const callRef = useRef(null);
 const [participants, setParticipants] = useState(null);
 const [hasJoinedMeeting, setHasJoinedMeeting] = useState(false);
 const [talkSession, setTalkSession] = useState(null);

 /**
  * Destroy TalkJS chat widget and reset daily-js-related state
  */
 const leaveCall = useCallback(() => {
   if (talkSession) {
     talkSession.destroy();
     setTalkSession(null);
     // Remove the user from the chat after they leave the call
     api.leaveTalkJsConversation(room, participants.local.session_id);
   }
   setRoom(null);
   setCallFrame(null);
   setHasJoinedMeeting(false);
   callFrame.destroy();
 }, [callFrame, setCallFrame, setRoom, room, participants, talkSession, setTalkSession ]);

 /**
  * Create the Daily iframe and join with username from JoinForm
  */
 const createAndJoinCall = useCallback(() => {
   const newCallFrame = DailyIframe.createFrame(
     callRef?.current,
     CALL_OPTIONS
   );

   newCallFrame.join({ url: room, userName: localUsername, token });

   const updateParticipants = (cf) => {
     setParticipants(cf?.participants());
   };

   const joinedMeeting = (cf) => {
     setParticipants(cf?.participants());
     setHasJoinedMeeting(true);
   };

   newCallFrame
     .on("joined-meeting", () => joinedMeeting(newCallFrame))
     .on("participant-updated", (e) => updateParticipants(e, newCallFrame));

   setCallFrame(newCallFrame);
 }, [room, setCallFrame, localUsername, token]);

 /**
  * Initiate Daily iframe creation on component render if it doesn't
  * already exist
  */
 useEffect(() => {
   if (callFrame) return;

   createAndJoinCall();
 }, [callFrame, createAndJoinCall]);

 return (
   <div className="call-container">
     {/* Daily iframe container */}
     <div className="call" ref={callRef}></div>
     <div className="chat-content">
       {hasJoinedMeeting && (
         <button className="leave-button" onClick={leaveCall}>
           Leave call
         </button>
       )}
       {hasJoinedMeeting && (
         <Chat
           participants={participants}
           room={room}
           setTalkSession={setTalkSession}
         />
       )}
     </div>
   </div>
 );
}
The first section to be aware of is the useEffect hook that triggers the Daily callframe instance to be initialized.
 useEffect(() => {
   if (callFrame) return;

   createAndJoinCall();
 }, [callFrame, createAndJoinCall]);
It calls createAndJoinCall(), which does exactly what it says:
- It creates the Daily callframe, which embeds the Daily iframe in the
divwe’ve provided:<div className="call" ref={callRef}></div> - It joins the Daily room using the
room,token, andlocalUsernamevalues from the local state
const createAndJoinCall = useCallback(() => {
   const newCallFrame = DailyIframe.createFrame(
     callRef?.current,
     CALL_OPTIONS
   );

   newCallFrame.join({ url: room, userName: localUsername, token });


   const updateParticipants = (_, cf) => {
     const participants = cf?.participants();

     if (!hasJoinedMeeting && participants.local.user_name === localUsername) {
       setHasJoinedMeeting(true);
     }
     setParticipants(cf?.participants());
   };

   newCallFrame
     .on("joined-meeting", (e) => updateParticipants(e, newCallFrame))
     .on("participant-updated", (e) => updateParticipants(e, newCallFrame));

   setCallFrame(newCallFrame);
 }, [room, setCallFrame, localUsername, hasJoinedMeeting]);
Let’s look more specifically at the order of events happening in createAndJoinCall():
- We create the Daily callframe instance with the
createFrame()factory method. It receives thedivthat will have the Daily iframe embedded in it and the call properties, which are optional. - We then join the call using the Daily
join()method and pass the Daily room’s URL and the local user’s name, which will be used by TalkJS as well. The token is passed as well to ensure Daily Prebuilt’s name form doesn’t show. - Next, we set the Daily event handlers for
joined-meetingandparticipant-updated. These help us know when the local user has officially joined and when others join or leave. - Lastly, we set the call frame in our local state so we know when it’s available to be used by other components.
Getting chatty: Setting up the TalkJS widget
The Chat.jsx component is where TalkJS really shines! 🌟 Let’s take a look at how we get it wired up:
function Chat({ participants, room, talkSession, setTalkSession }) {
 const chatRef = useRef(null);
 const [chatbox, setChatbox] = useState(null);

 const local = useMemo(() => participants?.local, [participants]);

 useEffect(() => {
   /**
    * Initialize TalkJS chat with the local user's info provided by
    * the Daily callFrame
    */
   const setUpTalkJs = async (user) => {
     await Talk.ready;

     const me = new Talk.User({
       id: user.session_id,
       name: user.user_name || "Local guest",
       role: "participant",
     });

     const session = new Talk.Session({
       appId: process.env.REACT_APP_TALK_JS_APP_ID,
       me,
     });

     const conversation = session.getOrCreateConversation(room);

     conversation.setAttributes({
       subject: "What's on your mind?",
     });

     conversation.setParticipant(me);

     const cb = session.createChatbox(conversation);
     cb.mount(chatRef?.current);

     // Set chat in local state so we know if it's set up already
     setChatbox(cb);
     setTalkSession(session);
   };

   if (local && !chatbox) {
     setUpTalkJs(local);
   }
 }, [chatbox, local, room, setTalkSession]);

 return (
   <div className="chat-container">
     {local && (
       <div style={{ height: "520px" }} ref={chatRef}>
         <Loader />
       </div>
     )}
    </div>
 );
}
The component’s return value contains a div for the TalkJS ChatBox to be embedded in, similar to how Daily Prebuilt is embedded.
To actually embed the widget, we use a useEffect hook to load it if the local participant has joined, assuming it hasn’t already been embedded:
   if (local && !chatbox) {
     setUpTalkJs(local);
   }
setUpTalkJs() is where we actually interact with the TalkJS API. (Note: We call setUpTalkJs() as a function because it requires async actions, which you should not do directly in a useEffect hook.)
Let’s step through what happens in order:
- First, we wait for the TalkJS script to load
await Talk.ready; - Next, we create a TalkJS user for ourselves (the local user) and set the user ID to the Daily user’s session ID, and set the name to the Daily user’s username (the one provided in the join form). This binds the Daily call participant information to TalkJS' participant information.
const me = new Talk.User({
       id: user.session_id,
       name: user.user_name || "Local guest",
       role: "participant",
     });
- After that, we create a new TalkJS session using our
Test App Id, which we previously set in the environment variables.
const session = new Talk.Session({
       appId: process.env.REACT_APP_TALK_JS_APP_ID,
       me,
     });
- Once the session exists, we can get (or create) the TalkJS conversation. (If the call has already been joined by someone else, the conversation will already exist.) We’ll also make ourselves a conversation participant.
const conversation = session.getOrCreateConversation(room);`
conversation.setParticipant(me);- Next, we create the chatbox, and embed (or “mount”) it by passing the
divcontainer that we created in the component’s return statement. (We’re selecting the container element with therefset on it.)
const cb = session.createChatbox(conversation);
cb.mount(chatRef?.current);- Finally, we set the chat box and session information in the state so it can be accessible elsewhere.
setChatbox(cb);
setTalkSession(session);
Once this process is complete, the TalkJS chat widget is embedded in the DOM and we will see the chatbox next to our Daily call with all call participants in the chat, as well! 💥
Daily has left the call
When a participant leaves the call, we can do some cleanup in case they want to join another call. You may have noticed in the Call component, there’s a custom button added to leave the call, instead of using Daily Prebuilt’s leave button.
*Note: We specifically disabled the leave button in our createCallFrame() options by setting showLeaveButton to false.
Instead of using the default, we have a leaveCall() method we call when the custom leave button gets clicked.
 /**
  * Destroy TalkJS chat widget and reset daily-js-related state
  */
 const leaveCall = useCallback(() => {
   if (talkSession) {
     talkSession.destroy();
     setTalkSession(null);
     // Remove the user from the chat after they leave the call
     api.leaveTalkJsConversation(room, participants.local.session_id);
   }
   setRoom(null);
   setCallFrame(null);
   setHasJoinedMeeting(false);
   callFrame.leave();
   callFrame.destroy();
 }, [
   callFrame,
   setCallFrame,
   setRoom,
   room,
   participants,
   talkSession,
   setTalkSession,
 ]);
We do a few things when this button gets clicked:
- We destroy the TalkJS session with their
destroy()method, reset the session state, and leave the conversation with theirleave(delete) REST endpoint. - We then reset all the Daily-related state in the app.
- Finally, we leave the call and destroy the
callFrameto return to our app’s initial state.
Wrapping up
Now that we have our Daily call and TalkJS chat widget set up and all the functionality we planned on adding, our demo is complete! Of course, this is just an example of what you can build that can be made more complex.
Some ideas of how to expand this example include:
- Setting specific roles in the chat for Daily meeting admins and regular participants. Follow our webinar tutorials for a base app to add TalkJS to.
- Building a custom video instead of using Daily Prebuilt, which you can learn how to do in our custom React video chat tutorial
- Hide the chat box until a conversation has started
If you’re curious to see how to build the inverse version of this demo—adding Daily video to the TalkJS chat widget—check out this tutorial from TalkJS.
Never miss a story
Get the latest direct to your inbox.