

A popular feature many applications include to enhance the user experience is the ability to use keyboard shortcuts to perform app operations. In this post, we will learn how to add keyboard shortcuts for call controls in a Daily-powered video app built with Vue.js. We'll do so with the help of the VueUse utility library.
This tutorial covers two possible implementations of this feature in Vue:
- The
setupcomposition API hook. - The more recent and standard
<script setup>syntax.
We've already published some posts about using Daily with Vue.js, one of them being the tutorial on building a custom video chat app with Vue. This post builds on that demo, so be sure to check it out.
Getting started
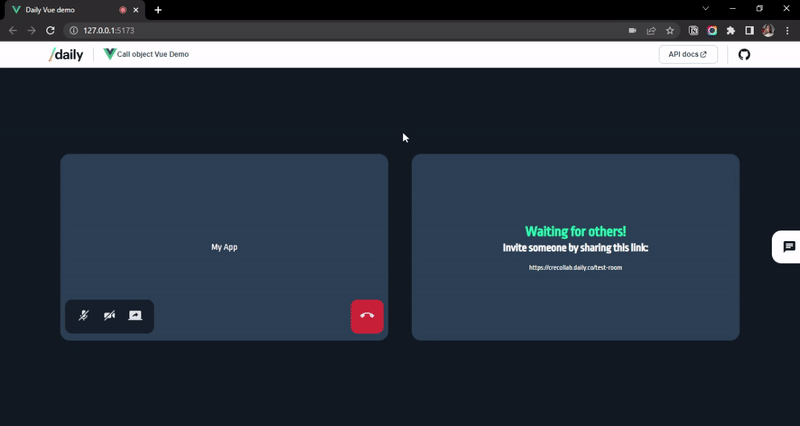
To follow along, create a Daily account and a room.
Next, you need to set up the Daily demo app we'll be working on in this tutorial. To clone and run the application, run the following commands in your terminal:
git clone https://github.com/daily-demos/vue-call-object.git
cd vue-call-object
npm install && npm run dev
Then, open the app on your browser at whichever port it is running. Mine is port http://localhost:5173/
The start script watches any changes you make in your code and updates the browser once you save the file.
If you would like to skip ahead to see the finished code for both implementations above, check out the corresponding branches below:
What are we building?
Our requirements for this feature are fairly simple.
- Add keyboard shortcuts for toggling the audio and video and activating our screen share dialog. Listed below are the keyboard combinations we want and their respective functionalities:
a. Shift + M: Audio toggle
b. Shift + V: Video toggle
c. Shift + S: Activate screen share dialog - Make our users aware of these shortcuts.
Now that we have clearly defined our use case and requirements, we can delve into building out the feature. But first, let’s take a moment to discuss the library we intend to use for this feature.
Vue Composition API and the VueUse package
When we look closely at the components of our Vue.js Daily demo app, we see a common theme in how they are defined. We will be working on the CallControls component because that is where the audio-visual and screen share controls are located. Let's use it as an example to discuss how component definition works in the Options API and then compare it with Composition API.
After the different import statements, there is a default export. That export is an object with the following properties:
namepropsdatamounted
The above keys are called options and you provide them to Vue to dictate the behaviour and state of the component it creates.This approach or syntax to creating elements is known as using the Options API. It is the traditional way for building components in Vue.
With the introduction of Vue 3, a new way of doing things emerged: the Composition API. Using this new API, developers can take a more functional programming approach to writing Vue components. You can write reusable functions to define and manage both component state and behaviour. With this new syntax came what is known as composables. Composables are reusable JavaScript functions that organize business logic. They encapsulate the definition and management of the internal state of a component. They also define methods or behaviour of that component.
VueUse is a Composition-API-based library or utility with a wide variety of composables that simplify complex development tasks and improve developer experience. Examples of such tasks include:
- Working with browser APIs.
- Dealing with geolocation.
Its core library has over 200 functions that you can import into your components, as well as a number of other add-ons.
Making our demo compatible with VueUse
To make our existing demo Composition-API ready to work with VueUse, we need to make some changes. As mentioned earlier, we will be working on the CallControls component. We are going to make some modifications to the <script> section.
First, add the setup hook as a property after the props property:
setup() {
  return {}
}
Vue provides a property called setup that gives you the ability to use Composition-API-based code in the Options API. It is a function-based hook like the other Vue hooks, like mounted. It is internally built into Vue versions 2.7 and above. If you want to use it in lower versions of Vue, you need to install the Vue Composition API plugin.
In the hook above, we return an empty object. Typically, this object would include reactive states/values you want to expose to the template and the other Option API hooks. However, in this case it is empty because we do not have any states declared and we do not want to trigger a linting error. We’ll be adding our shortcut-detection logic here shortly.
With these modifications in place, the CallControls component is now ready to use VueUse.
Adding VueUse to the project
We intend on using a function from the core VueUse package, so we are going to install it from NPM using the following command:
npm i @vueuse/core
The function we are using to build our keyboard shortcuts functionality is useMagicKeys. useMagicKeys handles the state of pressed keys reactively. Basically, it listens for keyboard events and tracks the keys that were pressed.
Note that useMagicKeys is not supported for Internet Explorer 11 and below. You might not want to use it for a feature that is integral to your application if you want to support those users. In our case it is an add-on feature that just improves the user experience, so we can go ahead and use it.
You can add useMagicKeys to the CallControls component by importing it from the VueUse core library as follows:
import { useMagicKeys } from '@vueuse/core'
Next, we are going to add the functionality for toggling the audio or video inside the setup hook we wrote above.
We could start by destructuring the shift, and m booleans from useMagicKeys, which would indicate whether either key has been pressed. We could then use either of the two Vue methods provided for handling side effects–watch and watchEffect–to track the keys and handle consecutive presses as needed. To learn more, you can checkout the usage section of the useMagicKeys documentation.
However, because of the nature of the feature we are developing, the approach described above is not quite suitable for us. Let’s find out why and what we will do instead.
Writing more succinct code using combinations and whenever
Using watchEffect or watch and retrieving the keys individually is a good way to get started. However, it is not very efficient if you have multiple keys to track like in our use case. Additionally, the code is not as succinct as it could be.
useMagicKeys provides the ability to create key combinations by joining keys together using the symbols + or _. The VueUse library also provides the whenever function, which can be used In place of the watchEffect or watch watchers. The whenever function is a shorthand for watching truthy reactive properties. It only runs when the value is true.
We will start by importing whenever from VueUse
import { useMagicKeys, whenever } from '@vueuse/core'
Next we destructure the shift_m combination from useMagicKeys for Shift and M as shown below:
setup(props) {
    const {
        shift_m,
    } = useMagicKeys()
    // The rest of the setup function below…
}
Then we add a control for shift_m with whenever:
setup(props) {
    // ...
    whenever(shift_m, () => props.handleAudioClick())
    // ...
}
handleAudioClick is a prop passed to CallControls that manages the behaviour of the audio control. To access that prop, the setup hook needs to receive the props of the component as a parameter. We added that parameter, retrieved the handleAudioClick() function, then called it.
Now when you save your changes, return to your app on the browser, and press Shift plus M consecutively, you should see the audio button turn off/on.
We can now add the code for the other keyboard shortcuts as shown below.
setup(props) {
    const {
          shift_m: audioToggle,
          shift_s: screenShareToggle,
          shift_v: videoToggle,
    } = useMagicKeys()


    whenever(audioToggle, () => props.handleAudioClick())
    whenever(screenShareToggle, () => props.handleScreenshareClick())
    whenever(videoToggle, () => props.handleVideoClick())

    // ...The rest of setup function
}
Above, we retrieve the combinations from useMagicKeys using object destructuring with aliases for all the key combinations.
Then, we use whenever to call the relevant handler whenever any of those key combinations are truthy.
Notifying users about the keyboard shortcuts for call controls
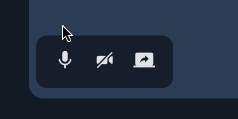
The final piece of this feature is providing awareness of this functionality to the end user. After all, what good does adding the feature do if no one knows it exists. To do that we will be using the `title` html attribute for each of the call control buttons. When users hover over any of the buttons, they will see a popup with the keyboard shortcut for that button.
We will add the title attribute to the buttons as shown below:
<button title="shift+m" @click="handleAudioClick">
        <!-- button content –-->
</button>
<button title="shift+v" @click="handleVideoClick">
        <!-- button content –-->
</button>
<template v-if="supportsScreenshare">
    <button title="shift+s" :disabled="disableScreenShare" @click="handleScreenshareClick">
        <!-- button content –-->
    </button>
</template>
Save the changes and observe the tooltip in the browser when you hover over each of the call control buttons.
VueUse with Vue 3 script setup
While the setup hook is a great way to get started with the composition API and VueUse, the Vue documentation recommends that modern Vue 3 projects use the <script setup> syntax.
This section will show how we convert the CallControls component we have written to <script setup> to align with current best practices. The final code can be found here.
First, we add setup to the script tag as shown below:
<script setup></script>
Next, we define our props below our imports:
const props = defineProps([
  "participant",
  "handleVideoClick",
  "handleAudioClick",
  "handleScreenshareClick",
  "leaveCall",
  "disableScreenShare",
])
We move our reactive properties and variables from the setup hook to a line after the props definition as follows:
const supportsScreenshare = ref(false)
const {
  shift_m: audioToggle,
  shift_s: screenShareToggle,
  shift_v: videoToggle,
} = useMagicKeys()
We also need to move over our whenever statements. They should be included after our reactive properties have been defined and initialised.
whenever(audioToggle, () => props.handleAudioClick())
whenever(screenShareToggle, () => props.handleScreenshareClick())
whenever(videoToggle, () => props.handleVideoClick())
Then we call the <script setup> equivalent of the mounted hook: the onMounted hook. There, we set the ability to show the screen share button only if the device supports it. You also need to import the onMounted hook from vue in your import section.
onMounted(() => {
    // Only show the screen share button if the browser supports it
    supportsScreenshare.value = daily.supportedBrowser().supportsScreenShare
  })
Finally, we delete the default export object such that we are left with the onMounted hook as the last line of our script section. You can check this branch to verify that you have the correct code.
Upon visiting the app in the browser, the controls should still work as before.
Conclusion
In this post, we learned about VueUse and how we can use it to enhance the call controls of our Daily-powered video call app by providing keyboard shortcuts. However, the library is not limited to this functionality.
Other potential use cases include:
useClipboardto provide a copy-to-clipboard functionality for sharing the link to a meeting.useBatteryto provide the ability to disable selected features, like multiple participant videos, when a user’s battery is low.useOnline/useNetworkto develop an indicator of network status for video call participants.