
This post is part one of a three-part series on how to build a custom Daily video call overlay app in Electron using daily-js.
Introduction
Daily provides real-time video and audio APIs to help developers integrate WebRTC functionality into their apps quickly and efficiently.
Electron allows developers to easily integrate Daily video calls into a desktop application by using Daily’s daily-js library.
This opens developers up to even more flexibility when creating apps for real-time video calls.
In this three-part tutorial, we’ll go through the basics of an Electron demo we created to showcase some of the cool things you can do with Electron and Daily.
In part one (this post!), we’ll focus on the Electron application structure and go over our main process and preload scripts.
In part two, we walk through the renderer processes and how our call window communicates with the Daily API.
Part three will be coming next week and will go through how to make our participant tiles draggable on the screen when a user is in the call.
We won’t go through every single detail of the code for brevity, but we’ll walk through the implementation of the main features and some possible gotchas to keep in mind.
What we’re building!
Have you ever felt the pain of toggling between a call and your applications in a video call?
Most of us have been there: sitting in a video meeting and having to toggle between documents or other applications and the call repeatedly. It can get annoying.
Wouldn’t it be nice if we could overlay the video call on top of our other applications, allowing us to interact with shared docs, code, or cat pics while still seeing everyone in the call and having access to our call controls?
Moreover, wouldn’t it be even nicer if we could drag and drop other participants on our screen in whatever arrangement works best with the background applications we’re using at the same time?
This feature set is what we will explore in this tutorial, by making an Electron application that allows us to join a Daily video call and have it seamlessly overlay our other applications. We will accomplish this by using the Daily call object.
Getting started
To clone and run our call overlay Electron demo, run the following commands in your terminal:
git clone git@github.com:daily-demos/electron-overlay.git
npm i && npm start
We also recommend that you check out our overview of the Electron framework from the Daily guide about integrating Daily Prebuilt with Electron.
Electron preload
One thing that is required in this call object-based Daily Electron app but not our previous Daily Prebuilt app is the use of Electron's preload scripts. You may have read about them in Electron’s process model.
Essentially, preload scripts run in the renderer process, but have access to Node.js APIs and are able to communicate with the main process.
In our case, the preload scripts will be used to control mouse event passthrough in the application. They’ll also expose methods to close the app, join a call, and update our UI when call state changes.
Our Daily call overlay app structure
Overview of our Main process directory
main.jscontains the application entry pointpreloadTray.jsexposes selected communication channels between our tray renderer process and the main processpreloadCall.jsexposes selected communication channels between our call window renderer process and the main process
Overview of our Renderer process directory
call/daily.jshandles communication between Daily and our appnav.jsis responsible for all navigation and call controlstile.jshandles rendering and adding/removing participant tilesdrag.jshandles drag and drop functionality
tray/tray.jscontains all setup and event handling for our system tray popup window
Creating our BrowserWindows and initializing the app
Let’s go through our application’s entry point in the main process: main/main.js.
We will start by waiting for Electron initialization to be complete. When our app (imported from Electron) receives the "ready" event, we’ll create our windows:
app.whenReady().then(() => {
  createCallWindow();
  createTrayWindow();
  setupTray();
});
Creating the call window
createCallWindow() starts by creating a BrowserWindow:
function createCallWindow() {
  // Create the browser window.
  callWindow = new BrowserWindow({
    title: "Daily",
    webPreferences: {
      // The path to our aforementioned preload script!
      preload: path.join(__dirname, "preloadCall.js"),
    },
    // Remove the default frame around the window
    frame: false,
    // Hide Electron’s default menu
    autoHideMenuBar: true,
    transparent: true,
    // Do not display our app in the task bar
    // (It will live in the system tray!)
    skipTaskbar: true,
    hasShadow: false,
    // Don't show the window until the user is in a call.
    show: false,
  });
  // Some more logic we'll go through next here!
You can also check out what each of the above properties does in the BrowserWindow Electron documentation. The gist is that we’re creating a full screen, transparent application window without a frame or menu bar.

Now that we have the BrowserWindow, we need to do a bit more setup to ignore mouse events and make sure our app always stays on top.
mainWindow.setIgnoreMouseEvents(true, { forward: true });
mainWindow.setVisibleOnAllWorkspaces(true, { visibleOnFullScreen: true });
Above, we first set the window to ignore mouse events and forward them to Chromium, allowing us to listen to things like mouseenter and mouseleave events from our preload when the user is hovering over elements of our app.
The setVisibleOnAllWorkspaces() call is Mac-specific, and makes sure our app window will be visible above other fullscreen windows on OS X.
Next, we have to set our BrowserWindow to always be
on top of other windows:
let level = "normal";
// Mac OS requires a different level for our drag/drop and overlay
// functionality to work as expected.
if (process.platform === "darwin") {
  level = "floating";
}
mainWindow.setAlwaysOnTop(true, level);
The level required a bit of experimentation to get right on different operating systems. On Windows, the "normal" level got the desired behavior. On Mac, "floating" seemed to be the most suitable.
We’re almost done with this part, I promise. The last thing left in createCallWindow() is to actually load our index.html file:
mainWindow.loadFile("index.html");
Creating the tray window
Next, we run createTrayWindow(). This is the window which gets shown on application startup, and which will pop up whenever a user clicks on the application icon in the system tray.
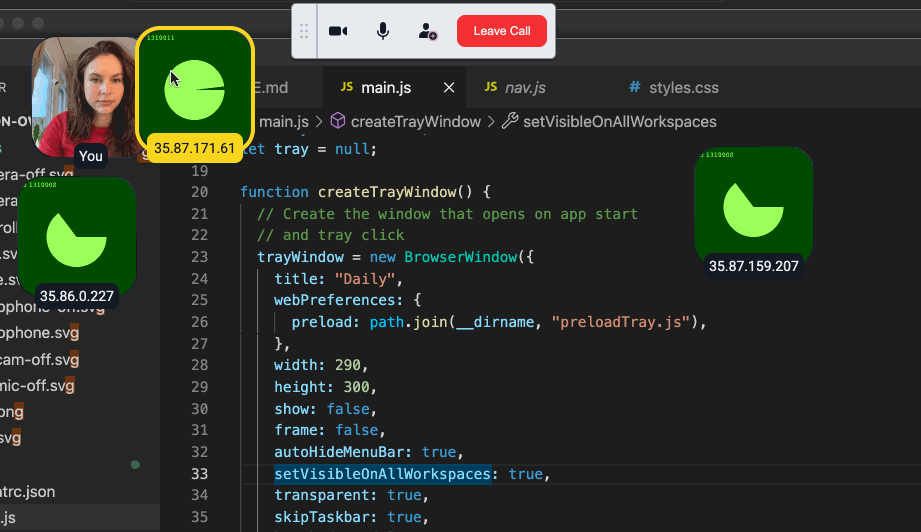
function createTrayWindow() {
  // Create the window that opens on app start
  // and tray click
  trayWindow = new BrowserWindow({
    title: "Daily",
    webPreferences: {
      preload: path.join(__dirname, "preloadTray.js"),
    },
    width: 290,
    height: 300,
    show: false,
    frame: false,
    autoHideMenuBar: true,
    setVisibleOnAllWorkspaces: true,
    transparent: true,
    skipTaskbar: true,
    hasShadow: false,
  });
  trayWindow.loadFile("tray.html");
}
Above, we specify a separate preload script for our tray window. Our tray and call windows will need to pass some data to each other via the main process, and the preload scripts will help us in this task.
We also want the window to disappear if a user clicks outside of it, as well as be focused automatically when shown. We do this by handling the "blur" and "focus" events.
  trayWindow.on("blur", () => {
    trayWindow.hide();
  });
  trayWindow.on("show", () => {
    trayWindow.focus();
  });
When the DOM is ready, we show the window and use the handy electron-traywindow-positioner package to position the tray window next to the tray:
trayWindow.webContents.once("dom-ready", () => {
  trayWindow.show();
});
That's it for our window creation!

Setting up the system tray
This is the kind of app that would do well in the system tray instead of the task bar. This way, someone could have it running indefinitely (minimized) and join Daily video calls at their convenience.
So the next thing we’ll do is set up the tray icon and context menu:
// setupTray creates the system tray where our application will live.
function setupTray() {
  if (app.dock) {
    app.dock.hide();
  }

  tray = new Tray(path.join(__dirname, "../assets/tray.png"));

  tray.setToolTip("Daily");
  tray.setIgnoreDoubleClickEvents(true);
  tray.on("click", function (e) {
    if (trayWindow.isVisible()) {
      trayWindow.hide();
      return;
    }
    trayWindow.show();
  });
  tray.on("right-click", () => {
    tray.popUpContextMenu(tray.contextMenu);
  });

  setupTrayMenu(false);
}
Above, we first run yet another Mac-specific function to hide the app in the dock if one exists (which it probably will on OS X).
Then, we create a new tray with our chosen logo as the icon, set a tooltip, and move on to setting up our tray context menu.
Note that tray is a global; it needs to be for the tray to be persistent during the application lifetime.
After creating the tray and setting the tooltip, we set up single-click and right-click behavior for the tray. When a user clicks on the tray icon, the tray window will either be shown or hidden (depending on its current state). When a user right clicks on the tray icon, the tray's context menu will be shown.
Finally, we set up the tray context menu. We wanted the context menu to change depending on whether the user is in a call or not. They should be able to leave a call through the context menu if they’re in one, and we always want them to be able to exit the app (I guess…)
So we generate the menu items based on the state of the call:
function setupTrayMenu(inCall) {
  const menuItems = [];

  // If the user is in a call, allow them to leave the call
  // via the context menu
  if (inCall) {
    const item = new MenuItem({
      label: "Leave Call",
      type: "normal",
      click() {
        callWindow.webContents.send("leave-call");
      },
    });
    menuItems.push(item);
  }
  const exitItem = new MenuItem({
    label: "Quit",
    type: "normal",
    click() {
      app.quit();
    },
  });
  menuItems.push(exitItem);

  const contextMenu = Menu.buildFromTemplate(menuItems);
  tray.contextMenu = contextMenu;
}
💡Note that after setting up the menu items above, we set our owncontextMenuproperty on ourtrayinstead of callingtray.setContextMenu(), which would handle the click behavior for us. We found that the default behavior when usingsetContextMenu()results in the context menu being shown even when single-clicking on the tray icon, which we do not want in this case.
Finally, we need to register a few small custom handlers which the preload will be using to refresh the system tray menu, join a call, or exit the application. We've left some comments noting what various handlers are doing inline:
// When a user fills in the call form from the tray window,
// this handler will send the room URL and the user's chosen
// name to the call window.
ipcMain.handle("join-call", (e, url, name) => {
  callWindow.webContents.send("join-call", { url: url, name: name });
});

// When we get a success or failure status from the call
// window when joining a call, this handler will send
// the failure (if any) to the tray window, OR alternatively
// maximize and focus the call window.
ipcMain.handle("call-join-update", (e, joined) => {
  if (!joined) {
    trayWindow.webContents.send("join-failure");
    trayWindow.show();
    return;
  }
  callWindow.maximize();
  setupTrayMenu(true);
  callWindow.show();
  callWindow.focus();
});

// When a user leaves a call, this handler will update
// the tray menu and send the event to the tray window
// (so that the tray window can be updated to show the
// join form once more)
ipcMain.handle("left-call", () => {
  setupTrayMenu(false);
  trayWindow.webContents.send("left-call");
  callWindow.hide();
});

// This handler updates our mouse event settings depending
// on whether the user is hovering over a clickable element
// in the call window.
ipcMain.handle("set-ignore-mouse-events", (e, ...args) => {
  const win = BrowserWindow.fromWebContents(e.sender);
  win.setIgnoreMouseEvents(...args);
});

ipcMain.handle("close-app", () => {
  app.quit();
});
And that’s it! We’re done with the main entry point setup. Now, let’s go through the preload before we move on to all the fun video call bits.
Setting up the trayWindow preload script
We need just two imports in preloadTray.js: contextBridge and ipcRender:
const { contextBridge, ipcRenderer } = require("electron");
Then, we set up a couple of relevant listeners, allowing the main process to tell the tray window renderer process when an attempt to join a call has failed, or when a user left a call:
// This listener will allow us to handle a call join failure.
ipcRenderer.on("join-failure", () => {
  window.dispatchEvent(new Event("join-failure"));
});

ipcRenderer.on("left-call", () => {
  window.dispatchEvent(new Event("left-call"));
});
Finally, we expose a single function that the tray window renderer process can call to actually join a call. When a user fills in the join form in the tray window, it will call the api.joinCall() method below to forward the specified room URL and user name to the main process, which will then send it on to our call window process:
// Expose the joinCall function to the main world.
contextBridge.exposeInMainWorld("api", {
  joinCall: (url, name) => {
    ipcRenderer.invoke("join-call", url, name);
  },
});
Setting up the callWindow preload script
Clicking all the things
The first thing we want to do in our callWindow preload is make our application elements clickable. Remember that we set our call window to ignore mouse events up above. We want to do this to allow the user to interact with background applications while they are in a video call. But we also want them to still be able to interact with the call itself if they so choose.
So, when our DOM is loaded or when something new is inserted, we have the preload refresh our clickable app elements:
window.addEventListener("DOMContentLoaded", () => {
  refreshClickableElements();
});

window.addEventListener("DOMNodeInserted", () => {
  refreshClickableElements();
});
refreshClickableElements() finds all DOM elements which can be clicked, iterates over them, and adds listeners to detect mouse enter and leave events.
function refreshClickableElements() {
  const clickableElements = document.getElementsByClassName("clickable");
  const listeningAttr = "listeningForMouse";
  for (const ele of clickableElements) {
    // If the listeners are already set up for this element, skip it.
    if (ele.getAttribute(listeningAttr)) {
      continue;
    }
    ele.addEventListener("mouseenter", () => {
      ipcRenderer.invoke("set-ignore-mouse-events", false);
    });
    ele.addEventListener("mouseleave", () => {
      ipcRenderer.invoke("set-ignore-mouse-events", true, { forward: true });
    });
    ele.setAttribute(listeningAttr, true);
  }
}
Above, when the user hovers over a clickable element, we get Electron to stop ignoring mouse events. When the mouse leaves a clickable element, we’ll set the app to ignore mouse clicks once more.
Leaving a call from the system tray
Next, we create a listener which will be used when a user leaves a call from the system tray context menu. Remember that system tray actions are all controlled from the main process, and that we also have a separate button to leave a call from the call controls in the renderer process. This means we need to be able to leave a call from both ends of the stack.
ipcRenderer.on("leave-call", () => {
  window.dispatchEvent(new Event("leave-call"));
});
The above receives a "leave-call" event sent from the main process and dispatches another event to the call window's renderer process. The renderer process then handles communication with the Daily API and does everything we need to gracefully leave our WebRTC video call.
Joining a call
As we mentioned above, the call join form is in the tray window process. When a user fills in the form in the tray window, that data is sent back to the main process. The main process then emits a "join-call" event with the required call data, which the call window preload listens to.
ipcRenderer.on("join-call", (e, arg) => {
  const event = new CustomEvent("join-call", {
    detail: {
      url: arg.url,
      name: arg.name,
    },
  });
  window.dispatchEvent(event);
});
Above, when a "join-call" event is received by the call window preload, it dispatches a CustomEvent to the call window renderer process, which will then try to join a call.
Allowing call window renderer to talk to main
We also need to do some communication the other way around: from the call window renderer process to the main process. Remember that the main process controls the Electron app lifecycle, the system tray, and the window state. We need to be able to change some of these things based on user actions in the call renderer process.
To do this, we expose some functions which the renderer process can call. These then invoke other functions in the main process, acting as a bridge between the two:
contextBridge.exposeInMainWorld("api", {
  close: () => {
    ipcRenderer.invoke("close-app");
  },
  callJoinUpdate: (joined) => {
    ipcRenderer.invoke("call-join-update", joined);
  },
  leftCall: () => {
    ipcRenderer.invoke("left-call");
  },
});
And that’s it. We are done with the main process setup 🎉

Next steps
In part one of this Electron and Daily call object walkthrough, we:
- Went over the structure of our Daily video call desktop app
- Learned how to set up an application window which can overlay and allow us to interact with background apps
- Set up preload scripts so that our windows can interact with the main process and each other.
Let's move on to part two, where we'll implement the next piece of the puzzle: importing daily-js and joining a video call.