


[14/01/22] This demo app uses manifest v2. Manifest v2 is being deprecated by Chrome in 2022 and will no longer be accepted into the Chrome store. The Daily code included below is still valid, however.
This tutorial is part of a series on how we built Daily Collab, our latest Chrome extension demo, which lets you embed and transcribe Daily video calls in any Notion page.
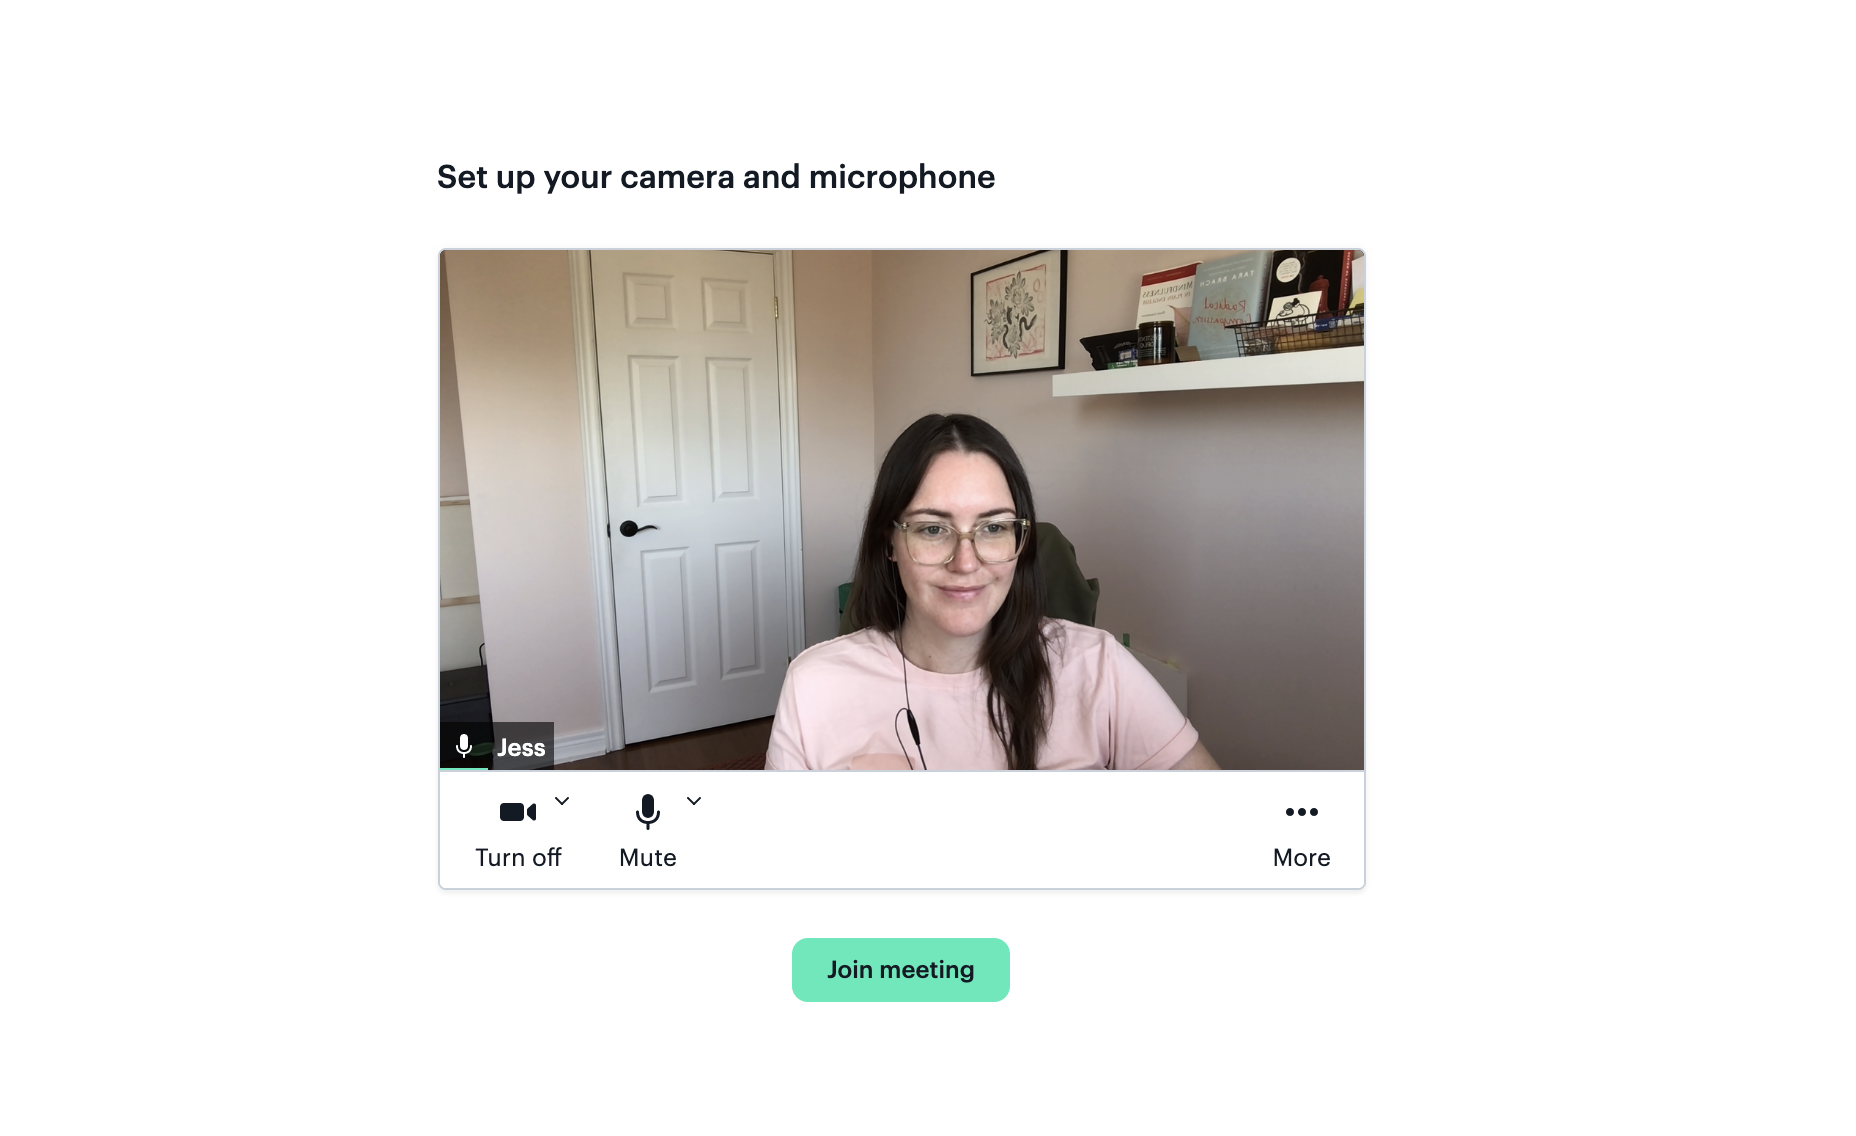
If you’ve taken a look at Daily Prebuilt, Daily’s “plug and play” option for embedding video calls into any app, you may have noticed the new prejoin UI that can be optionally displayed for participants before joining a call. The prejoin UI was built to solve a problem most of us can relate to: you join a call but no one can hear you, or the call is using the wrong webcam. Worse, you have lipstick on your teeth and don’t notice until the call ends.

Instead of fumbling at the start of a meeting, the prejoin UI allows participants to preview their video before joining, as well as select their preferred devices (camera and microphone), and set their username.
Giving participants the option to set themselves up before joining a call helps reduce a lot of in-call confusion or disruption. Since Daily Prebuilt is built with Daily’s own custom video APIs (call object mode), anyone using call object mode can also build a custom prejoin UI for their own app.
In today’s tutorial, we’ll look at how we built a custom prejoin UI (or a “hair check”, as we sometimes call it internally) for Daily’s latest Chrome extension demo, Daily Collab.
Getting started
To follow along in the full source code for Daily Collab, check out the Github repo.
If you want to test out Daily Collab, you can install it from the Chrome store or run it locally.
To run it locally, you will need to:
- Clone Daily Collab locally
- Run
npm installto install the dependencies - Run
npm run start - Load your extension on Chrome following:
- Access
chrome://extensions/ - Check
Developer mode - Click on
Load unpacked extension - Select the
buildfolder.
- Access
Determining our feature specifications
As a first step to building Daily Collab's prejoin UI, let’s first decide what it should do. For the initial v1 prejoin UI, we want the following features:
- Participants need to be able to decide which devices they want used in the call for a camera and microphone before joining.
- Participants need to be able to set their username for the call. We’ll also save the username in local storage so we can prefill the input later.
- Since this is a demo app with reduced scope, we won’t worry about adding buttons to turn video and audio on/off for now. This is a great feature to include in production apps, though!
- Participants should be allowed to not join the call from the prejoin UI. There should be a way to cancel the join flow.
In terms of features, that’s all we’ll try to cover for now but, as always, you can expand your app’s features as much as you’d like.
In terms of Daily room settings, Daily Collab only uses public rooms. That means Daily Collab does not use any of Daily’s features related to private rooms, such as knocking to enter or meeting tokens to authorize access.
Since rooms are public, the following tutorial does not cover the broader “lobby” functionality that Daily Prebuilt’s prejoin UI does, where participants can request access to a call. We'll cover this in a future tutorial, as we know it’s an important use case, too!
Pre-prejoin: How to determine when to show the prejoin UI
Daily Collab manages which view to show in Main.jsx, a parent component that is always rendered.
The current state of the call is tracked in the app by the state value callState, which updates with the function setCallState. (This state is initialized in CallProvider.jsx.)
The four possible callState values are:
idle: This is the default state

idle call statesetup: This state represents the stage prior to a participant starting a call while they’re selecting the call’s settings
setup call statehaircheck: This is our prejoin UI! 💫
haircheck call statejoined: This is the in-call state when the participant has successfully joined a new or existing Daily call.

joined call stateTo transition through these states, we’ll use the following Daily methods:
createCallObject()to create the Daily call object instancepreAuth()to get into our prejoin (orhaircheck) call statestartCamera()to make the local participants devices available before joining the calljoin()to actually join the callleave()anddestroy()to clean up after ending a call
Stepping through the pre-prejoin code
There are a number of steps that need to happen sequentially related to the app’s callState value to get to our prejoin UI. To get a better understanding of how callState is used, let’s look at Main.jsx:
export default function Main() {
const {
callState,
setCallState,
daily,
dailyUrl,
messageReceived,
setParticipants,
backgroundError,
authError,
leaveCall,
} = useCallState();
...
// if the Daily call object exists (triggered by createCallObject), go to the haircheck to join call
useEffect(() => {
if (!daily || !dailyUrl) return;
if (daily.meetingState() === 'joined-meeting') {
/**
* if the meeting is already joined, this indicates a tab change.
* for now, just exit the call.
*/
leaveCall();
return;
}
const setup = async () => {
await daily.preAuth({ url: dailyUrl });
await daily.startCamera();
setParticipants(Object.values(daily.participants()));
setCallState('haircheck');
};
setup();
}, [daily, dailyUrl]);
const mainContent = useMemo(() => {
if (!messageReceived) {
return <Loading />;
}
if (callState === 'idle') {
return (
<div className="authorized-container">
<Authorization />
{dailyUrl ? <JoinCallButton /> : <StartCallButton />}
<style jsx>{`
.authorized-container {
display: flex;
}
`}</style>
</div>
);
}
return (
<>
{callState !== 'joined' && (
<LightButton onClick={close}>
<span>Close</span>
</LightButton>
)}
{callState === 'setup' && <Setup />}
{callState === 'haircheck' && <Haircheck />}
{callState === 'joined' && <Call />}
</>
);
}, [callState, messageReceived, dailyUrl, close]);
return (
<div className="main-container">
{mainContent}
{(backgroundError || authError) && (
<ErrorMsg backgroundError={backgroundError} authError={authError} />
)}
<style jsx global>{`
...
`}</style>
</div>
);
}
This is a big chunk of code so let’s step through it from the perspective of a call participant interacting with the UI:
Main.jsxdetermines its main content based on the value ofcallStatein the memoized valuemainContent.- The initial value of
callStateisidle. InCallProvider.jsx, we can see it initialized like so:
const [callState, setCallState] = useState('idle');
- Before a call has been started, there will be no
dailyUrlvalue, because thedailyUrl(and Daily room) are created when a call is started by a Daily Collab user. Therefore, we can assume nodailyUrlmeans no live call. We can see this logic reflected in the return value of the main content block inMain.jsx:
if (callState === 'idle') {
   return (
     <div className="authorized-container">
     <Authorization />
       {dailyUrl ? <JoinCallButton /> : <StartCallButton />}
     </div>
   );
 }
- Depending on whether a live call is available to join, the local participant will either start a new call or join an existing call. In either case, an instance of the Daily call object (
createCallObject()inCallProvider.jsx) will need to be created to have a local instance of the call to join.
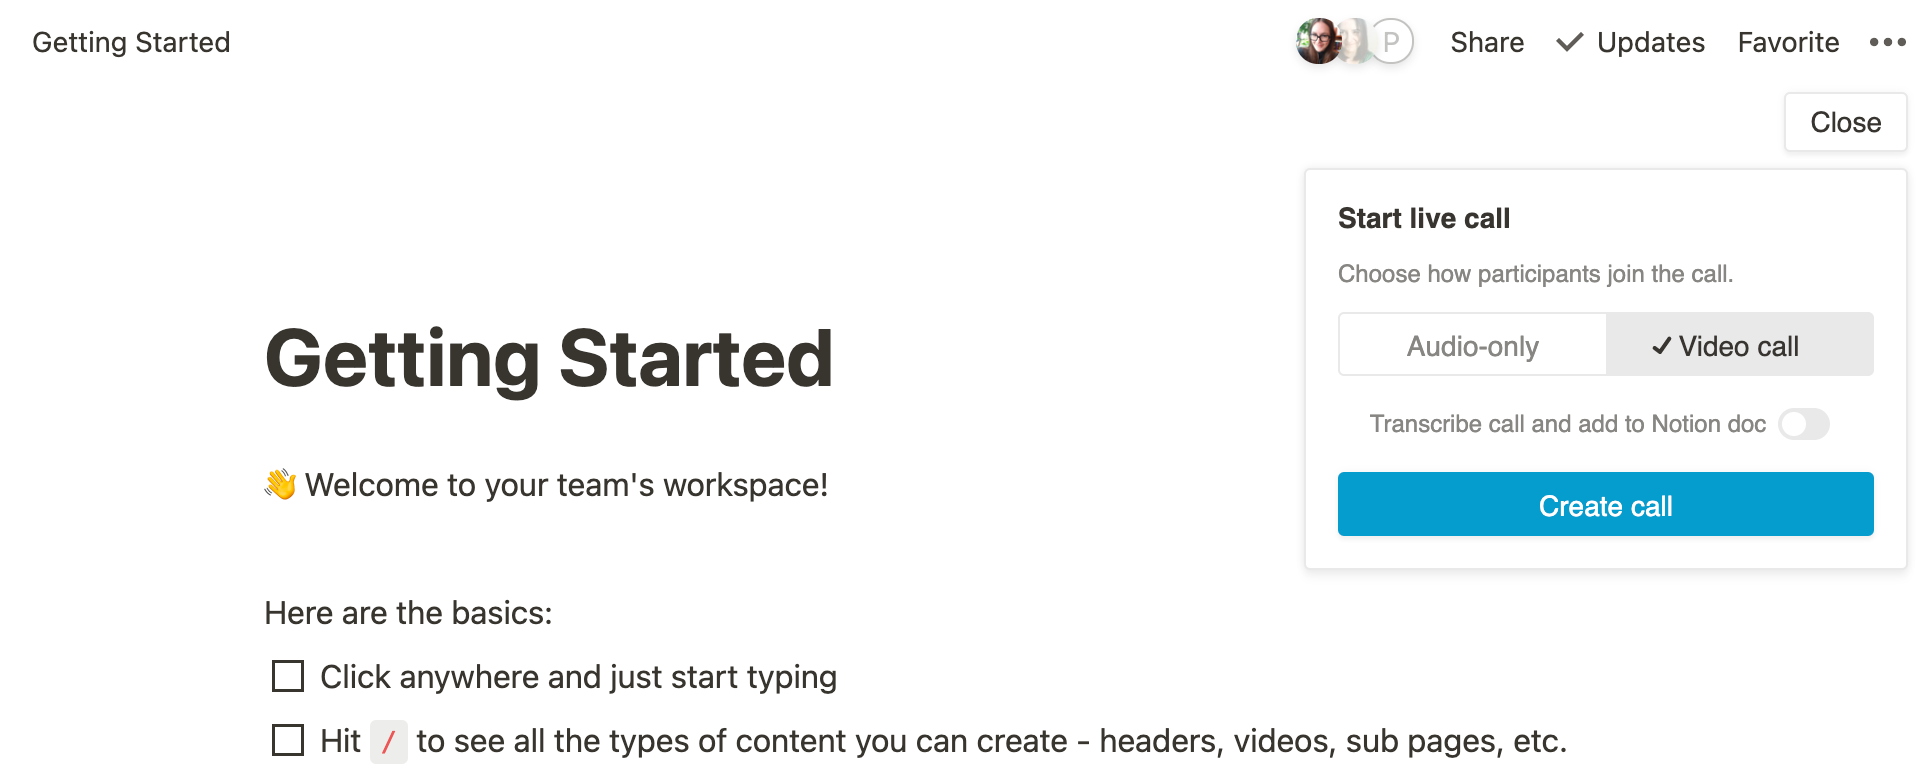
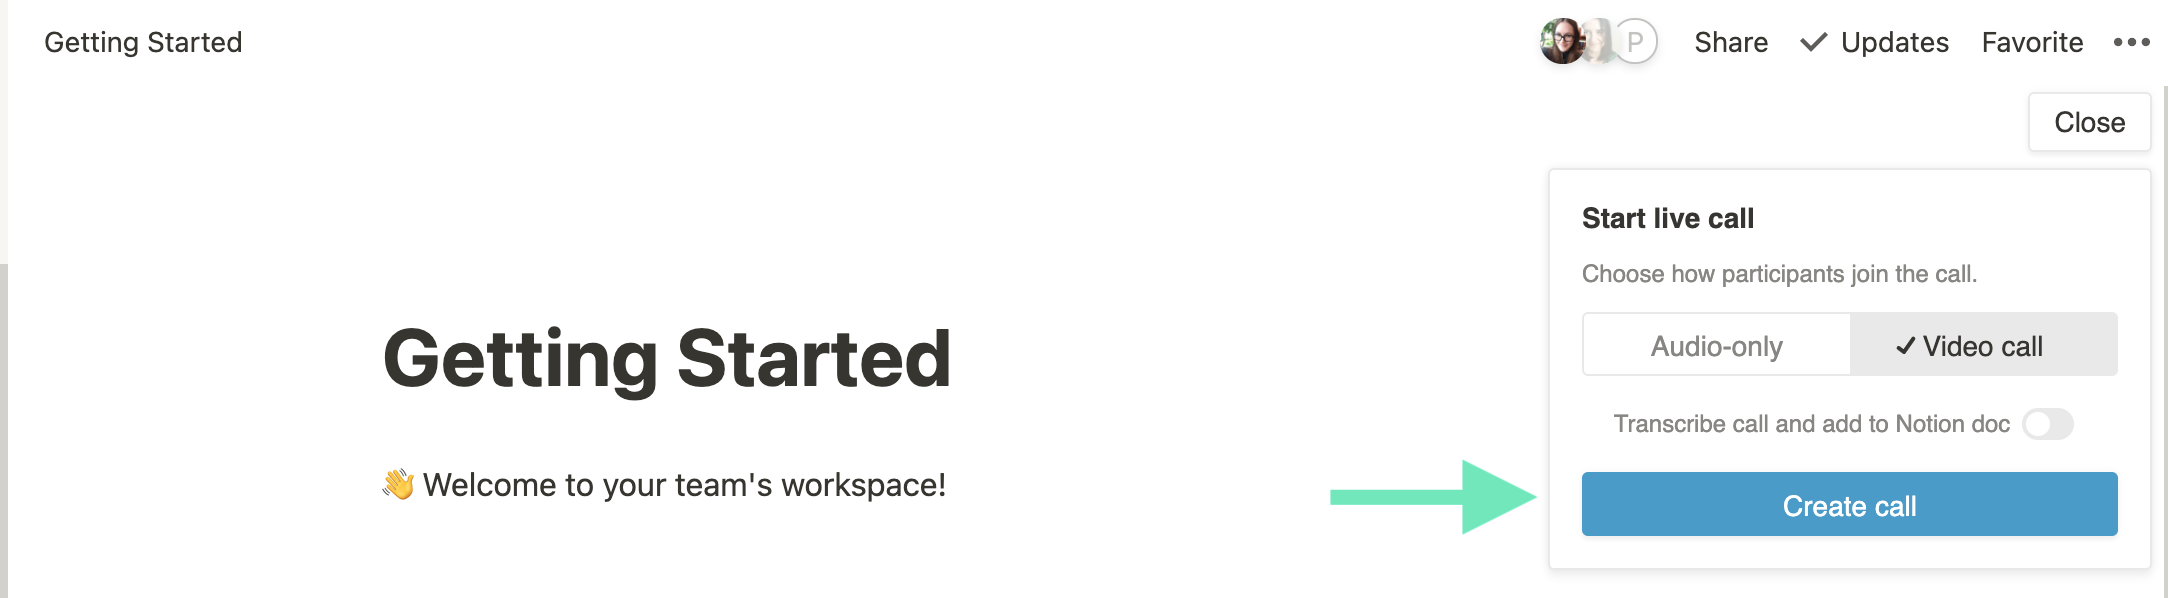
If they start a new call, createCallObject() is called from the Setup view once the new Daily room has been created by the background script and is available to join.
/**
  * Once the Daily room has been created by the background script after clicking the “Create call” button, the dailyUrl is set and the call object is created. The user will then be redirected to the haircheck
*/
 useEffect(() => {
   if (!dailyUrl) return;
   createCallObject();
 }, [dailyUrl]);
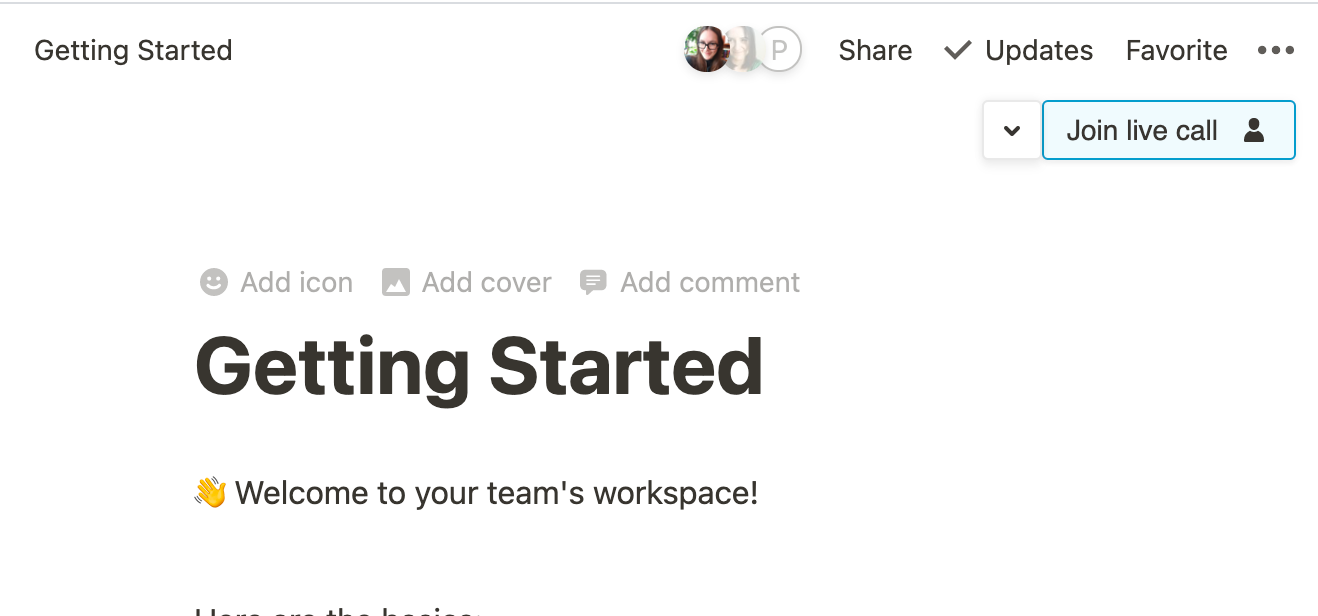
- At this point, depending on the view (Setup or “Join live call”), the participant either clicks the “Create call” or “Join live call” button to create the call object.
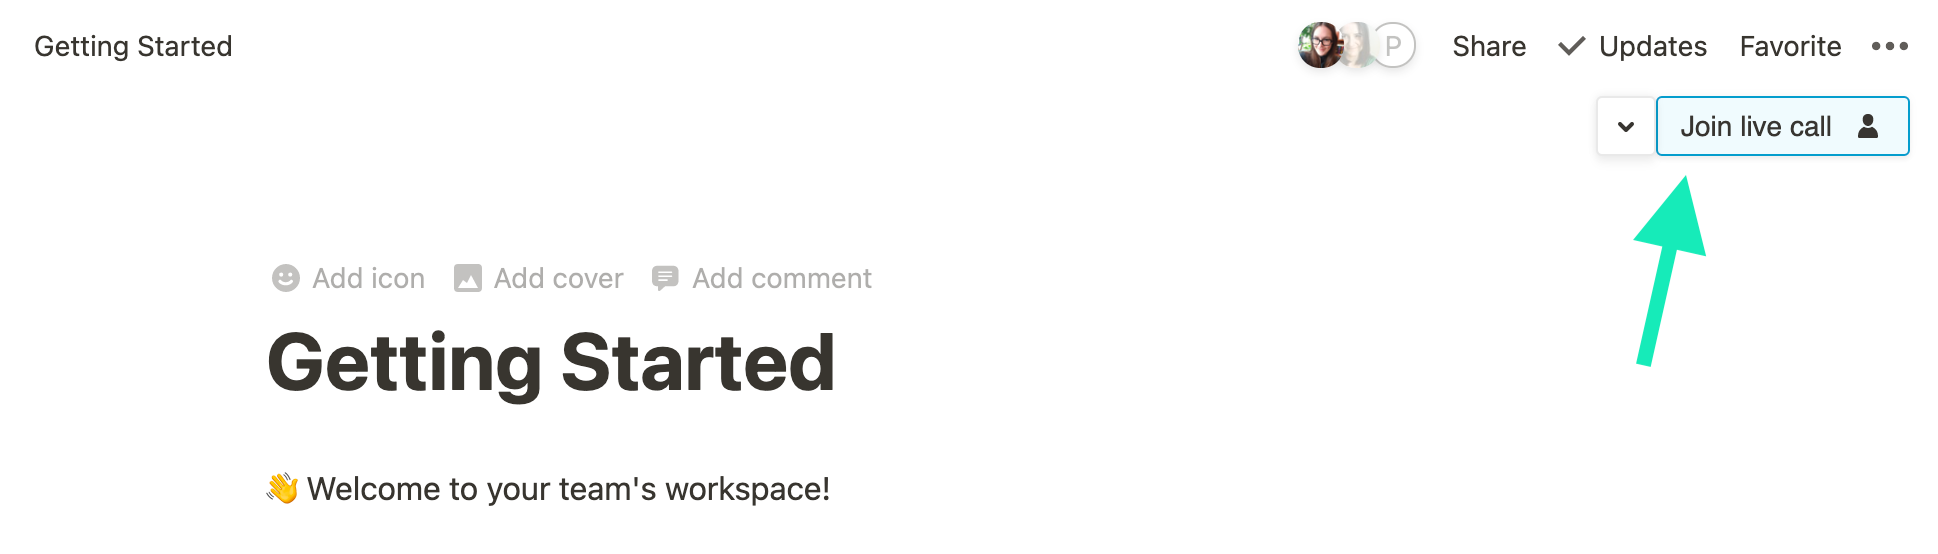
In both cases, the dailyUrl and call object (referred to as daily in the source code) will already exist, and we can transition to the prejoin (or haircheck) UI.
// if the Daily call object exists (triggered by createCallObject), go to the haircheck to give option to join call
 useEffect(() => {
   if (!daily || !dailyUrl) return;
   ...

   const setup = async () => {
     await daily.preAuth({ url: dailyUrl });
     await daily.startCamera();
     setParticipants(Object.values(daily.participants()));
     setCallState('haircheck');
   };

   setup();
}, [daily, dailyUrl]);- You’ll notice in the code block above, two Daily methods mentioned earlier are called prior to updating the
callStatevalue tohaircheck.
preAuth() gives us access to the Daily call before actually joining; however, this is limited access and most call information will still be hidden until the call is joined (like the participant count) for security purposes.
Note: the dailyUrl must be passed to preAuth() for it to work.
startCamera() provides access to the local participant’s devices (cameras and microphones) so we can create the device selection flow in the prejoin UI.
Note: These two methods are only used if you are building a prejoin UI flow. Otherwise, Daily’s join() method will take care of enabling device access.

- Once you have called
preAuth()andstartCamera(), we can finally build our prejoin UI. 🙌
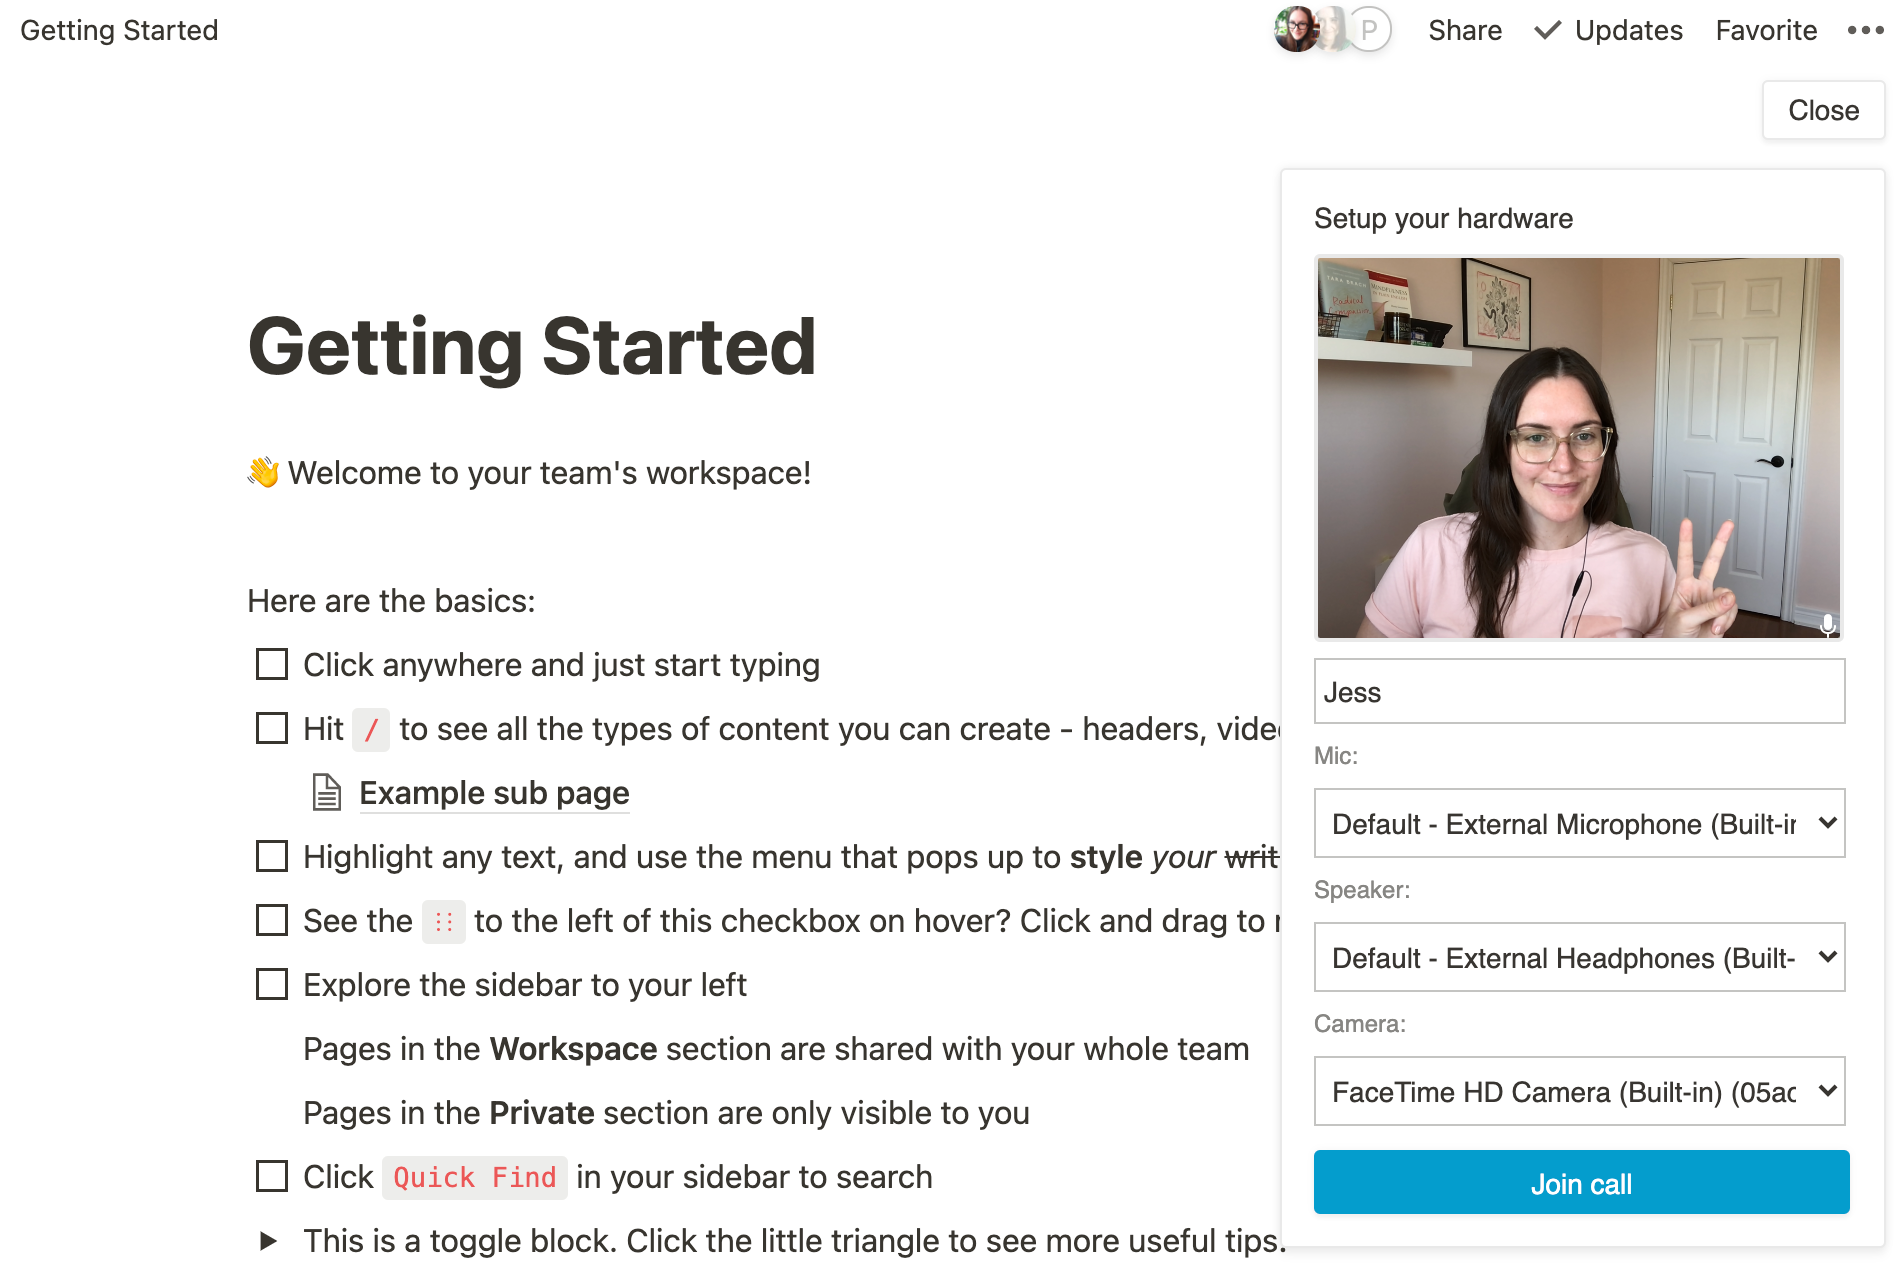
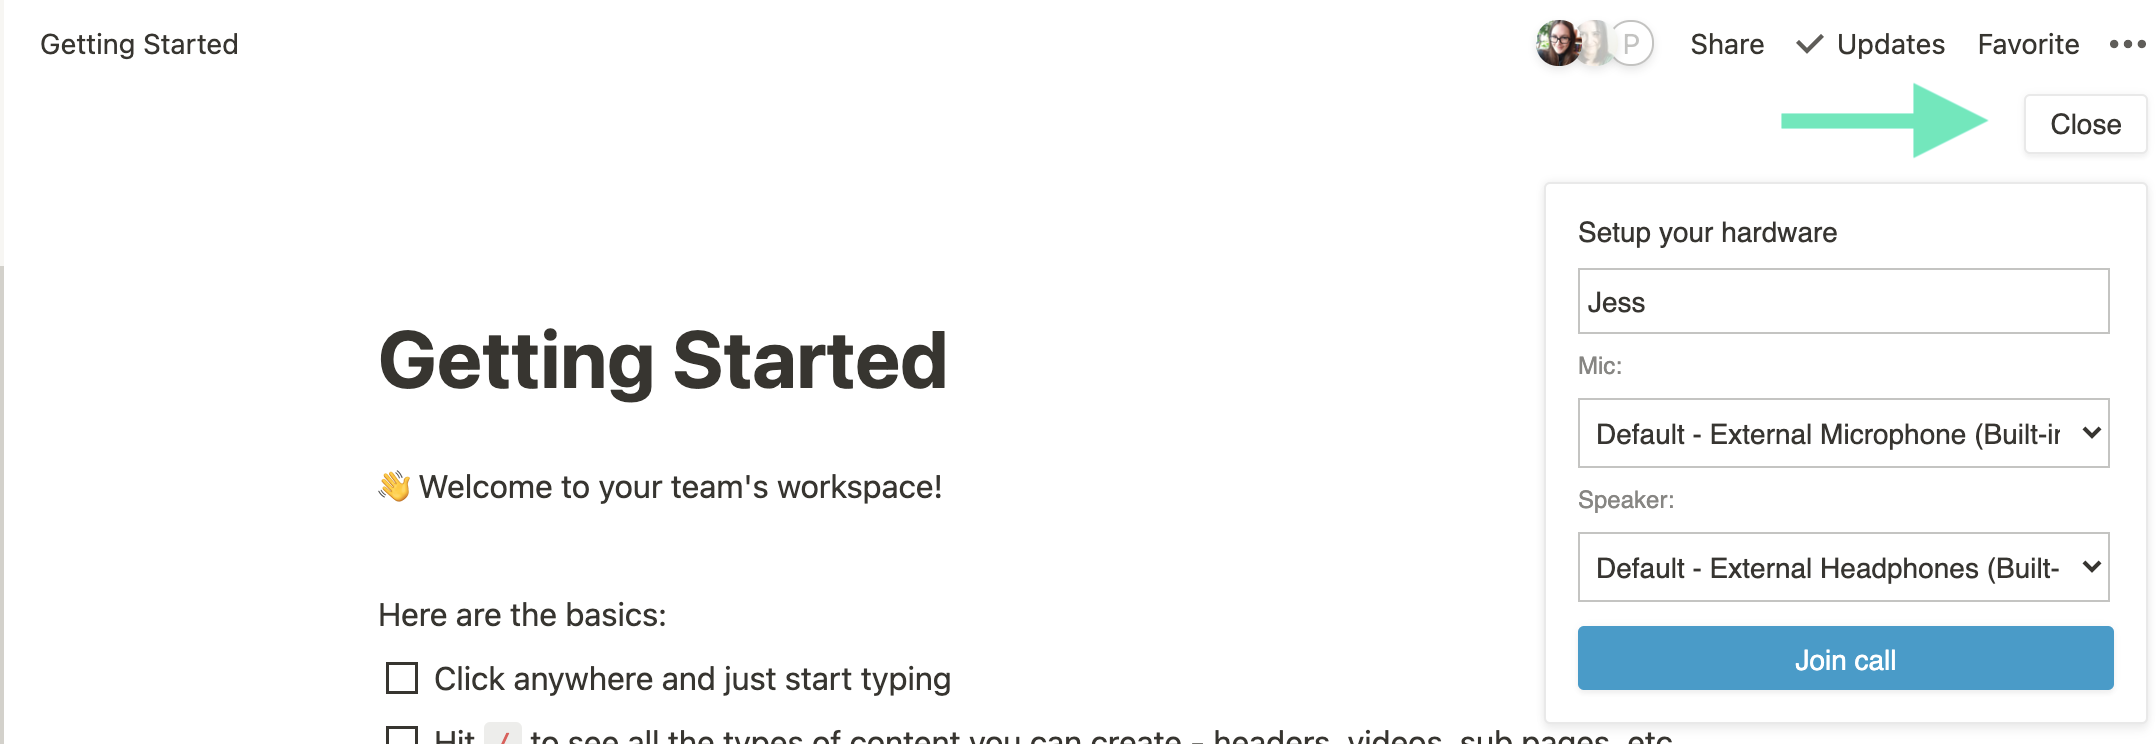
In Daily Collab, this includes an input to enter a username for the call, and a few <select>s to choose your preferred devices for the call.
Since Daily Collab offers video and audio calls, the camera input options are only available for video calls and audio input/output options are available for both. These elements are rendered by SettingOptions.jsx.
There is also a video preview of the local participant if they are joining a video call. This—and rendering the device options— is all handled in Haircheck.jsx.
- Once the local participant has set themselves up with the prejoin UI, they are then ready to join the call. In
Haircheck.jsx, a join button is rendered like so:
<BlueButton onClick={joinCall}>Join call</BlueButton>
Clicking this button calls joinCall, which— unsurprisingly— calls the Daily method join(), mentioned earlier.
 /**
  * Join Daily call
 */
 const joinCall = useCallback(() => {
   setButtonLoading(true);
   if (!daily) return;
   const userName = inputRef?.current?.value?.trim();

   if (userName) {
     localStorage.setItem('daily-notion-username', userName);
   }

   daily
     .join({ userName })
     .then(() => {
       setCallState('joined');
       setButtonLoading(false);
     })
     .catch((e) => {
       console.warn(e);
       setCallState('error');
       setButtonLoading(false);
     });
 }, [daily, dailyUrl]);
Let’s go through what’s happening here in order. We:
- Update the join button to be in a loading state to accommodate the async actions about to happen
- Get the username from the username input. (We’re accessing it through the input’s ref)
- If there is a username, set it in
localStorageso we can prefill the input next time the user opens the prejoin UI - Finally, join the Daily call with the Daily
join()method and update thecallStatetojoinedto redirect the user to the call UI.
Note: There is also a Close button in the prejoin UI that will call the Daily leave() and destroy() methods so the participant doesn’t feel forced to join.
Once the participant has joined the call, the prejoin flow is complete and they are ready to get chatting. 😊
Wrapping up
Now that we know how to add a prejoin UI to a Daily app, the UI and additional features can be customized as much as you’d like. As mentioned before, this demo does not accommodate private room access management, so we’ll cover that in an upcoming tutorial.
To learn more about prejoin UI or to get inspired by additional features you can add to it, check out Daily Prebuilt and be sure to turn on the prejoin UI feature through the Daily Dashboard.
Never miss a story
Get the latest direct to your inbox.