


What is Daily?
At Daily, we build video APIs to simplify adding video chat to any website or app. Developers can use our tools to embed a prebuilt call interface that works across browsers and devices in minutes.
This post walks you through those minutes. Using our prebuilt interface, we’ll cover how to:
- Create your first API generated video chat room.
- Customize room settings using configuration properties.
- Control who can access your room with meeting tokens.
- Embed a Daily room in a web page.
- Review data about your rooms and calls.
Of course, there’s so much more you can do with Daily. Our API also supports advanced features and customization, like building your own text chat within a video call. For the purpose of getting started, though, in this post we'll stick to the prebuilt UI.
1. Create your first API generated video chat room
If you haven’t already, sign up for a Daily account. When you create an account, you also create a unique Daily URL.
A room URL is made up of your unique Daily URL followed by the room name. Each room URL points to a unique video chat location, and looks something like:
https://your-domain.daily.co/<room-name>/.
Let’s create a room with the obvious name my-first-daily-room.
You can create rooms either through a POST request to the /rooms Daily API endpoint, or from the dashboard. Let’s look at both options.
Option 1: Use the /rooms endpoint
Find your API key in the "Developers" tab of the Daily dashboard. Click the dots to the right of the key to copy it to your clipboard.
You’ll send your key as an authorization header in your POST request. A curl command would look like:
curl --request POST \
     --url https://api.daily.co/v1/rooms \
     --header 'authorization: Bearer INSERT_YOUR_API_KEY_HERE' \
     --header 'content-type: application/json' \
     --data '{"name":"my-first-daily-room"}'
If all goes as planned, you should see a response like this:
{
"id":"5b5ef36e-df9f-488e-85d9-95ff795b36e5",
"name":"my-first-daily-room",
"api_created":true,
"privacy":"public",
"url":"https://your-domain.daily.co/my-first-daily-room",
"created_at":"2020-07-20T17:40:14.967Z",
"config":{}
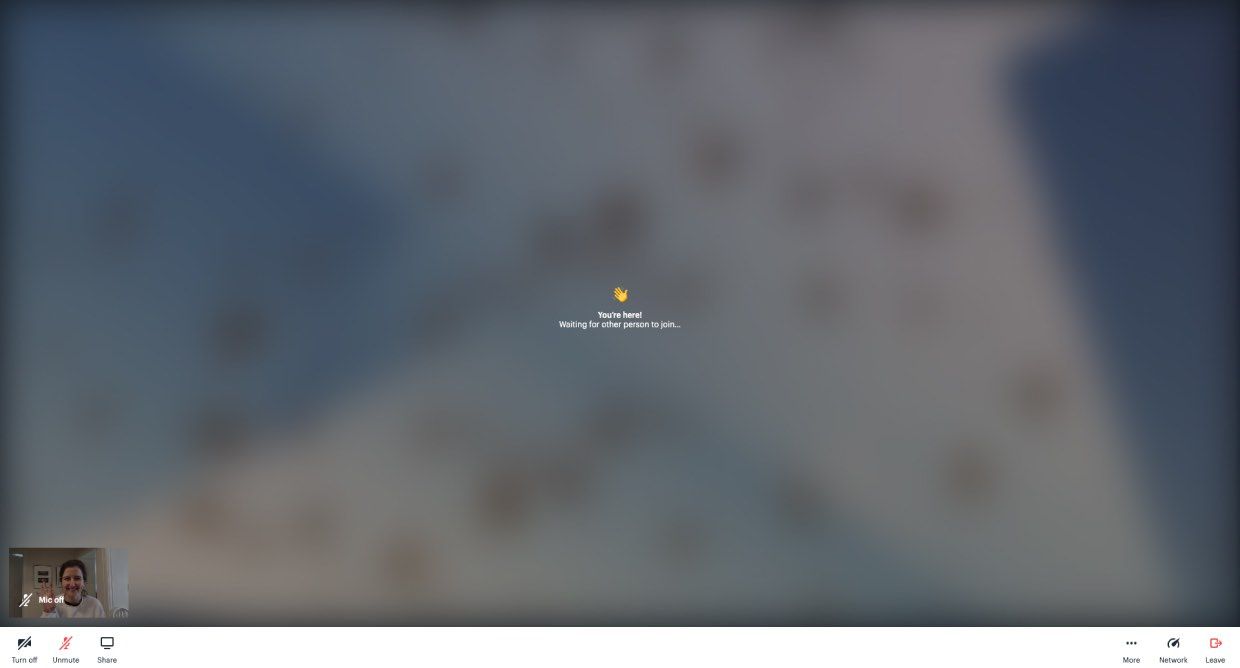
}After url, you'll see the unique Daily domain URL you set up when you signed up for a Daily account, followed by the room name. Copy and paste the URL in your browser. You should now be in a video call, waiting for the other person to join:
Option 2: Generate a new room from the dashboard
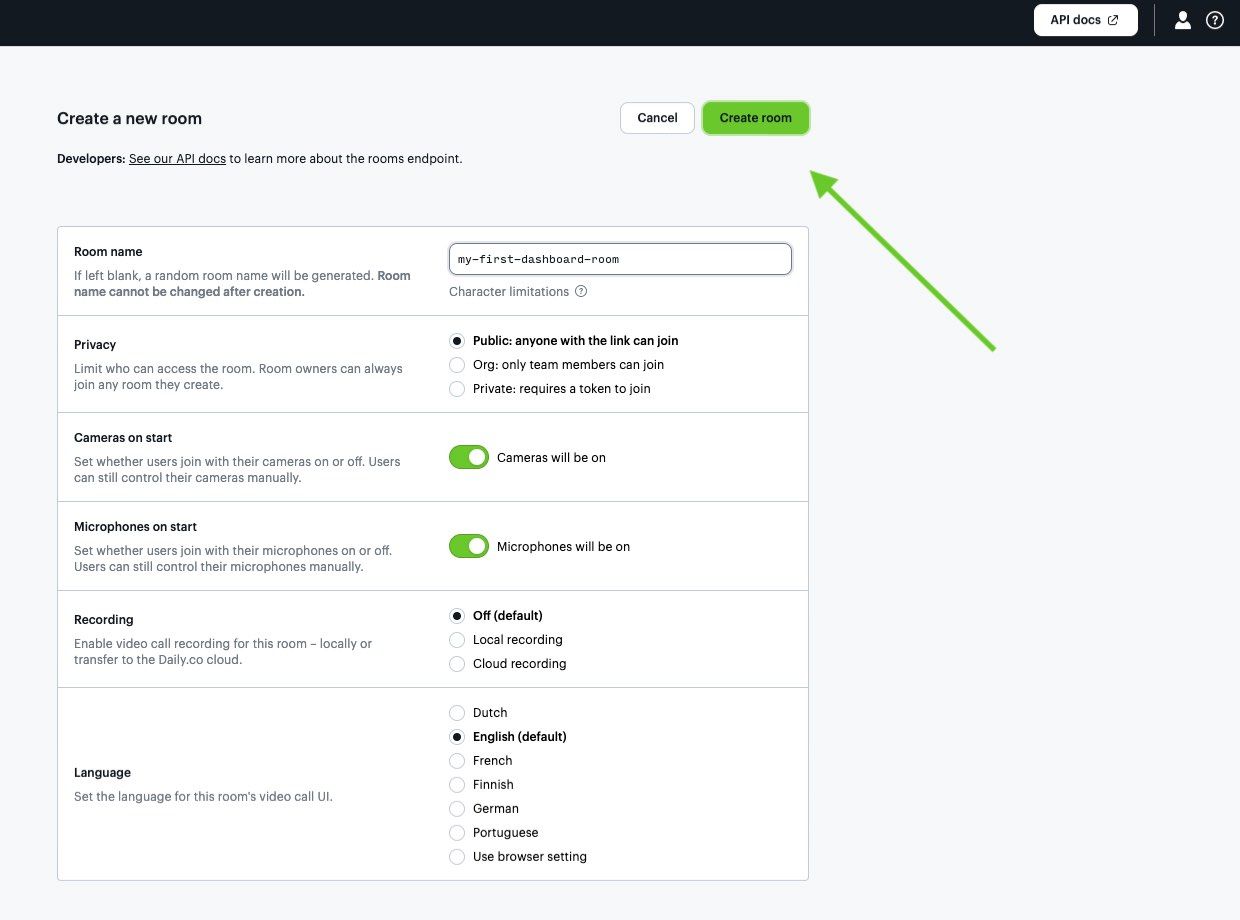
To create a room from the Daily dashboard, head to the “Rooms” tab, and click the “Create room” button at the top right corner. From there, you’ll be taken to a screen that prompts you to specify characteristics about the room. We’re just concerned with specifying a name right now, so type that in and click "Create room.”
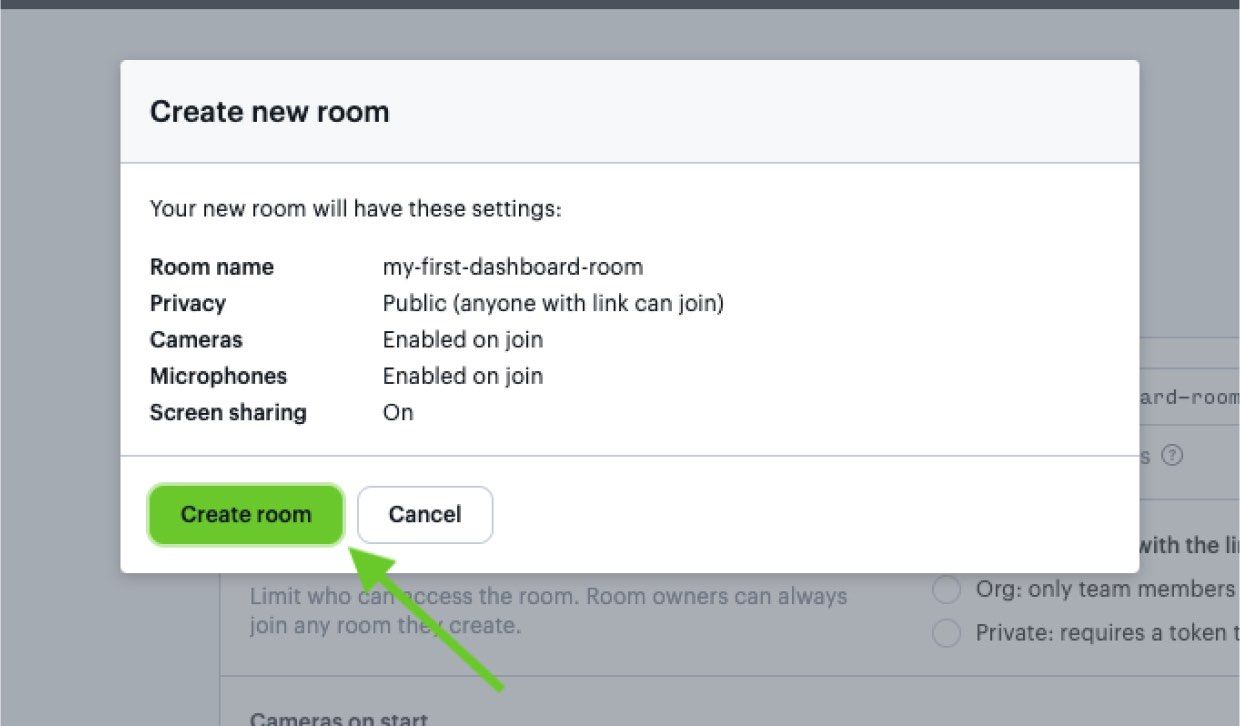
You’ll be prompted to confirm that your room settings all look correct. If they do, click “Create room” one last time:
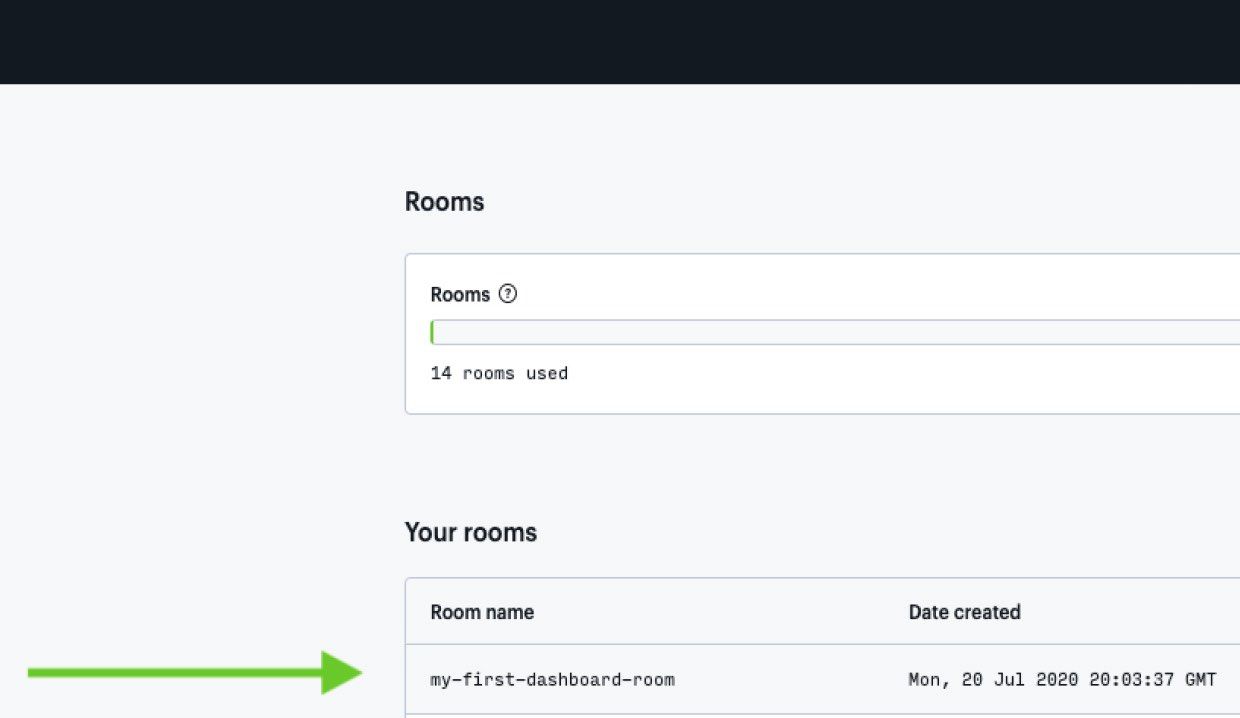
With that, you’ll be brought back to your "Rooms" page. You can find the room you most recently created at the top of the "Your rooms" list:
Copy the room URL to your clipboard, and open a new tab to make sure it works as expected.
2. Customize room settings using configuration properties
Different video calls have different needs. Sometimes you might want text chat enabled. In webinars or other group meetings, you might want to turn off videos for everyone but the person leading the meeting.
You can set these and many other room settings via the Daily API room configuration properties.
For example, let’s create a webinar room with text chat turned on so participants can ask questions, but with videos turned off for everyone but the meeting owner. Finally, let’s also make it a private room:
curl --request POST \
     --url https://api.daily.co/v1/rooms \
     --header 'authorization: Bearer INSERT_YOUR_API_KEY_HERE' \
     --header 'content-type: application/json' \
     --data '{"properties": {"enable_chat":true,"owner_only_broadcast":true},"name":"private-webinar-with-chat", "privacy":"private"}'
Your response should look very similar to the response we received after creating the first room, but it should now include some config data. When you test out the returned URL in your browser, you should see a chat button in the bottom left corner. Paste the URL in a fresh incognito window, and you should see a message that says “You are not allowed to join this meeting”, because we set the room to private (more on that in the next section).
If you’ve read this far you probably know you can create rooms from the Daily dashboard, so it should come as no surprise that you can also customize rooms there. If you scroll down on the “Create room” page, you’ll see an option to “Show advanced room settings.” From there, you can set room configuration [0].
3. Control who can access your room with meeting tokens
You might want to restrict who can join a room, and how they can participate in a meeting. After you create a room with the privacy property set to private (like we did in #2), you’ll need to generate a Daily meeting token.
A meeting token controls how a particular user experiences your room. Under the surface, a meeting token is a JSON Web Token (JWT). The token contains information about the participant, like whether they are an owner of the meeting, whether a recording should start when they join, and lots of other potential properties.
Let's keep building a private webinar with text chat enabled. We’ll need two tokens:
- Instructor: Person who will be leading and “owns” the webinar. We want recording to start when they join the room [1].
- Attendee: Someone who is able to join the meeting. In a private room, attendees need tokens in order to enter.
The instructor will need a token with the properties:
"room_name": "private-webinar-with-chat""is_owner": true"start_cloud_recording": true"user_name": "Instructor"
We’ll send a POST request to the Daily /meeting-tokens API endpoint to create the token:
curl --request POST \
     --url https://api.daily.co/v1/meeting-tokens \
     --header 'authorization: Bearer INSERT_YOUR_API_KEY_HERE' \
     --header 'content-type: application/json' \
     --data '{"properties":{"room_name":"private-webinar-with-chat","is_owner":true,"start_cloud_recording":true,"user_name":"Instructor"}}'
You’ll receive a token in response:
{"token":"eyJhbGciOiJIUzI1NiIsInR5cCI6IkpXVCJ9.eyJyIjoicHJpdmF0ZS13ZWJpbmFyLXdpdGgtY2hhdCIsIm8iOnRydWUsInNyIjp0cnVlLCJ1IjoiSW5zdHJ1Y3RvciIsImQiOiJhMzAyNTExNy1iZWJlLTRlNTUtYmUyOC0yYTI4MWM1YjdhYjAiLCJpYXQiOjE1OTU1NDE3NzJ9.d5tqZgRsHdgVIjOt9_CW-tSuPyVKLu0X6sYY4jAUhCw"}The attendee will need a similar token, but since they only need a token to enter the room, theirs is pretty simple:
"room_name": "private-webinar-with-chat""user_name": "Attendee"
Here's what that request would look like:
curl -request POST \
    --url https://api.daily.co/v1/meeting-tokens \
    --header 'authorization: Bearer INSERT_YOUR_API_KEY_HERE' \
    --header 'content-type: application/json' \
    --data '{"properties":{"room_name":"private-webinar-with-chat","user_name":"Attendee"}}'
Successful response:
{"token": "eyJhbGciOiJIUzI1NiIsInR5cCI6IkpXVCJ9.eyJyIjoicHJpdmF0ZS13ZWJpbmFyLXdpdGgtY2hhdCIsInUiOiJBdHRlbmRlZSIsImQiOiJhMzAyNTExNy1iZWJlLTRlNTUtYmUyOC0yYTI4MWM1YjdhYjAiLCJpYXQiOjE1OTU1NDU1MzR9.Wl36ozwXyuY04F3H8dOIjx6CHdwcK3nSCD7-leXwGQg"}We can quickly test each of these tokens in our browser. We just need to append the t=INSERT_TOKEN query to the end of our room URL, e.g:
https://your-domain.daily.co/private-webinar-with-chat?t=INSERT_TOKEN_HERE
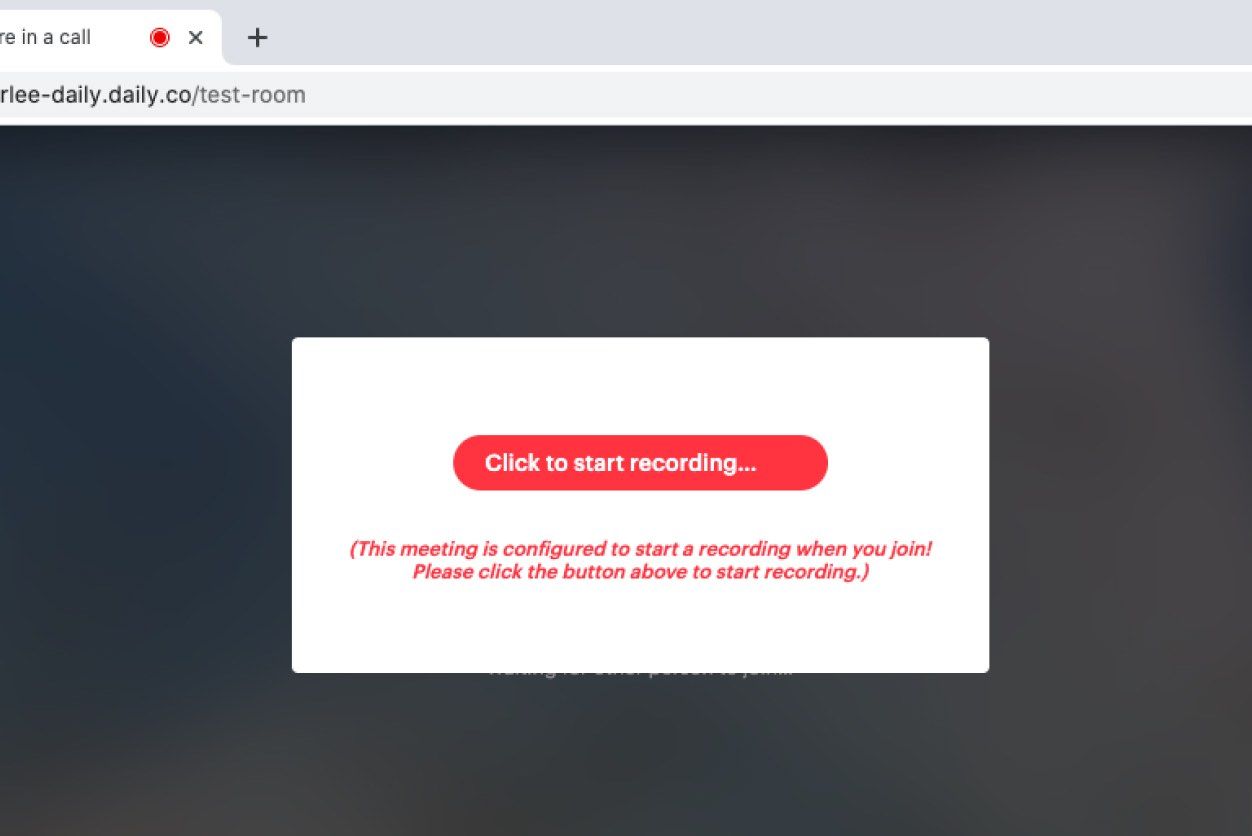
Start with the Instructor token. You should see a prompt to “Click to start recording…” after you visit the URL. Don’t worry about actually recording; just make sure the prompt is there.
In a fresh incognito window, try the attendee token. You should be in a meeting with your camera and mic off, with only the option to text chat in your toolbar. This is because we set up our room as a private webinar. Go ahead and close this incognito window.
Now, to confirm the room is private, try joining in an incognito window again, but this time without a token. You should be greeted with the message that you are not allowed to join this meeting.

Testing meeting tokens in the browser is fine for quick prototyping, or for getting to know the Daily API. In production applications, however, you’re going to want to generate your tokens and meeting rooms dynamically server side, without revealing them on the frontend. Read about how to set up an instant server with Glitch. And, to dive deeper on tokens, see our intro to room access control blog post.
4. Embed a Daily room in a web page
While you can send the room URLs you create directly to participants, developers often want to embed calls within their own web pages.
To do this as quickly as possible, modify any html file:
- Add the
daily-jsscript to the<head>. - Add a
<script>tag in the<body>, if there isn’t one already. - Create the Daily Iframe in the second script.
- Call the Daily
.join()method, passing in your room URL as a parameter.
Using the URL from #1, your code might be:
<head>
    <script crossorigin src="https://unpkg.com/@daily-co/daily-js">
    </script>
</head>
<body>
    <script>
        callFrame = window.DailyIframe.createFrame();
        callFrame.join({
            url: "https://your-domain.daily.co/my-first-daily-room"
        });
    </script>
</body>
It’s also possible to pass styling parameters to .createFrame(), if you want to add a bit of customization to the call [2]. This example sets a call to fullscreen:
callFrame = window.DailyIframe.createFrame({
    showLeaveButton: true,
    iframeStyle: {
        position: 'fixed',
        width: '100%',
        height: '100%'
    }
});
5. Review data about your rooms and calls
With all that experimenting, we’ve probably racked up some time in the rooms we created. We can see all of our meeting analytics by querying the /meetings endpoint. To see data about specific rooms, we can append the room names.
To see all of your rooms’ data:
curl --request GET \
       --url https://api.daily.co/v1/meetings \
       --header 'authorization: Bearer INSERT_YOUR_API_KEY_HERE'
Getting data for a specific room:
curl --request GET \
       --url https://api.daily.co/v1/meetings/my-first-daily-room \
--header 'authorization: Bearer INSERT_YOUR_API_KEY_HERE' The responses tell us how long the calls were, who was in every call, and how long each participant stayed. You can analyze these meeting analytics to improve call quality. You can also have a look at your overall high level Daily metrics, like the number of minutes used and rooms created, from the "Overview" page of the dashboard.
Dive deeper with Daily
We hope this guide gives you a start to finish high-level overview of interacting with the Daily API. If you’re looking to go a bit further, experiment with more advanced features like live streaming or track subscriptions.
As always, please reach out any time with feedback. If there’s anything we can do to make this guide more helpful, please let us know!
[0] Check out all the other new tools we recently added to the dashboard.
[1] Recording is a feature of the Daily Scale plan.
[2] For more complex customization, use the createCallObject daily-js method, or check out our React blog post.
Finally, if you clicked on this post from our blog directory, you might've noticed a directory photo. Thanks to Francesco Gallarotti on Unsplash for that!
Never miss a story
Get the latest direct to your inbox.