
This post is part four of a series on how to build an app with spatialization features using Daily's real time video and audio APIs.
Introduction
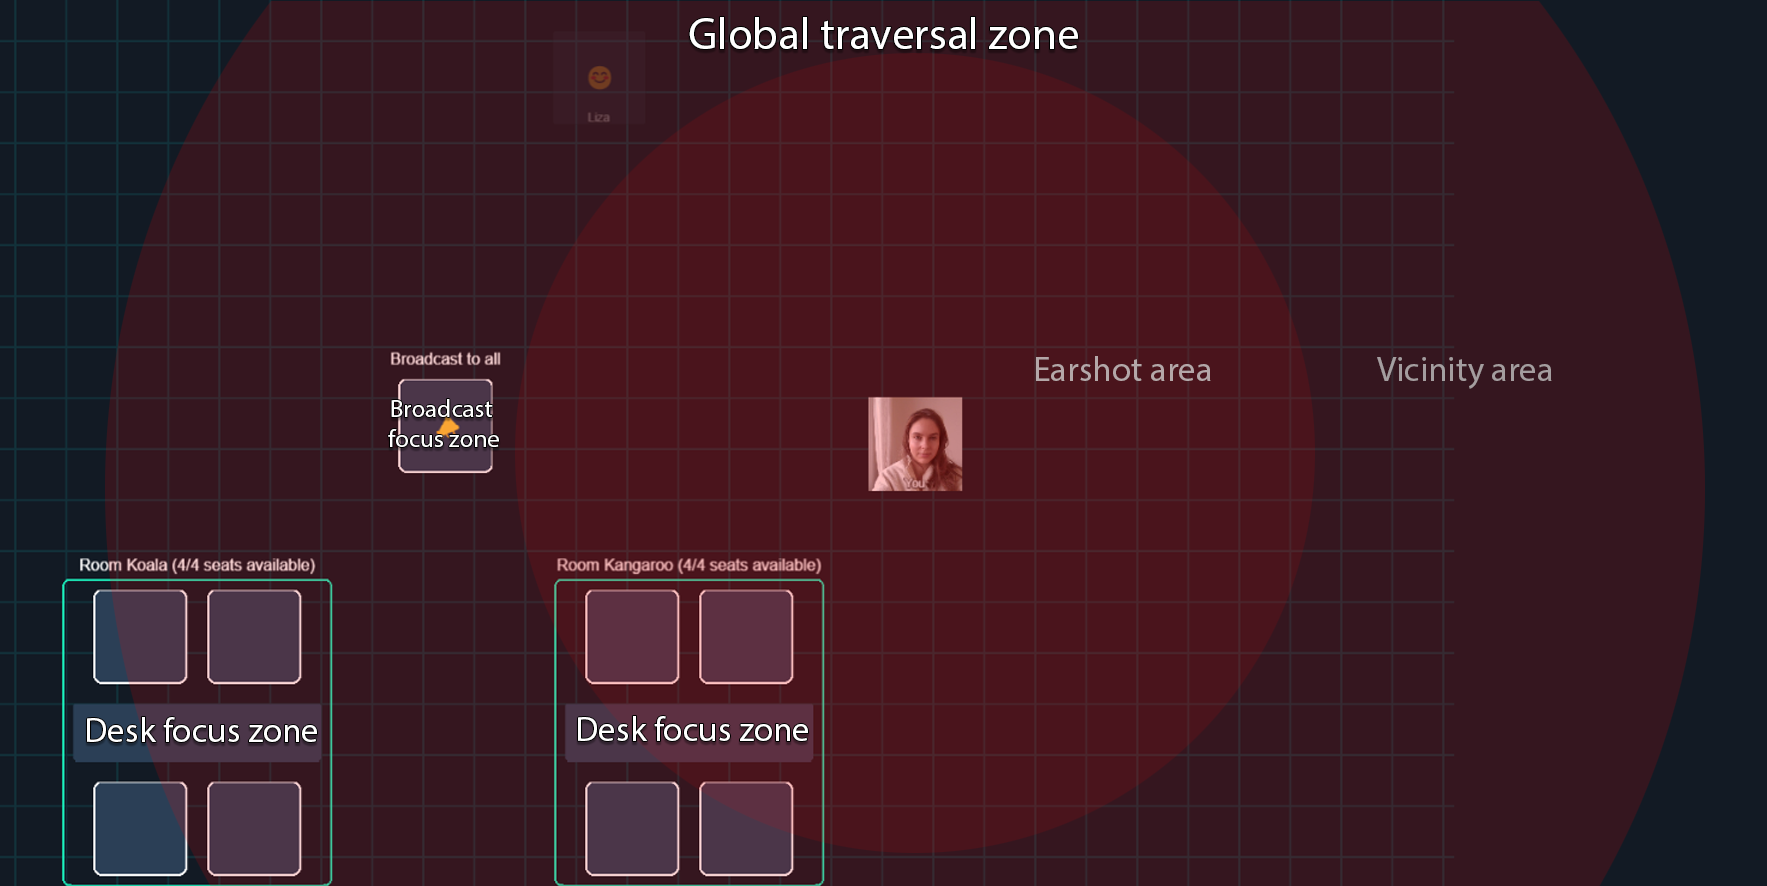
In the previous post of our spatialization series, we went through how our 2D world is constructed and how users send and receive each other’s position data.
To recap, we are building a 2D world with TypeScript and PixiJS in which participants’ video and audio track volume, fade, and pan are affected by their proximity to each other. To check out the full tech stack and learn how to run the demo locally, check out part one of our series.
In this post, we’ll dig into how users’ video and audio tracks are managed, how we work with user proximity, and how we build our audio graph to implement spatial audio features in the world.
The User and their UserMedia
Every participant in our Daily video call has a User instance associated with it. A user has two possible texture types: a default texture and a video texture. In PixiJS, a texture is one of the main resources which can be displayed on the screen. It is an image associated with a sprite, defining what our sprite looks like in the world. A texture can be created from various types of backing resources: an image, a video, or even an HTML5 canvas.
A sprite is one of the most basic renderable objects in PixiJS. A sprite contains all the data associated with displaying an object in the world: such as a texture, a position, a size, and any other relevant display states.
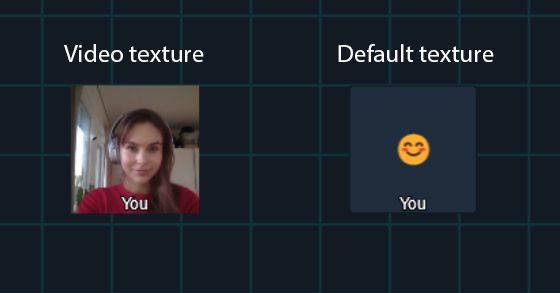
When a user is spawned, we use the default texture. We want to toggle this to a video texture in the following cases:
- We have a video track, the user is a local user, and the user is in our global zone (the one we traverse in).
- We have a video track and the user is in close enough proximity to the local user.
Our logic for showing the video texture or not is independent of track subscriptions themselves. We may have a video track for a user, but not show it.
When we do want to show the video texture, we call the private setVideoTexture() method on the User class. We've left inline comments below to help explain each step:
 private setVideoTexture(forceReset = false) {
    // If the user already has a video texture set and we didn't
    // specify a force reset, early out.
    if (this.textureType === TextureType.Video && !forceReset) {
      return;
    }

    // If the user has no video track, early out.
    const videoTrack = this.media.getVideoTrack();
    if (!videoTrack) return;

    // If we're already waiting for a video texture to be set,
    // early out.
    if (this.videoTextureAttemptPending) {
      return;
    }

    // If the video tag we'll be using to create this texture is
    // not yet playing, create a pending attempt.
    if (!this.media.videoPlaying) {
      console.log(
        "video not playing; will set texture when play starts",
        this.userName
      );
      this.videoTextureAttemptPending = Date.now();
      this.setDefaultTexture();
      this.media.setDelayedVideoPlayHandler(() => {
        console.log("video started playing - applying texture", this.userName);
        this.media.setDelayedVideoPlayHandler(null);
        this.videoTextureAttemptPending = null;
        this.setVideoTexture();
      });
      return;
    }

    this.textureType = TextureType.Video;

    // Create a base texture using our video tag as the
    // backing resource.
    let texture = new PIXI.BaseTexture(this.media.videoTag, {
      mipmap: MIPMAP_MODES.OFF,
      resourceOptions: {
        updateFPS: 15,
      },
    });
    texture.onError = (e) => this.textureError(e);

    let textureMask: PIXI.Rectangle = null;

    // Set our texture frame to ensure correct dimensions
    // and aspect ratio based on the size of the backing
    // video resource.
    const resource = texture.resource;

    let x = 0;
    let y = 0;
    let size = baseSize;
    const aspect = resource.width / resource.height;
    if (aspect > 1) {
      x = resource.width / 2 - resource.height / 2;
      size = resource.height;
    } else if (aspect < 1) {
      y = resource.height / 2 - resource.width / 2;
      size = resource.width;
    } else {
      texture.setSize(baseSize, baseSize);
    }
    textureMask = new PIXI.Rectangle(x, y, size, size);

    // Create and set our video texture!
    this.texture = new PIXI.Texture(texture, textureMask);

    // Ensure our name label is of the right size and position
    // for the new texture.
    this.tryUpdateNameGraphics();
  }
Above, we early out of the method if:
- The texture type is already
Videoand the caller did not request a force-reset - The user does not have a video track to use for a video texture
- We’re already waiting for a video texture to be set
The latter case would be hit if we tried to set a video texture before the backing video tag has started playing. The video must be playing for the texture to be set successfully, so if it isn’t, we wait until it is and then attempt to set the texture again.
We then create a base texture from our user’s video tag. PixiJS is able to handle the video tag resource we pass in and create this for us. Next, we create a rectangular frame to apply onto the texture. This ensures we show a proportional view of the user’s video feed regardless of their track’s aspect ratio.
Finally, we create a PixiJS texture from our base texture and frame, and set it on the sprite.
The result is that our sprite now has a video texture set, displaying their video track.
When would we force-reset the video texture?
As you can see above, we pass a boolean to setVideoTexture() to optionally force-reset the texture even if the sprite’s texture is already set to TextureType.Video. You might wonder when we ever want to force-reset an existing video texture.
We want to do this when the size of the backing video track changes – for example, when video constraints are modified, as they are with the setBandwidth() usage we covered in part two of this series! As we mentioned in that post, the world and sprites within it should function regardless of the implementation details or variation of our media tracks. They should not rely on any particular aspect ratio or dimensions of their backing tracks. This is why in the User constructor, we set a handler to listen for video resize events:
    this.media.addVideoResizeHandler((e: UIEvent) => {
      this.videoTextureResized(e);
    });
So if the user’s video is resized for any reason, the sprite can adjust its texture appropriately:
  // If the video is resized, we will need to recalculate
  // the texture dimensions and mask.
  private videoTextureResized(e: UIEvent) {
    if (this.textureType === TextureType.Video) {
      this.setVideoTexture(true);
    }
  }
Managing user tracks
Who tracks the tracks?
Every user has an instance of UserMedia, which holds their video and audio tags and tracks. This class is responsible for managing our media tracks and any focus tiles when the user is in non-global zones.
Updating media tracks
You may remember that when we get a "participant-updated" event from Daily, the handler calls world.updateUser() and passes the updated participant's session ID, username, and tracks to the world. world.updateUser() is a small method which finds the user in our user container by session ID and calls user.updateTracks() on it:
 updateUser(
    id: string,
    name: string,
    video: MediaStreamTrack = null,
    audio: MediaStreamTrack = null
  ) {
    const user = this.getUser(id);
    if (user) {
      user.updateTracks(video, audio);
      if (!user.isLocal) user.setUserName(name);
    }
  }
If the user is not a local user, we also set the username. We don't do this for the local user because we always want their username to appear as "You". Now, let's check out what updateTracks() actually does.
updateTracks() streams the given video and audio tracks, and as we'll see shortly most of that work is delegated to UserMedia. The User class is mostly responsible for setting the correct sprite texture and handling proximity calculations between users. The UserMedia class is mostly responsible for actually managing the video and audio resources, tags, and nodes.
  // updateTracks sets the tracks, but does not
  // necessarily update the texture until we are in
  // earshot
  updateTracks(
    videoTrack: MediaStreamTrack = null,
    audioTrack: MediaStreamTrack = null
  ) {
    this.streamVideo(videoTrack);
    if (!this.isLocal) {
      this.streamAudio(audioTrack);
    }
  }
Let's go through the video streaming first.
Updating the video track
The user's streamVideo() method first asks its UserMedia instance to update the video source and then updates the sprite's texture as needed:
  private streamVideo(newTrack: MediaStreamTrack) {
    this.media.updateVideoSource(newTrack);
    if (this.media.cameraDisabled) {
      if (this.textureType === TextureType.Video) {
        this.setDefaultTexture();
      }
      return;
    }

    if (this.isLocal && this.zoneData.zoneID === globalZoneID) {
      this.setVideoTexture();
    }
  }
Above, after updating the video source via UserMedia, we check if the user’s camera is now disabled. If so, and if we previously had a video texture on the sprite, we set their texture to the default texture. Otherwise, if the user is our local user and is in the global traversal zone, we set their sprite to use their video track as the texture.
UserMedia.updateVideoSource() does some track juggling, which we've commented inline for clarity.
updateVideoSource(newTrack: MediaStreamTrack) {
if (!newTrack) {
// If the update was called with no valid video track,
// we take that as the camera being disabled. If the user
// is in a focus zone or broadcasting, update their
// focus tiles accordingly.
this.cameraDisabled = true;
if (this.currentAction === Action.InZone) {
this.showOrUpdateZonemate();
return;
}
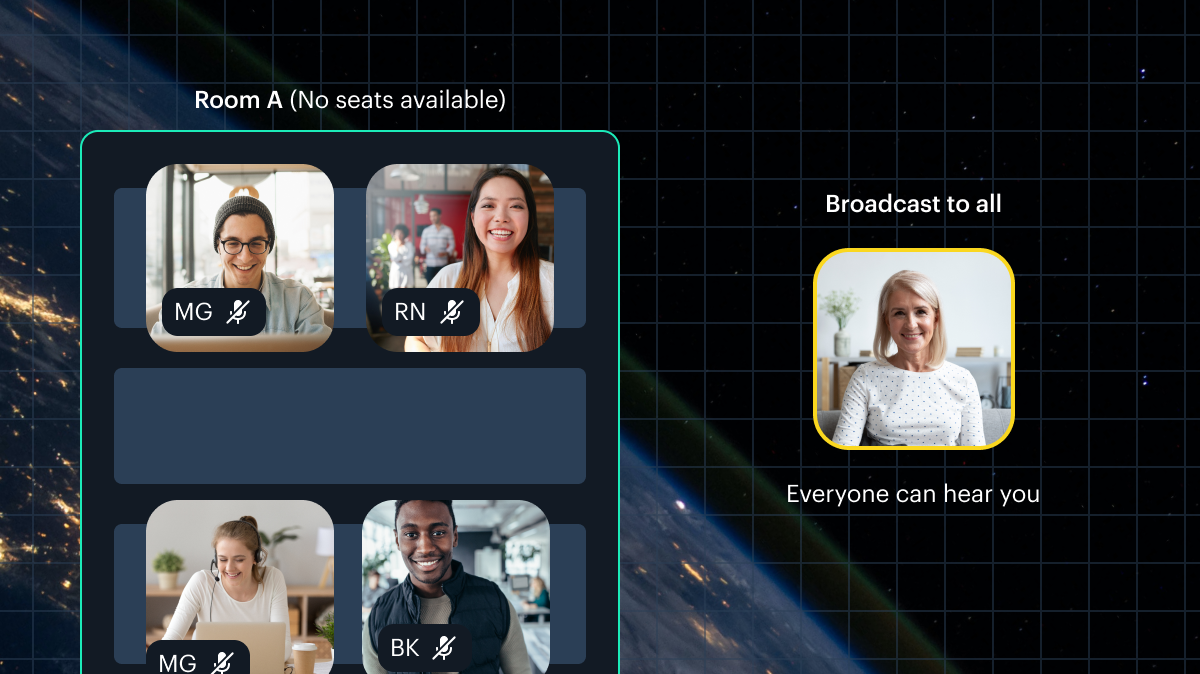
if (this.currentAction === Action.Broadcasting) {
this.showOrUpdateBroadcast();
}
return;
}
// If there is a valid video track, we know the camera
// is not disabled.
this.cameraDisabled = false;
// Only replace the track if the track ID has changed.
if (newTrack.id !== this.videoTrack?.id) {
this.videoTrack = newTrack;
this.videoTag.srcObject = new MediaStream([newTrack]);
}
// If the user is in a focus zone or broadcasting,
// update their focus tiles accordingly.
if (this.currentAction === Action.InZone) {
this.showOrUpdateZonemate();
return;
}
if (this.currentAction === Action.Broadcasting) {
this.showOrUpdateBroadcast();
}
}
As you can see, the core jobs of the updateVideoSource function are:
- To update any focus tiles as needed.
- To update the user's video tag source if the track has changed. This is very important, because as we saw above, our
Userclass uses this tag as the base resource for the sprite's video texture.
Updating the audio track
Our user's private streamAudio() method calls out directly to UserMedia and does nothing else:
  private streamAudio(newTrack: MediaStreamTrack) {
    this.media.updateAudioSource(newTrack);
  }
Let's go through updateAudioSource() now.
  updateAudioSource(newTrack: MediaStreamTrack) {
    if (!this.audioTag || !newTrack) return;

    if (newTrack.id === this.audioTrack?.id) {
      return;
    }

    this.audioTrack = newTrack;

    // The track has changed, so reset the nodes.

    // Save current gain and pan values, if any.
    const gain = this.nodeChain?.getGain();
    const pan = this.nodeChain?.getPan();

    // Destroy the current node chain.
    this.nodeChain.destroy();

    // Recreate audio nodes with previous gain and pan.
    if (gain && pan) {
      this.createAudioNodes(gain, pan);
    }

    if (this.currentAction === Action.InZone) {
      this.showOrUpdateZonemate();
      return;
    }
    if (this.currentAction === Action.Broadcasting) {
      this.showOrUpdateBroadcast();
    }
  }
Above, if there is a valid audio track provided and its ID is different from that of the previously stored track, we save the current gain and pan values (if any) and destroy the existing node chain.
A node chain is an instance of NodeChain, which is a custom class we defined to store all of the Web Audio API nodes we'll be working with. It is responsible for maintaining the audio graph.
We then update relevant focus tiles, if any, depending on whether the user is in a focus zone.
Creating our Web Audio API nodes
Let's go through the actual creation of our audio graph. The first thing we need to know is that we instantiate a new NodeChain as soon as a UserMedia instance is created:
private nodeChain = new NodeChain();
At this point, however, we don't actually do anything else with the instance. No Web Audio API nodes are created or connected at this time, since we don't yet have an audio track to work with.
We also create the user's video tag and audio tag when constructing the UserMedia instance.
As we saw above, we call UserMedia.createAudioNodes() when we get a new audio track:
  private async createAudioNodes(gainValue: number, panValue: number) {
    const stream = await this.nodeChain.init(this.audioTrack);
    this.nodeChain.updateGain(gainValue);
    this.nodeChain.updatePan(panValue);

    this.audioTag.muted = false;
    this.audioTag.srcObject = stream;
    this.audioTag.play();
  }
At this point, the node chain is initialized. We do so by passing it our audio track in a call to init(). The function returns a MediaStream, which we then set on our existing audio tag. After retrieving the new media stream, we update the gain and pan values of our nodes and set our audio tag's source to our new stream.
Let's go through the NodeChain.init() method below:
  async init(track: MediaStreamTrack): Promise<MediaStream> {
    const stream = new MediaStream([track]);

    this.mutedAudio.srcObject = stream;
    this.mutedAudio.play();

    this.gain = window.audioContext.createGain();
    this.stereoPanner = window.audioContext.createStereoPanner();
    this.compressor = window.audioContext.createDynamicsCompressor();
    this.source = window.audioContext.createMediaStreamSource(stream);
    this.destination = window.audioContext.createMediaStreamDestination();

    this.source.connect(this.gain);
    this.gain.connect(this.stereoPanner);
    this.stereoPanner.connect(this.compressor);
    this.compressor.connect(this.destination);

    let srcStream: MediaStream;

    // This is a workaround for there being no echo cancellation
    // when using Web Audio API in Chrome (another bug):
    // https://bugs.chromium.org/p/chromium/issues/detail?id=687574
    if (isChrome) {
      this.loopback = new Loopback();
      await this.loopback.start(this.destination.stream);
      srcStream = this.loopback.getLoopback();
    } else {
      srcStream = this.destination.stream;
    }
    this.initialized = true;
    return srcStream;
  }
Above, we start with creating a MediaStream with the given MediaStreamTrack (our user's audio track).
Next, we set our new stream as the source object of a muted audio element. This appears to be required due to a Chromium issue.
We then create our GainNode, StereoPannerNode, DynamicsCompressorNode, MediaStreamAudioSourceNode, and MediaStreamAudioDestinationNode, and chain them together. Our audio graph ends up looking like this:
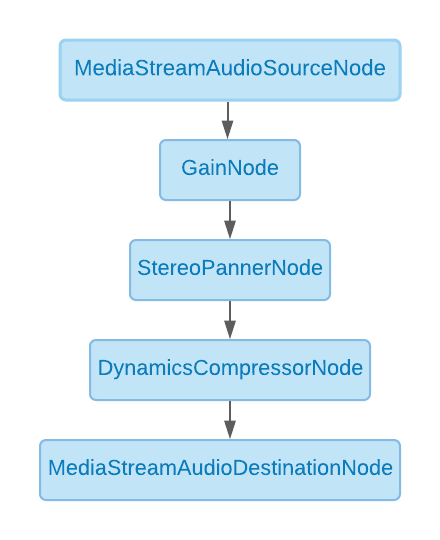
Next, we put in place another Chrome issue workaround (for echo cancellation this time) by creating an RTCPeerConnection loopback in order to get echo cancellation working on Chrome.
Unfortunately, this workaround also renders the StereoPannerNode non-functional on Chrome. So until we find a better workaround, we'll have volume fade when running the demo in Chrome, but not left-right panning. Between having panning and having proper echo cancellation, we decided the echo cancellation wins.
The panning is also hardware-dependent. For example, some types of Bluetooth earphones don’t register any pan at all. If you are using a non-Chrome browser and don’t hear any panning, try another output method! Luckily, the GainNode seems much less finicky in this regard.
Finally, we toggle our initialized bool and return our source stream.
Now that we know a bit about how user video and audio tracks are handled, we can go through the user update that runs on every tick
Processing the users
Each tick, the app calls processUsers() on our local user, providing a collection of all users from our app's userContainer.
  async processUsers(others: Array<DisplayObject>) {
    for (let other of others) {
      this.processUser(<User>other);
    }
  }
There, we iterate through each user and see where they are in relation to the local user. We won't go through the entire processUser() method here since we’re focusing on just the proximity update parts in this post, but we've left comments in the linked code to explain exactly what it does.
The proximity update
One of the first things processUser() does is perform a proximity update if both users are traversing the world in the global zone. Let's go through it now.
Getting the distance between users
We get started with the proximity update by making sure we're running checks against a valid user, getting the distance between the two users being checked, and setting our sprite's transparency based on the distance:
 private async proximityUpdate(other: User) {
    // Check that we aren't updating proximity against ourselves
    if (other.id === this.id) {
      return;
    }

    const distance = this.distanceTo(other.getPos());

    // Calculate the target alpha of the other user based on their
    // distance from the user running this update.
    other.alpha =
      (this.earshotDistance * 1.5 - distance) / this.earshotDistance;

	// The rest of the function below...
  }
First, we early out just in case someone mistakenly calls this function on the local user. We don't need to check proximity against ourselves!
Next, we calculate the distance between our local user and the other user:
  protected distanceTo(other: Pos) {
    // We need to get distance from the center of the user
    const thisX = Math.round(this.x + baseSize / 2);
    const thisY = Math.round(this.y + baseSize / 2);

    const otherX = Math.round(other.x + baseSize / 2);
    const otherY = Math.round(other.y + baseSize / 2);
    const dist = Math.hypot(otherX - thisX, otherY - thisY);
    return Math.round(dist);
  }
After retrieving the distance between the two users, we calculate what the user's alpha should be. This allows us to have the other user fade in as we approach and fade out as we retreat.
Vicinity check
Next, we check if the local user is in the other user's vicinity. In our demo, vicinity distance is this.earshotDistance * 2, and earshot distance defaults to 400. This means when a user is 800 pixels away from the local user, they enter each other's vicinity. At this point, we preemptively subscribe to their tracks by calling onEnterVicinity(), which is a function passed by our world to the local user's constructor.
These values can be tweaked as desired to whatever feels right and makes for a smoother and more reliable transition as the user moves in and out of earshot.
We’ve left inline comments for this part of the proximity update below:
 private async proximityUpdate(other: User) {
    // ...beginning of the function, which we covered above…

    // Do vicinity checks. This is where track subscription and unsubscription
    // will happen. We do it when the user is in vicinity rather than earshot
    // to prepare the tracks in advance, creating a more seamless transition when
    // the user needs the tracks.
    if (this.inVicinity(distance)) {
      // If we just entered vicinity, trigger onEnterVicinity
      if (!other.isInVicinity) {
        other.isInVicinity = true;
        if (this.onEnterVicinity) {
          this.onEnterVicinity(other.id);
        }
      }
    } else if (other.isInVicinity) {
      // If we just left vicinity, trigger onLeaveVicinity
      other.isInVicinity = false;
      if (this.onLeaveVicinity) {
        this.onLeaveVicinity(other.id);
      }
    }

    // Earshot checks below...
  }
You might remember that onEnterVicinity() was originally passed to our World instance from our Room class. All this function does is subscribe the local user to the remote user's tracks:
    this.callObject.updateParticipant(sessionID, {
      setSubscribedTracks: { audio: true, video: true, screenVideo: false },
    });
Likewise, onLeaveVicinity() unsubscribes the user from the other user's tracks if the call is in SFU mode:
    // Unsubscriptions are not supported in peer-to-peer  mode. Attempting
    // to unsubscribe in P2P mode will silently fail, so let's not even try.
    if (this.topology !== Topology.SFU) return;

    this.callObject.updateParticipant(sessionID, {
      setSubscribedTracks: { audio: false, video: false, screenVideo: false },
    });
Earshot check
Finally, we move on to earshot checks:
 private async proximityUpdate(other: User) {
    // ...distance and vicinity checks here, which we've already covered above...

    // Do earshot checks

    // User is in earshot
    if (this.inEarshot(distance)) {
      const pm = this.getAudioMod(distance, other.getPos());
      other.media.updateAudio(pm.gain, pm.pan);
      other.media.unmuteAudio();
      if (
        !other.media.cameraDisabled &&
        other.textureType != TextureType.Video
      ) {
        other.setVideoTexture();
      }
      return;
    }

    other.media.muteAudio();
    other.setDefaultTexture();
  }
Above, if the remote user is in earshot (that is, no more than 400px away from the local user), we figure out where they are and what their audio pan and gain values should be:
  private getAudioMod(
    distance: number,
    otherPos: Pos
  ): { gain: number; pan: number } {
    let gainValue = clamp(
      ((this.earshotDistance - distance) * 0.5) / this.earshotDistance,
      0,
      0.5
    );

    const dx = otherPos.x - this.x;
    const panValue = (1 * dx) / this.earshotDistance;

    return {
      gain: gainValue,
      pan: panValue,
    };
  }
We set 0.5 to the max gain value when traversing through the world in this case, but of course this can be tweaked to whatever feels best for the world design.
The pan value depends on whether the other user's position on the x axis is to the left or the right of our local user. If they are in exactly the same position on the x axis, pan will be 0. If they're all the way to the left of the earshot distance, the pan value will be -1. If they're all the way to the right of the earshot distance, it will be 1.
Updating the audio nodes
Once we have our audio values, we call UserMedia.updateAudio(), which updates the values on our GainNode and StereoPannerNode in our NodeChain instance:
  updateAudio(gainValue: number, panValue: number) {
    if (!this.audioTag || !this.audioTrack) return;

    if (!this.nodeChain.initialized) {
      this.createAudioNodes(gainValue, panValue);
    }

    this.nodeChain.updateGain(gainValue);
    this.nodeChain.updatePan(panValue);
  }
Finally, in the user's proximity update, if the other user's camera is not disabled we enable their video texture. If the user is not in earshot of the local user, we mute their audio and make sure the default texture is set for their sprite.
Conclusion
In this post, we went through how we set up the world and the users within it. We then covered how we handle video and audio tracks provided by Daily, how our node chain is constructed, and how we calculate proximity between the local user and users around them.
In the next post, we'll go through interactive elements (other than users!) inside the world space, and how they are used to manipulate the call.