

This post is part three of a series on how to build an app with spatialization features using Daily's real time video and audio APIs.
Introduction
In our last spatialization series post, we went through all the ways in which we'll use the Daily API to enable implementing spatial video and audio in a 2D world. Now, let's go through the operation of the world itself, and how we'll create and update local and remote users.
In our next post, we’ll walk through user media track management in the world, and the building of our Web Audio API audio graph.
As a recap, in our demo users’ video and audio qualities will change as they traverse the world with other users. Audio and video will fade in and out as other users approach our local participant or retreat away from them.
We used TypeScript for this demo, but all of these features can of course be adapted to vanilla JavaScript as well. Please check out our first post in the series for the full tech stack and instructions on running the demo locally.

PixiJS
For this demo, we chose to use PixiJS as the rendering framework. PixiJS handles rendering everything on the screen except for our navigation and video nodes when the user is in a focus space. There are plenty of other options if you don't feel like using Pixi (including not using a framework at all and building your own!)
We won't go too deep into explaining PixiJS concepts here because our choice of framework isn't really relevant to building spatialization features themselves.
A whole new World
Our World class is instantiated when we import room.ts, before any call is actually joined. It remains hidden to the user with just basic configuration setup done until they join a Daily room.
We've left some comments inline below, and will go through the constructor in brief afterwards:
 constructor() {
    const w = document.getElementById("world");

    // Create PixiJS Application and set its size to
    // our "world" div
    this.app = new PIXI.Application({
      width: w.offsetWidth,
      height: w.offsetHeight,
      resizeTo: w,
      backgroundColor: 0x121a24,
      resolution: 1,
    });
    this.app.ticker.maxFPS = 30;

    // Create window frame
    let frame = new PIXI.Graphics();
    frame.beginFill(0x121a24);
    frame.drawRect(0, 0, this.app.renderer.width, this.app.renderer.height);
    frame.position.set(0, 0);
    this.app.stage.addChild(frame);

    // Main world container, which will hold user
    // and focus zone containers.
    this.worldContainer = new PIXI.Container();
    this.worldContainer.width = defaultWorldSize;
    this.worldContainer.height = defaultWorldSize;
    this.worldContainer.sortableChildren = true;

    const floor = new Floor(defaultWorldSize, defaultWorldSize);
    this.worldContainer.addChild(floor);

    frame.addChild(this.worldContainer);

    // Container that will hold our users
    this.usersContainer = new PIXI.Container();
    this.usersContainer.width = this.worldContainer.width;
    this.usersContainer.height = this.worldContainer.height;
    this.usersContainer.zIndex = 100;
    this.worldContainer.addChild(this.usersContainer);

    // Container that will hold our room "focus zone" elements,
    // like broadcast spots
    this.focusZonesContainer = new PIXI.Container();
    this.focusZonesContainer.zIndex = 90;
    this.focusZonesContainer.width = this.worldContainer.width;
    this.focusZonesContainer.height = this.worldContainer.height;
    this.worldContainer.addChild(this.focusZonesContainer);

    document.getElementById("world").appendChild(this.app.view);
  }
Above, we get our currently-empty "world" div from the DOM. We then instantiate PIXI.Application. PIXI.Application is a convenience class. It will create a renderer and ticker for us.
The renderer is responsible for drawing all elements of our world onto a canvas. If WebGL is supported in the user's browser, PixiJS will use its WebGL PIXI.Renderer class. Otherwise, it will use the PIXI.CanvasRenderer. PixiJS will figure out which one of these should be used for us.
A "tick" is a single update of our world, where we perform checks and actions such as listening for user input, re-checking our proximity to other users, rendering the scene (which PixiJS itself handles for us), and more.
When configuring our application, we set it to resize our renderer view to our "world" div. The div size is set in our stylesheet as follows:
#world {
 display: block;
 width: 100%;
 height: 100%;
}
So our PixiJS application will take up the full size of the page (aside from our header). If a user changes the size of their browser window, our world will resize along with it. As you can see, this allows us to resize the browser window without vertical or horizontal scroll bars appearing when the size changes:
Next in our constructor, we create a frame with an instance of PIXI.Graphics. Our frame size is set to that of our PIXI application's renderer (which will be resized to the size of our "world" div as we covered above). This frame is what the user will see on their screen.
Once we have our frame, we instantiate a PIXI.Container which is going to be our "world container". This will be the container that holds our main world space. Its size is larger than that of the frame we created above. Our default world size is set to 2000px in our world configuration. Unless the user has a very large browser window, they will probably not see the entire world at the same time.
Next, we create an instance of our Floor sprite and append it to our world container. We won't go into the implementation details of that sprite here - all we really need to know is that this is a tiling sprite which will draw our floor grid on top of the world. You can check out the source for it here if you're curious.
Afterwards, we create a container for our users and add it as a child of the world container. We then do the same for our focus zones. "Focus zones" will include our desk spaces and broadcast spots (which we'll go through in more detail in the next post).
Finally, we append our application view to our "world" div. The view is going to be a canvas element produced by PixiJS.

Starting the world
As we saw in our last post, the world is not actually started until the local user joins a Daily call. Once this happens, the start() method is called to bring our world to life:
start() {
    this.app.ticker.add((deltaTime) => {
      this.update(deltaTime);
    });

    // Ensure our world is correctly sized
    this.app.resize();

    // Create a single broadcast spot
    const zoneBroadcast = new BroadcastZone(broadcastZoneID, 0, defaultWorldSize / 2);
    zoneBroadcast.moveTo({ x: defaultWorldSize / 2 - zoneBroadcast.width / 2, y: zoneBroadcast.y });
    this.focusZonesContainer.addChild(zoneBroadcast);
    this.focusZones.push(zoneBroadcast);

    // Create two desk zones
    const yPos = defaultWorldSize / 2 + 325;
    const zone1 = new DeskZone(1, "Koala", 4, { x: 0, y: yPos });
    zone1.moveTo({
      x: defaultWorldSize / 2 - zone1.width - zoneBroadcast.width,
      y: zone1.y,
    });
    this.focusZonesContainer.addChild(zone1);
    this.focusZones.push(zone1);

    const zone2 = new DeskZone(2, "Kangaroo", 4, { x: 0, y: yPos });
    zone2.moveTo({ x: defaultWorldSize / 2 + zoneBroadcast.width, y: zone2.y });
    this.focusZonesContainer.addChild(zone2);
    this.focusZones.push(zone2);
  }
Above, we first add a handler to the ticker PixiJS created for us as part of its PIXI.Application implementation. This update() method will be our main handler for the update loop, and we'll go through it shortly.
Next, we call this.app.resize() just once, to make sure the first time our world is rendered it will be of the correct size - that is, the size of our aforementioned "world" div.
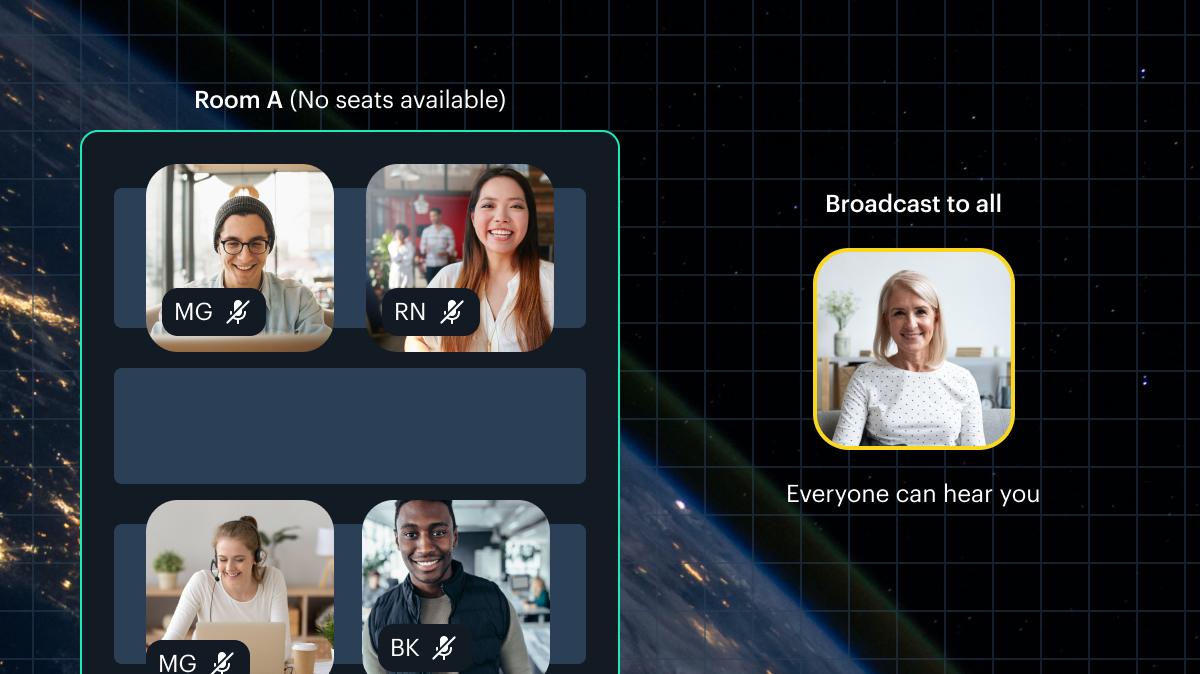
Finally, we add some focus zones! We first create a single BroadcastZone instance. This will be the area that a user can enter to broadcast to everyone else in the world.
Then, we add two instances of DeskZone, where four users can gather at a time to see and hear each other in larger focus tiles.

Note: In PixiJS, sprite positions are relative to their parent element. This means that when we refer to the position of our focus zone objects, we do so knowing that the x and y values are by default expressed in relation to the element holding them: ourfocusZonesContainer, which in turn is held by ourworldContainer.
We'll dig into the implementation details for the zones, and how that impacts our Daily track subscriptions and audio logic, in a future post.
Spawning the local user
As you might recall from the previous post, our local user sprite is initialized when we receive the "joined-meeting" event from Daily. Here is how that actually happens:
  initLocalUser(sessionID: string, videoTrack: MediaStreamTrack): void {
    window.audioContext = new AudioContext();

    const worldCenter = defaultWorldSize / 2;

    // These position constraints are largely arbitrary;
    // I just went with what spawning area "feels" right.
    const p = {
      x: rand(worldCenter - 300, worldCenter + 300),
      y: rand(worldCenter - 250, worldCenter + 250),
    };

    const user = this.createUser(sessionID, p.x, p.y, "You", true);
    // This will render the world and allow us to cross
    // check collision, to make sure the local user is not
    // colliding with focus zones.
    this.app.render();

    // Make sure we aren't colliding with any focus zones,
    // reposition if so.
    this.getFinalLocalPos(user);

    this.localUser = user;

    // The rest of the function to come...
  }
Now that we have a local user in the world, we start by creating our AudioContext and setting it on the window. The audio context is responsible for our entire audio processing graph. It controls the creation and execution of all of our audio nodes, which we'll go into later in this post.
Next, we find the center of our world container and set a semi-randomized spawning position for the user. At this point, however, we don't know if our spawning position is actually on top of a focus zone (which we do not want). So after we create the User sprite, we run a recursive method to check if the user collides with anything and reposition them if so. You can check out that method here.
Let's get back to initLocalUser():
 initLocalUser(sessionID: string, videoTrack: MediaStreamTrack): void {
    // ...Parts we already covered are above.

    const finalPos = this.localUser.getPos();

    // Center world container on local user
    this.worldContainer.position.x =
      this.app.view.width / 2 - finalPos.x - this.localUser.width / 2;
    this.worldContainer.position.y =
      this.app.view.height / 2 - finalPos.y - this.localUser.height / 2;

    user.updateTracks(videoTrack, null);
    this.sendZoneData();
    this.sendPosData();
    this.keyListener.listenKeys();
 }
Once the user is nicely positioned, we center the world container on their sprite.
Next, we update the local user's video track. The audio track is not relevant for the local user - we don't want them to hear themselves!
Following that, we send the user's final zone and position data to all other users in the world by using sendZoneData() and sendPosData().
Finally, we tell our key listener to start listening for navigational key presses.

Spawning remote users
In part two of our spatialization series, we went over how our Room instance listens for a "participant-joined" event from Daily. When it receives this event, it calls our world's initRemoteParticipant() method:
  initRemoteParticpant(sessionID: string, userName: string) {
    // User may have been created as part of an out of order
    // update.
    let user = this.getUser(sessionID);
    if (!user) {
      user = this.createUser(sessionID, -10000, -1000, userName);
    }
  }
Above, we check if the user for this session has already been initialized. If not, we call createUser() with default off-world coordinates. We'll be expecting an "app-message" from that user with their real coordinates shortly, as the "participant-joined" event does not contain them.
createUser(), which is also used when we generate the local user, creates our actual User instance:
  private createUser(
    userID: string,
    x: number,
    y: number,
    userName: string = null,
    isLocal = false
  ): User {
    let onEnterVicinity = null;
    let onLeaveVicinity = null;
    let onJoinZone = null;
    if (isLocal) {
      onEnterVicinity = this.subToTracks;
      onLeaveVicinity = this.unsubFromTracks;
      onJoinZone = this.onJoinZone;
    }
    const args = {
      id: userID,
      userName: userName,
      x: x,
      y: y,
      isLocal: isLocal,
      onEnterVicinity: onEnterVicinity,
      onLeaveVicinity: onLeaveVicinity,
      onJoinZone: onJoinZone,
    };
    const user = new User(args);
    this.usersContainer.addChild(user);
    return user;
  }
If the user is a local user, we provide relevant callbacks which it will use to handle coming into and out of proximity with other users, or joining a zone. These functions were provided to our World instance by the Room when a user first joined the call, and we went over them in our last post. They handle subscribing to/unsubscribing from other users' tracks and sending zone update messages when the user moves to a new zone.
After spawning the user, the model is added to our usersContainer.
Updating the world
Now that we know how the world and users within it are constructed, it’s time to go through our update loop.
  private update(delta: number) {
    // Process texture queue
    const textures = Textures.get();
    textures.processQueue(this.app.renderer);

    if (!this.localUser) return;

    // Update all robots
    for (let robot of this.robots) {
      robot.update();
      robot.checkFocusZones(this.focusZones);
    }

    this.localUser.processUsers(this.usersContainer.children);
    this.localUser.checkFocusZones(this.focusZones);
    this.checkNavigation(delta);
  }
The first thing we do in each tick is process any textures that we may have in our texture queue. In PixiJS, it is not recommended to create new textures if they can be reused. For example, our seating spots above all have the same texture applied to them. This means that instead of creating a new texture object for each spot, the sprite instance can first check if the texture already exists in our texture catalog and reuse it.
This is why we have created a Textures singleton which can retrieve existing reusable textures and generate new ones. The processQueue() method above processes any pending textures that are to be generated.
Going through this process in detail is out of scope of this post, but if you're curious you can check out the implementation here and get in touch if you have any questions!
The rest of the update is only relevant if we already have a localUser sprite in the world, so we early out if that isn't the case.
The next thing we do is loop through all of our robots - Daily's automated WebDriver instances - and update them (in case we spawned any for testing).
Finally, we process the local user's interaction with all other users in the world, check any focus zone interaction for the local user, and check navigation. Speaking of navigation…
Navigation
In our world, the user can navigate using the arrow keys or WASD. The checkNavigation() method is responsible for:
- Checking for movement
- Checking if the local user is about to walk into an object that they're not supposed to be able to pass through
- Updating the local user's position
- Keeping the world container centered on the local user
- Broadcasting the local user's updated position to other participants
We've left comments in-line to explain how the above is accomplished:
 private checkNavigation(delta: number) {
    // Figure out what our real speed should be.
    // Using the local user's default speed and
    // the delta since the last tick.
    const s = delta * this.localUser.speed;

    // Get the user's current position, and set
    // their new coordinates to the same
    // x and y values.
    const currentPos = this.localUser.getPos();
    let newX = currentPos.x;
    let newY = currentPos.y;

    // If arrow keys or WASD are pressed, update
    // the new x and y values using the speed
    // we calculated above.
    this.keyListener.on("w", () => {
      newY -= s;
    });

    this.keyListener.on("ArrowUp", () => {
      newY -= s;
    });

    this.keyListener.on("s", () => {
      newY += s;
    });

    this.keyListener.on("ArrowDown", () => {
      newY += s;
    });

    this.keyListener.on("a", () => {
      newX -= s;
    });

    this.keyListener.on("ArrowLeft", () => {
      newX -= s;
    });

    this.keyListener.on("d", () => {
      newX += s;
    });

    this.keyListener.on("ArrowRight", () => {
      newX += s;
    });

    // If no keys were pressed, the coordinates remain
    // identical. Early out, nothing more to do.
    if (newX === currentPos.x && newY === currentPos.y) {
      return;
    }
    // If the user moved, move them to the new coordinates.
    this.localUser.moveTo({ x: newX, y: newY });

    // Iterate over all focus zones and, if the new position
    // results in them colliding with an object that has
    // physics enabled, reset their pos to their previous
    // position and return.
    for (let o of this.focusZones) {
      if (o.physics && o.hits(this.localUser)) {
        this.localUser.moveTo(currentPos);
        return;
      }
    }

    // Get the final position of the user.
    const newPos = this.localUser.getPos();

    // Center world container on local user.
    this.worldContainer.position.x =
      this.app.view.width / 2 - newPos.x - this.localUser.width / 2;
    this.worldContainer.position.y =
      this.app.view.height / 2 - newPos.y - this.localUser.height / 2;

    // Send their new position data to other participants.
    this.sendPosData();
  }
We hope the comments above gave you a good idea of what the function does. If not, please don't hesitate to reach out.
And all of this leads us to...
Sending our new position to other participants
Let's walk through the final call we saw above: sendPosData(), and see how the local participant lets everyone know where they are.

  private async sendPosData() {
    const lu = this.localUser;
    const zd = lu.getZoneData();
    const zID = zd.zoneID;

    // If we're in the global zone, broadcast to everyone
    if (zID === globalZoneID) {
      this.onMove(lu.getPos());
      return;
    }

    // If we are in an isolated zone and have zonemates,
    // only broadcast to them
    const zonemates = lu.getZonemates();
    for (let zm in zonemates) {
      this.onMove(lu.getPos(), zm);
    }
  }
Above, we start by getting the local user's zone data. ZoneData is a type that contains two pieces of information: what zone ID the user is currently in, and what spot ID within that zone they're occupying. Our globalZoneID is the default zone that the user spawns in, and the space they traverse before they occupy a desk or broadcast spot.
We'll go deeper into zones in a future post, but the gist is:
- A desk zone has up to 4 zonemates.
- A broadcast zone cannot have zonemates because there's only one spot within it. One user can be broadcasting at a time.
- The global zone (the main part of our world) can have zonemates, but we still want people who are in more specific zones (like desk or broadcast zones) to see who is approaching or moving around outside of their zone.
Therefore, in the code above, we send the local user's position data to all other users if the local user is in a global zone. Otherwise, we only send our position data to the user's zonemates.
As you might recall from our previous post that covered all of the Daily interaction in our demo, onMove(), which we call as the last step above, was a function provided by our Room instance to the world. It sends an "app-message" to other participants with the local user's coordinates:
    // The function World will call when the local user moves.
    // This will broadcast their new position to other participants.
    const onMove = (pos: Pos, recipient: string = "*") => {
      const data = {
        action: "posChange",
        pos: pos,
      };
      this.broadcast(data, recipient);
    };
Handling other users' position updates
When the "posChange" app message is received by our Room, it calls our world.updateParticipantPos() method, which simply retrieves the user if one already exists (or creates one) and moves them to the newly given coordinates:
  updateParticipantPos(sessionID: string, posX: number, posY: number) {
    let user = this.getUser(sessionID);
    if (!user) {
      user = this.createUser(sessionID, posX, posY);
    }
    user.moveTo({ x: posX, y: posY });
  }
And that’s it! This is how users send and receive position updates for themselves and others.
Conclusion
In this post, we went through how we set up our 2D world and the users within it. We learned how navigation is implemented and how users send their positional data to each other.
In the next post, we'll go through how we handle video and audio tracks provided by Daily, how our node chain is constructed, and how we calculate proximity between the local user and users around them.
Never miss a story
Get the latest direct to your inbox.