
Lately at Daily, we’ve been rolling out new ways to customize recording and live streaming feeds. Custom layouts, image and text overlays, and the ability to update settings mid-stream are all features that are regularly requested from current and potential customers.
Today, we’ll be looking at Daily’s new baseline composition setting for live streaming and recording – a new offering that’s part of our Video Component System (VCS). VCS lets developers build engaging, feature-packed video layouts for recording and live streaming video calls. We’ll be rolling out more VCS content — along with some exciting new functionality — in the weeks and months to come.
Note: Live streaming is a pay-as-you-go feature. Learn more on our pricing page.
Today’s agenda
In this tutorial, we’ll update the Daily Prebuilt demo code with a few new live streaming-related buttons, and configure those buttons to use the baseline composition option for 'custom' layouts.
We’ll try out a few options that the baseline composition offers:
- Adding a text overlay
- Adding an image overlay using a
pngof our choice - Changing the layout to use picture-in-picture mode
But first, let’s review some definitions.
What is Daily's VCS?
VCS stands for Video Component System. It’s Daily's video-oriented layout engine that can be used to create layouts, known as "compositions," which turn Daily calls into highly customized interactive live streams or engaging recorded content.
VCS lets you easily:
- Update video layouts on the fly or add graphic overlays to your live streamed or recorded videos.
- Have a call host or broadcaster. They no longer have to fuss with an OBS setup.
- Build an interface for a remote production team, which is ideal for multi-camera set ups. You can now cut between different video sources or switch between different layouts as you are live streaming. For instance, with a few lines of code or a click of a button, you can switch from an interview in grid view to picture-in-picture as your host does a screen share.
- Add animated toast animations with VCS. These are the text-based messages that pop up temporarily or the floating heart emojis that you may have seen in an Instagram live or Periscope video. In a follow-up tutorial coming out soon, we’ll show you how to easily add a toast video to your broadcast.
VCS can help you quickly add simple flourishes to your WebRTC broadcasts or build a full featured live production suite for streaming.
What is Daily’s baseline composition?
The baseline composition is VCS’s default collection of layout and graphics features that work together and are easily accessible with a unified JSON-based control interface. It allows developers to add custom layouts and graphics via the 'custom' layout option in daily-js and react-native-daily-js’s live streaming and recording instance methods. In essence, it handles how video and graphic inputs are composed in the final video stream.
It can be used with any Daily live stream or recording and accepts a comprehensive list of parameters to help you customize your feed to meet your (or your customers’) needs.
Whereas before you could choose between more basic layout options (like ‘single-participant’, ’portrait’, etc.), now you can fine tune a number of options, like specifying how many videos are included, adding an image or text overlay, and much more.
How do I access the baseline composition?
To use Daily’s baseline composition, you need to set the layout.preset value in your live stream or recording options to 'custom', like so:
await call.startLiveStreaming({
  rtmpUrl: 'RTMP_URL',
  layout: {
    preset: 'custom', // Gives access to VCS
    composition_id: 'daily:baseline', // optional (default value)
    composition_params: {
        // Specify your composition parameters here.
        // More on this below
    },
  },
});
Once the 'custom' layout preset is applied, you can set your composition parameters (composition_params) to whatever you’d like either at the start of the stream or mid-stream using:
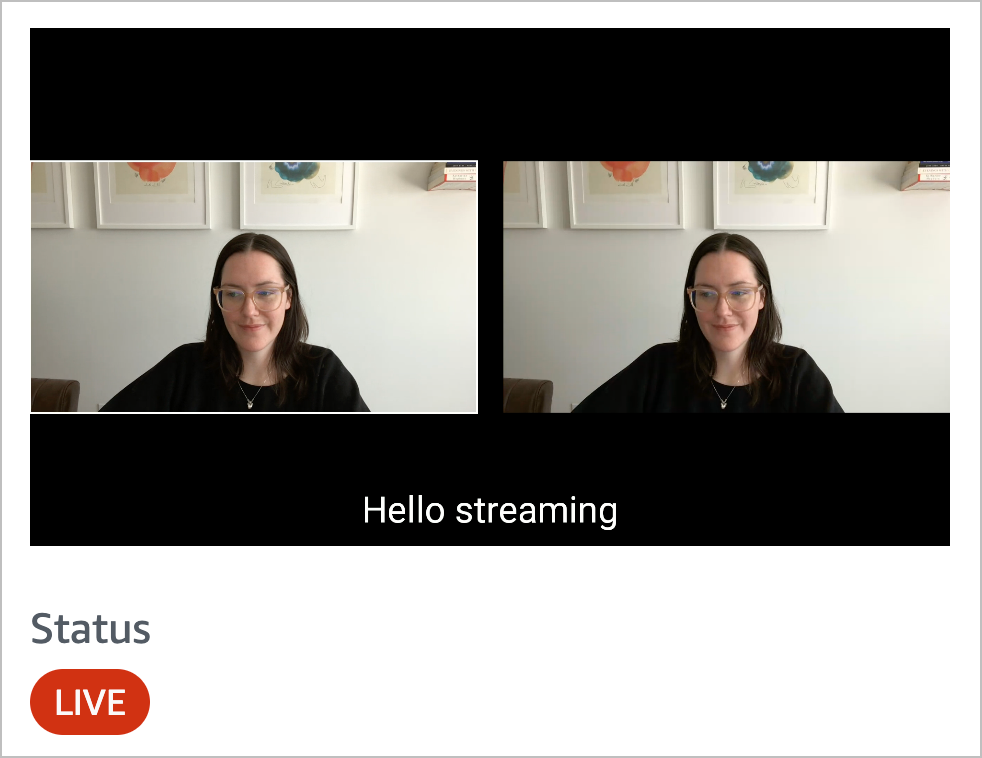
For example, you could add a text overlay with the phrase “Hello streaming” after a live stream has started by calling updateLiveStreaming() with the following composition_params:
call.updateLiveStreaming({
  layout: {
    preset: 'custom', // required even in updates
    composition_params: {
      showTextOverlay: true,
      'text.content': 'Hello streaming',
      'text.align_vertical': 'bottom',
      'text.align_horizontal': 'center',
      'text.offset_y': 20,
      'text.color': 'white',
      'text.strokeColor': 'rgba(0, 0, 0, 0.8)',
    },
  },
});
Your live stream will look like this as a result:
To learn more, read our VCS guide.
To see a more detailed example on how to use it, keep reading!
Running the prebuilt-ui demo locally
This tutorial will use the vcs-live-streaming branch of the prebuilt-ui demo app.
To run this branch locally, enter the following commands in your terminal:
git clone https://github.com/daily-demos/prebuilt-ui.git
cd prebuilt-ui
git checkout vcs-live-streaming
npm i
npm run dev
These commands will clone the repo, checkout the specific branch we’re looking at today, install the dependencies, and then start your server.
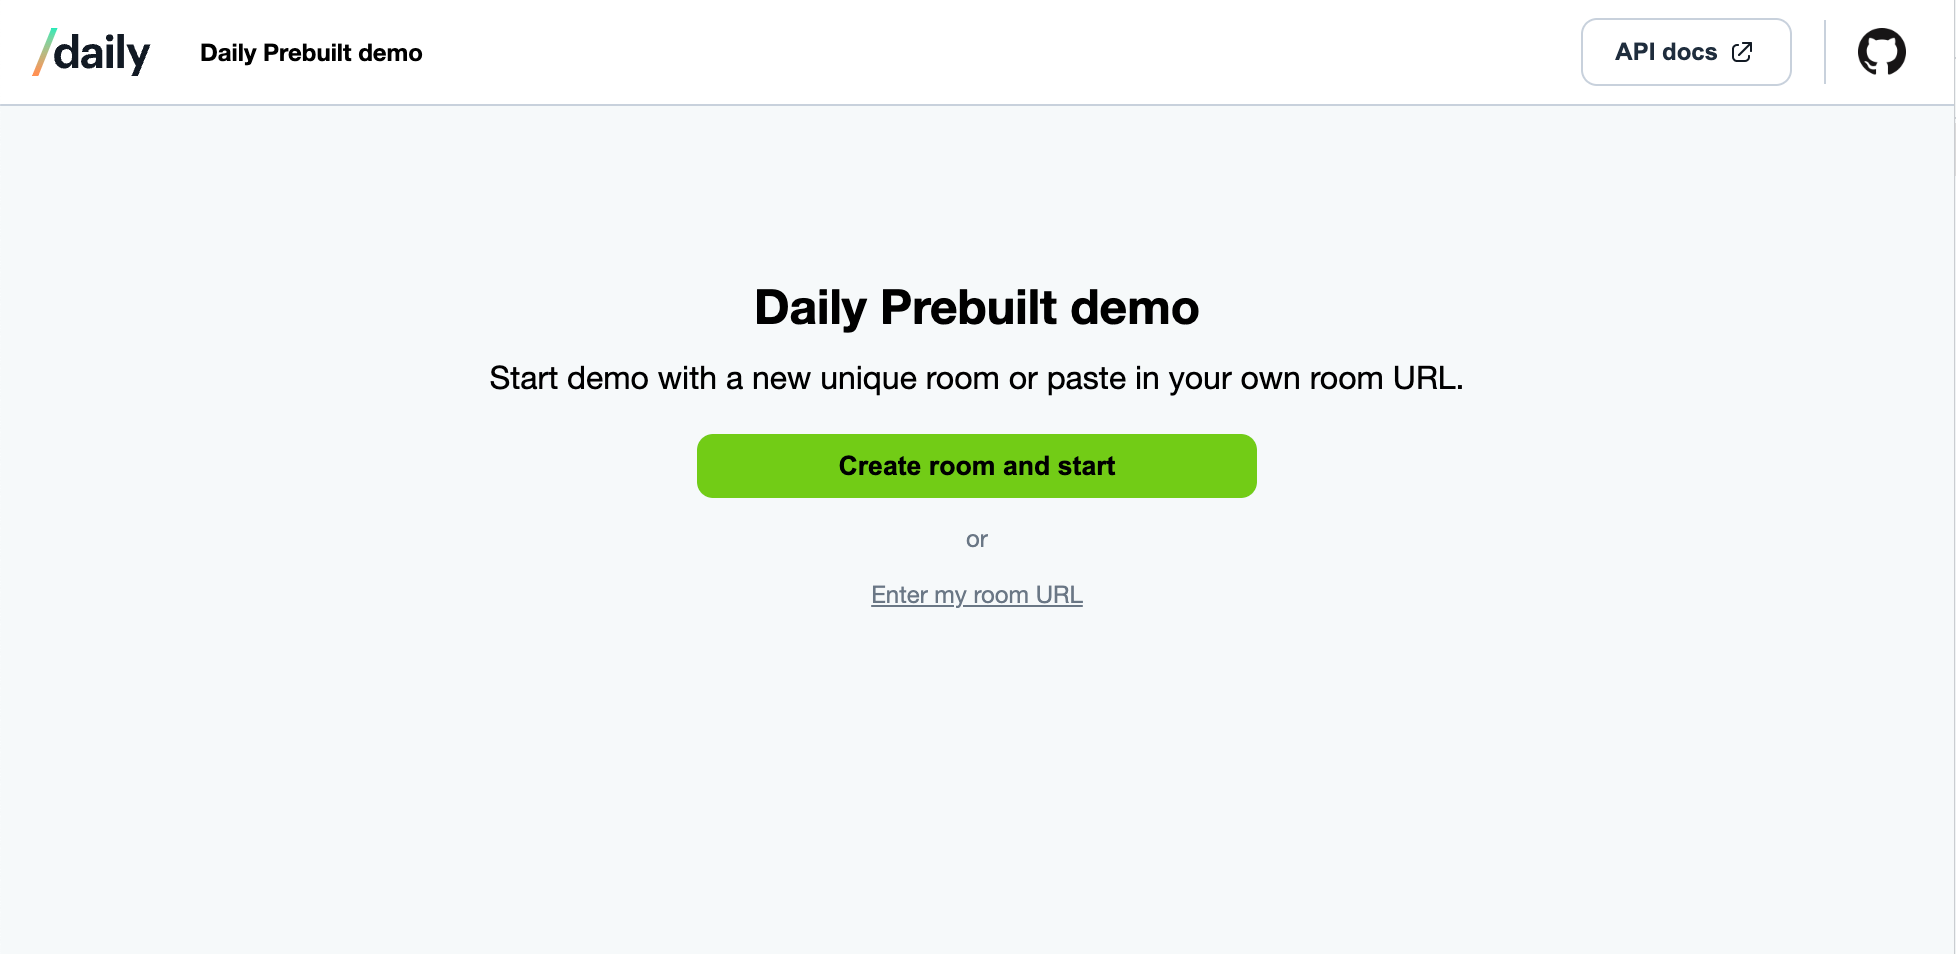
Open the demo in your browser at localhost:8080 and you should see the demo home screen.
Setting up a Daily account
To use Daily live streaming or recording, you’ll first need a Daily account. Sign up via the Daily dashboard. Live streaming is a pay-as-you go feature so you will need to set up a paid account by adding a credit card to your account.
Getting an RTMP URL to use in this demo
We’ll specifically be looking at live streaming with IVS today, although the composition parameters we’ll be using can also be applied to recordings.
To use Daily live streaming, you’ll need an RTMP URL in the following format:
const rtmpUrl = 'rtmp://RTMP_ENDPOINT/STREAM_KEY';
Note: An RTMPS URL is valid too: 'rtmps://RTMP_ENDPOINT/STREAM_KEY'.
To learn more about what an RTMP URL is, check out our guide on live streaming with Daily. We also have a tutorial on how to set up live streaming with Daily and AWS IVS.
Creating an owner meeting token to start a live stream
To start a live stream of a Daily call, you will need an owner meeting token.
You can create one with the following cURL command. (Don’t forget to add your API key available through the Daily dashboard.
curl --request POST \
--url https://api.daily.co/v1/meeting-tokens \
--header 'Authorization: Bearer <API-KEY>' \
--header 'Content-Type: application/json' \
--data '{"properties":{"is_owner":"true"}}'
To learn more about meeting tokens, read our guide on meeting access controls.
Updating our Daily Prebuilt demo code
Okay, now we can really jump into updating our demo code.
The Daily Prebuilt (prebuilt-ui) demo is written in plain JavaScript and HTML. To add live streaming with the baseline composition, we’ll need to:
- Add a few buttons related to live streaming in the
index.htmlfile - Add a few functions to the
index.jsfile to handle click events for our new live streaming buttons
Updating our demo HTML
Let’s start by reviewing what our app UI currently looks like:
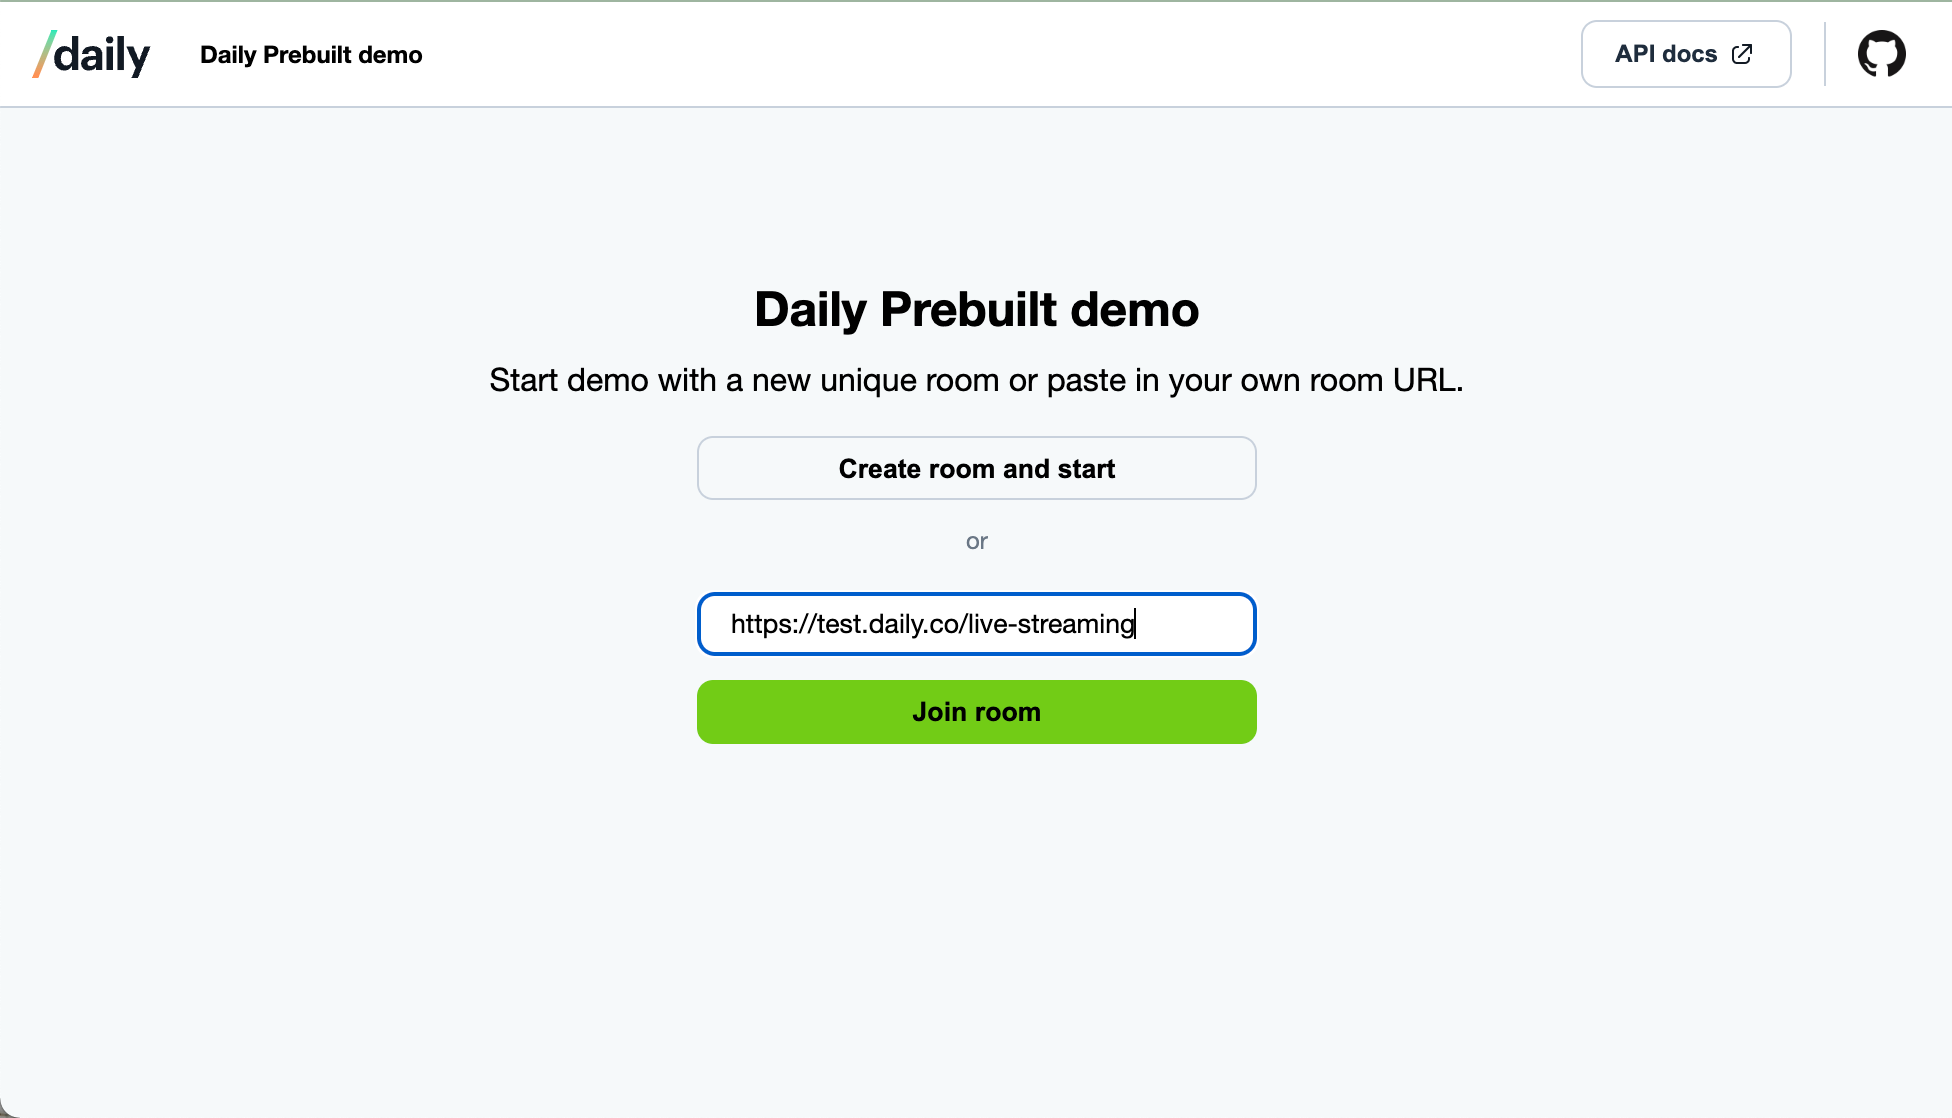
From the home screen, we want to join a room that is from a paid account to give us access to live streaming. Once the room URL is entered, you can click “Join room”.

We will then be brought to the in-call UI after joining the Daily room. On the right side, we see a control panel with buttons like “Toggle camera” that will programmatically make updates to the Daily call you’re currently in via daily-js instance methods.
We’re going to update this control panel to include a few more live streaming-specific buttons:
- Start live streaming
- Apply custom VCS settings
- Stop live streaming
Our goal is to start a live stream (via startLiveStreaming()) with the 'custom' option to access the baseline composition. We’ll then update the layout settings with the baseline composition composition_params mid-stream via updateLiveStreaming.
The UI you use in your own app is ultimately up to you; our goal here is to show how UI interactions can trigger live streaming API calls.
If we jump to our index.html file, we can add the following elements to the bottom of the .call-controls <div>:
<div class="controls-custom-example">
    <h3>Live streaming controls</h3>
    <div class="custom-buttons">
        <button
                class="button controls-button white-button"
                id="start-livestreaming"
                onclick="startLiveStreaming()"
                >
            Start live streaming
        </button>
        <button
                class="button controls-button white-button"
                id="start-livestreaming"
                onclick="updateLiveStreaming()"
                >
            Apply custom VCS layout
        </button>
        <button
                class="button controls-button white-button"
                id="stop-livestreaming"
                onclick="stopLiveStreaming()"
                >
            Stop live streaming
        </button>
    </div>
</div>
We have three buttons that map to what we outlined above, each with a related click handler:
startLiveStreaming()updateLiveStreaming()stopLiveStreaming()
Now, we see the new “Live streaming controls” section at the bottom with our three new buttons.

That’s it for our HTML. Now let’s define our JavaScript methods.
Updating our demo JavaScript
As mentioned, we have three new click handlers that we need to define. Let’s step through each one individually.
Starting a live stream with Daily’s baseline composition enabled
The first step to starting a live stream is providing our demo app with the owner meeting token we created earlier. We’ll do this by setting the token option in our join() call, like so:
async function joinCall() {
 const url = document.getElementById('url-input').value;
 const copyUrl = document.getElementById('copy-url');
 copyUrl.value = url;

 try {
   await callFrame.join({
     url: url,
     showLeaveButton: true,
     token: <add-your-token-here>,
   });
 } catch (e) {
   …
 }
}
Note: Alternatively, you can set it in the Daily room URL you entered in the home screen’s URL input with a t= query param. (e.g. https://[my-domain].daily.co/[room-name]?t=[token].) Whichever you use is up to you!
You might be wondering what the global callFrame variable being used here is. It’s an instance of the DailyIframe class created in the createCallframe() function at the top of index.js. We won’t be reviewing the details of how this works here but just know that callFrame gives us access to the daily-js APIs, like live streaming.
Next, we can define the startLiveStreaming() click handler function being used by the “Start live streaming” button. This will call Daily’s startLiveStreaming() instance method.
function startLiveStreaming() {
    const rtmpUrl = 'rtmp://RTMP_ENDPOINT/STREAM_KEY';
    // start the live stream
    callFrame.startLiveStreaming({
        rtmpUrl,
        layout: {
            preset: 'custom', // use VCS
            composition_params: {
                'videoSettings.showParticipantLabels': true,
            },
            /* optional:
            sessions assets must be included in startLiveStreaming()
            even if they aren't used until an updateLiveStreaming()
            call.
     		session asset images *must* be a .png
     		 */
            session_assets: {
                'images/dailyLogo':
                	'https://docs.daily.co/assets/generic-meta.png',
            },
        },
    });
}
There are a few things to be aware of in this code block:
- You’ll need to enter your actual RTMP URL for the
rtmpUrloption. See our live streaming guide for more information, but you’ll find this value in your transcoder service of choice. Here is where to find your RTMP endpoint and Stream key in the IVS console:
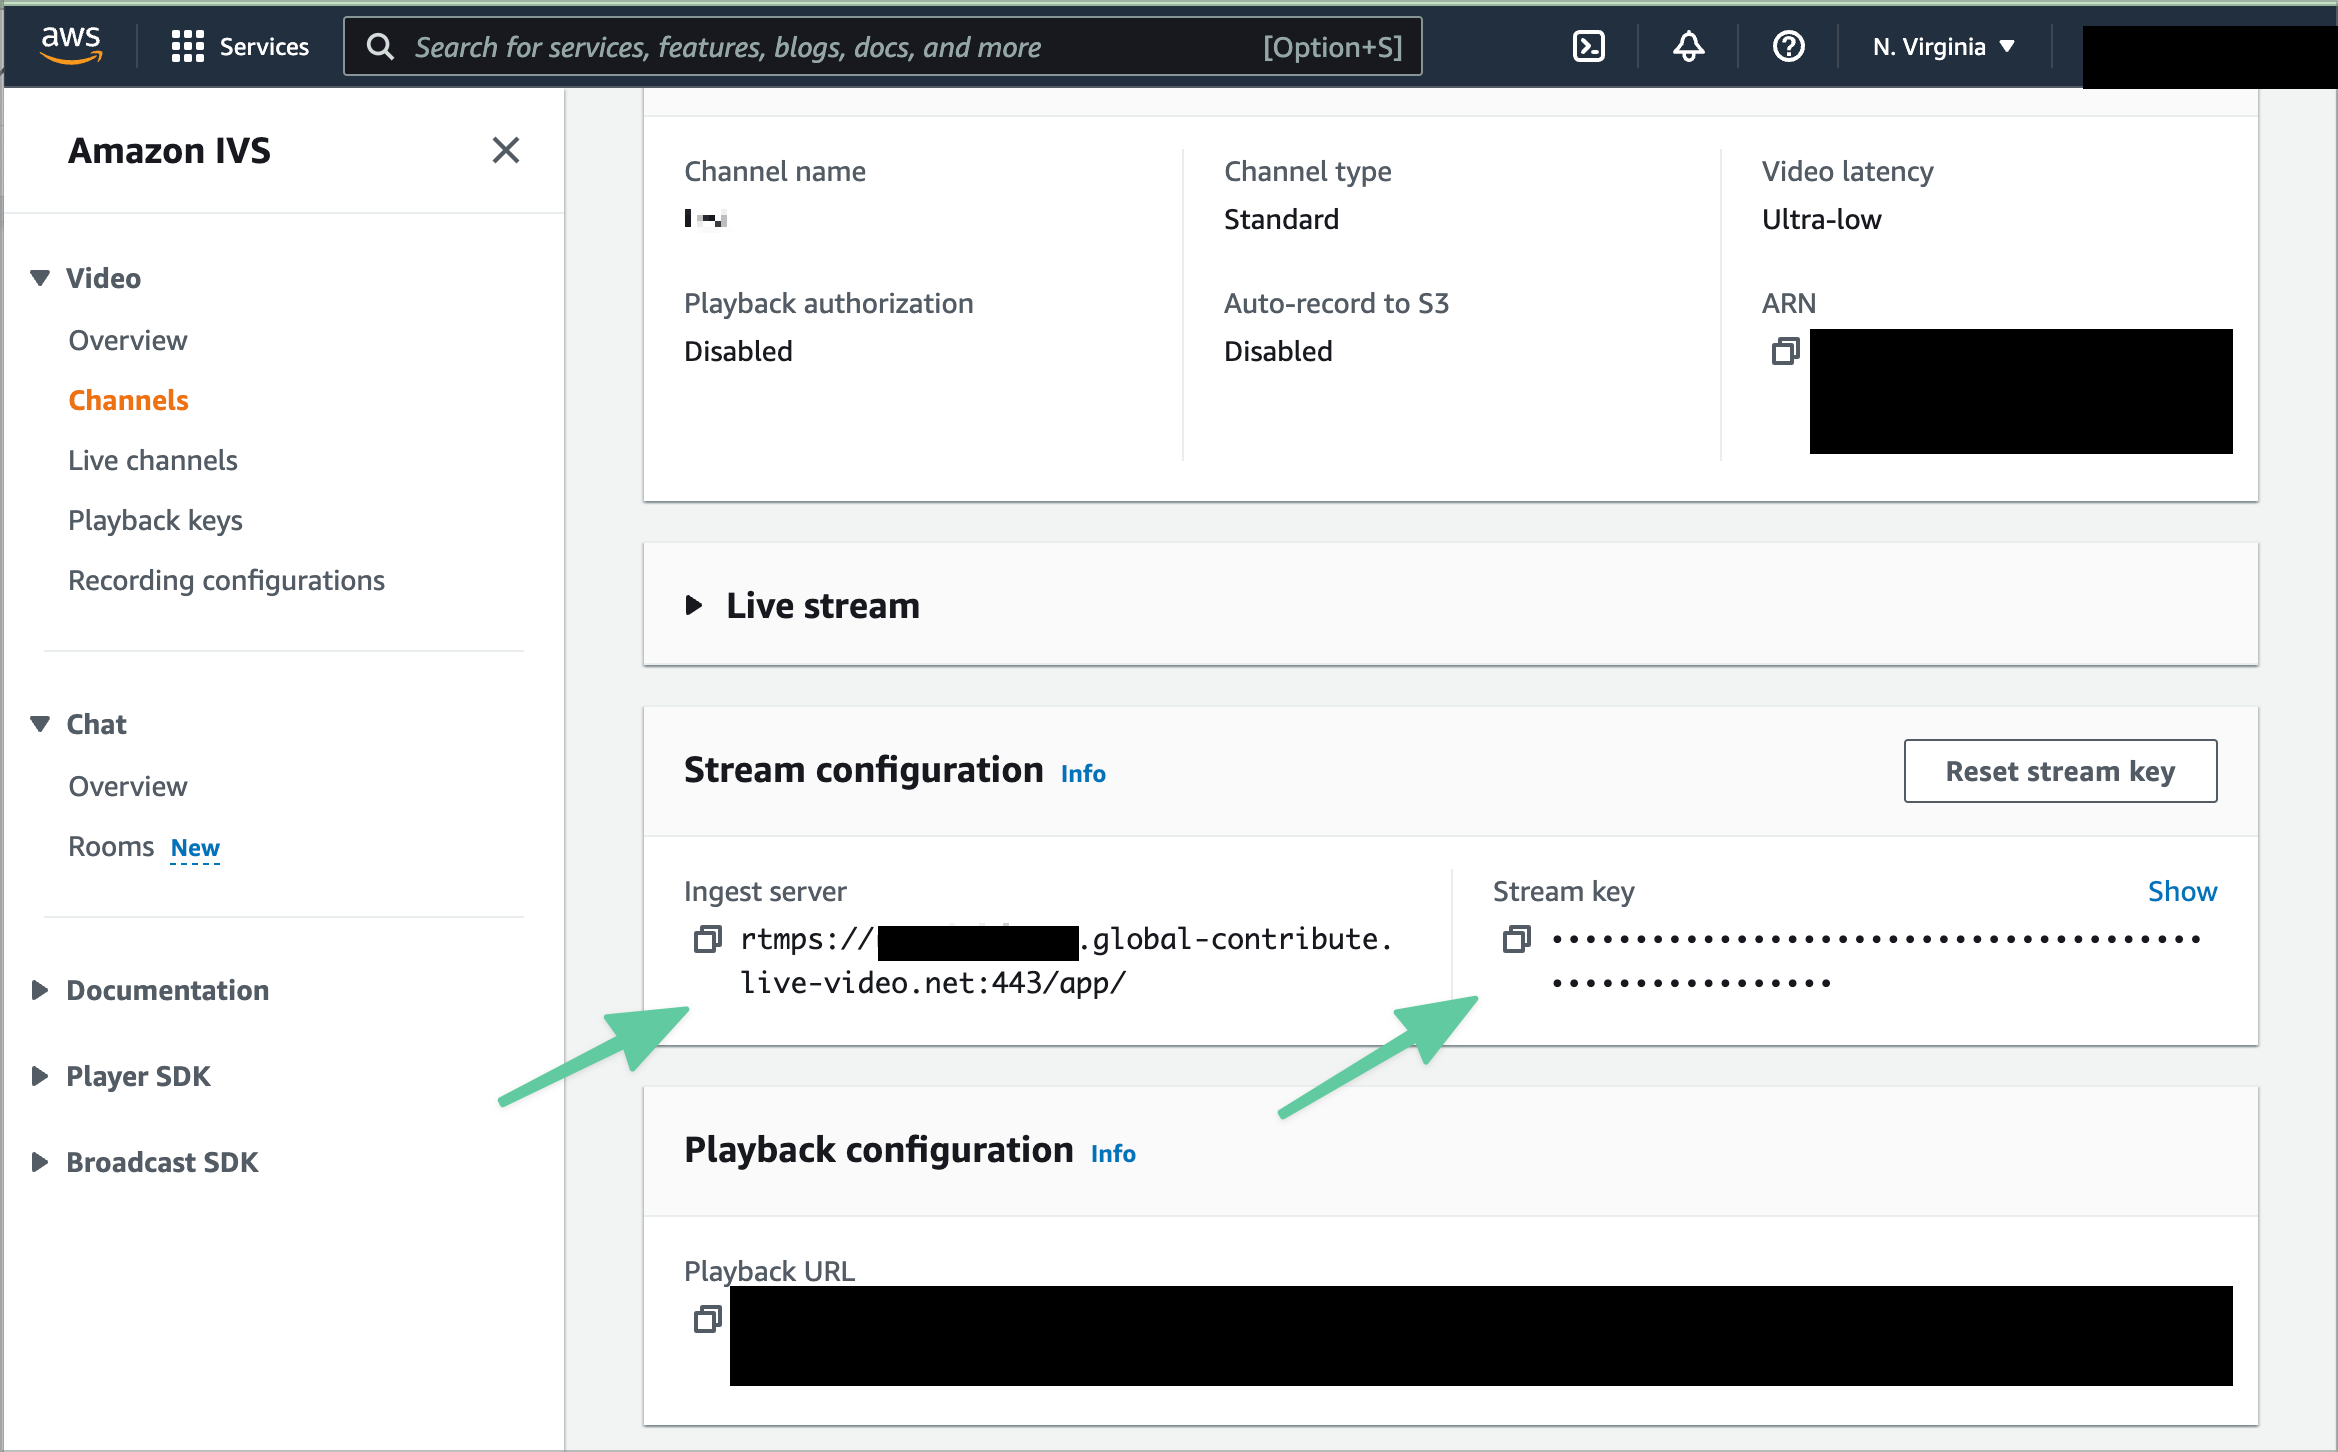
- Next, we’re setting the
layout.presetoption to'custom'to access VCS. (The baseline composition – a subsection of VCS – is used by default right now, but we’ll have some other options coming out soon too. 👀) - We're using the
videoSettings.showParticipantLabelsoption undercomposition_paramsto show our participants' name in the live stream. - We’re providing a link to a Daily logo under
layout.session_assets, which will allow us to overlay that image on our live stream feed. The image is not actually being used yet; we’re just making it available to be used by including it in thesession_assetsoption.
session_assets can only be included when a live stream or recording is started, even if you’re not using them immediately.
At this point, we’ve started our live stream but we’re not really taking advantage of the baseline composition options other than participant names. We can confirm our live stream is working in IVS:

Next, let’s take a look at how to update our live stream to apply our custom layouts via the baseline composition options.
Updating our live stream layout with VCS’s baseline composition
Let’s define our updateLiveStreaming() click handler that we added to the “Apply custom VCS settings” button.
function updateLiveStreaming() {
 callFrame.updateLiveStreaming({
   layout: {
     preset: 'custom',
     composition_params: {
       mode: 'pip',
       showImageOverlay: true,
       'image.assetName': 'dailyLogo',
       'image.aspectRatio': 1,
       'image.position': 'bottom-left',
       'image.opacity': 0.7,
       'image.height_vh': 0.2,
       'image.margin_vh': 0.01,
       showTextOverlay: true,
       'text.align_horizontal': 'right',
       'text.align_vertical': 'bottom',
       'text.offset_x': -20,
       'text.fontFamily': 'PermanentMarker',
       'text.content': 'Hello from Daily!',
     },
   },
 });
}
Hold on a sec – what are all these composition_params and how did we decide on them?
Thankfully, we have all the composition_params options documented in the startLiveStreaming() docs.
Note: All of these work for Daily cloud recordings, too!
You can define styles related to participant labels, your video grid layout, image and text overlays, toast components, and more.
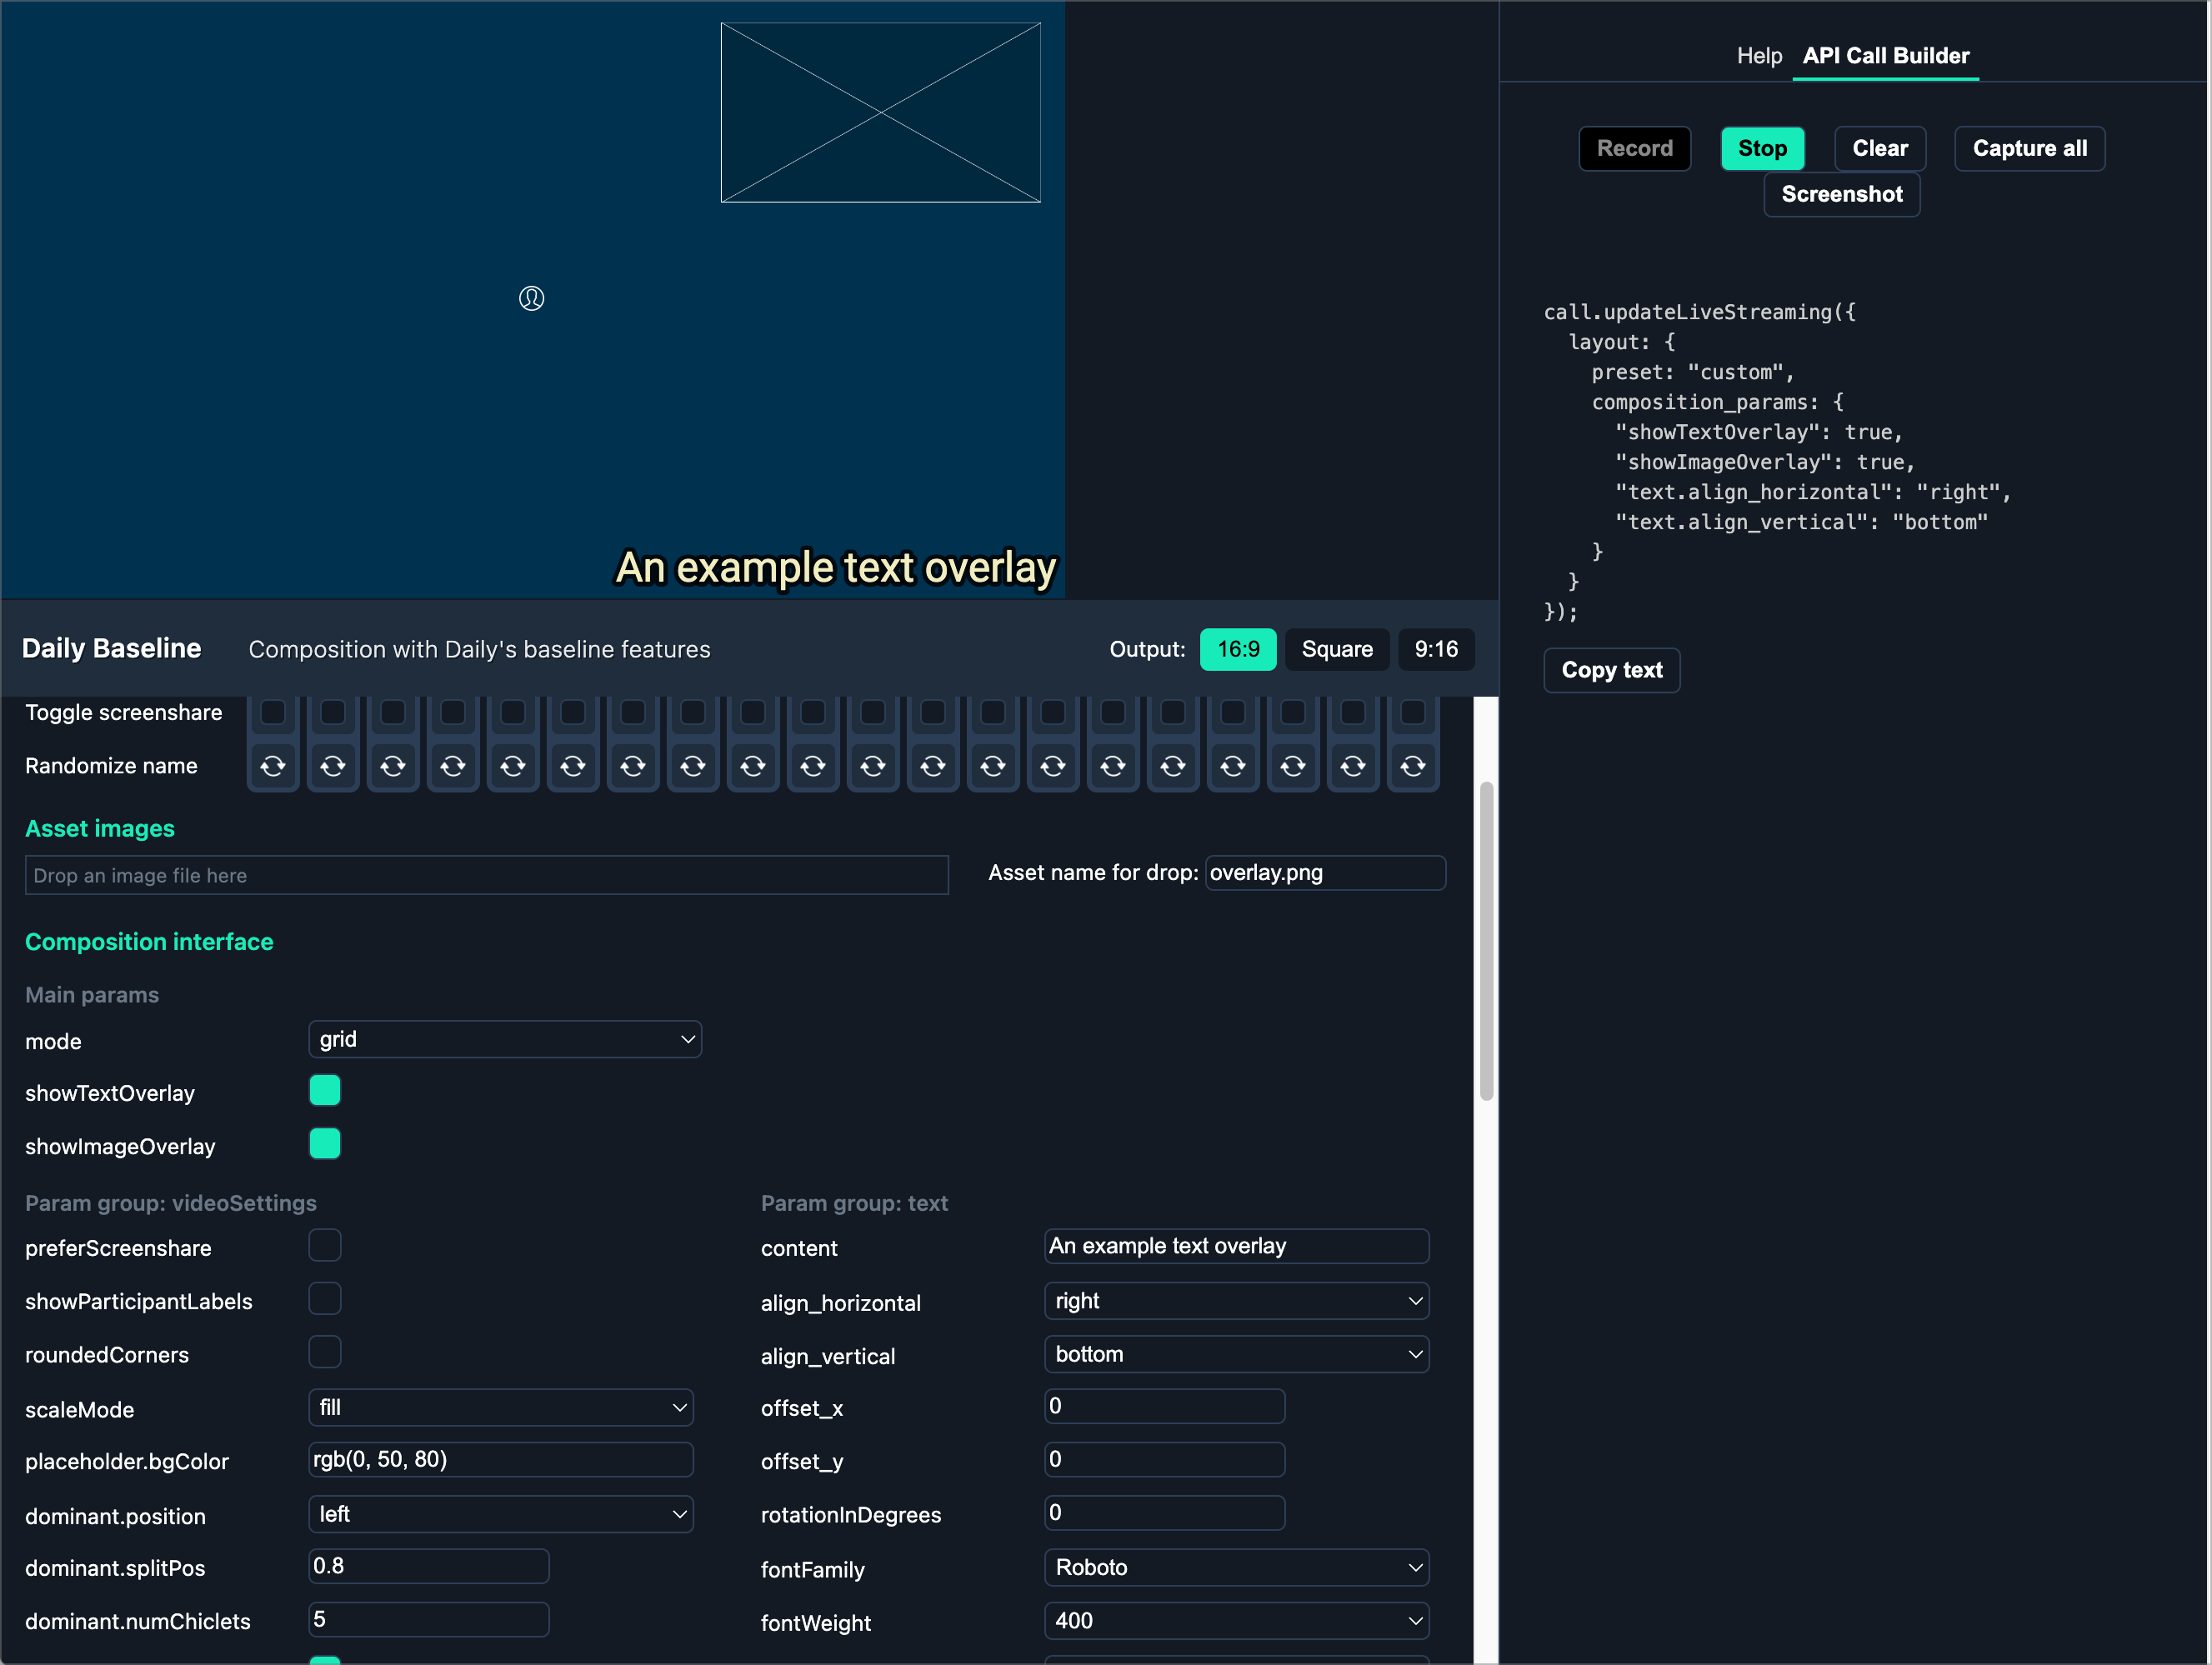
The fastest way to see what you can do with the baseline composition is to test out different options with our VCS Simulator.
Click the “API Call Builder” tab on the far right and then click the “Record” button before turning on options via the simulator UI. After clicking “Record”, all your options will be recorded and displayed in the API Call Builder panel on the right side.
In the updateLiveStreaming() function defined above, we chose the following options:
composition_params: {
    mode: 'pip',
    showImageOverlay: true,
    'image.assetName': 'dailyLogo',
    'image.aspectRatio': 1,
    'image.position': 'bottom-left',
    'image.opacity': 0.7,
    'image.height_vh': 0.2,
    'image.margin_vh': 0.01,
    showTextOverlay: true,
    'text.align_horizontal': 'right',
    'text.align_vertical': 'bottom',
    'text.offset_x': -20,
    'text.fontFamily': 'PermanentMarker',
    'text.content': 'Hello from Daily!',
}
This means we’ll use:
- The picture-in-picture (
’pip’) mode - An image overlay with our Daily logo supplied to
session_assetsalready, with some additional image styling - A text overlay (
showTextOverlay) that says “Hello from Daily!”, which also has some additional styling
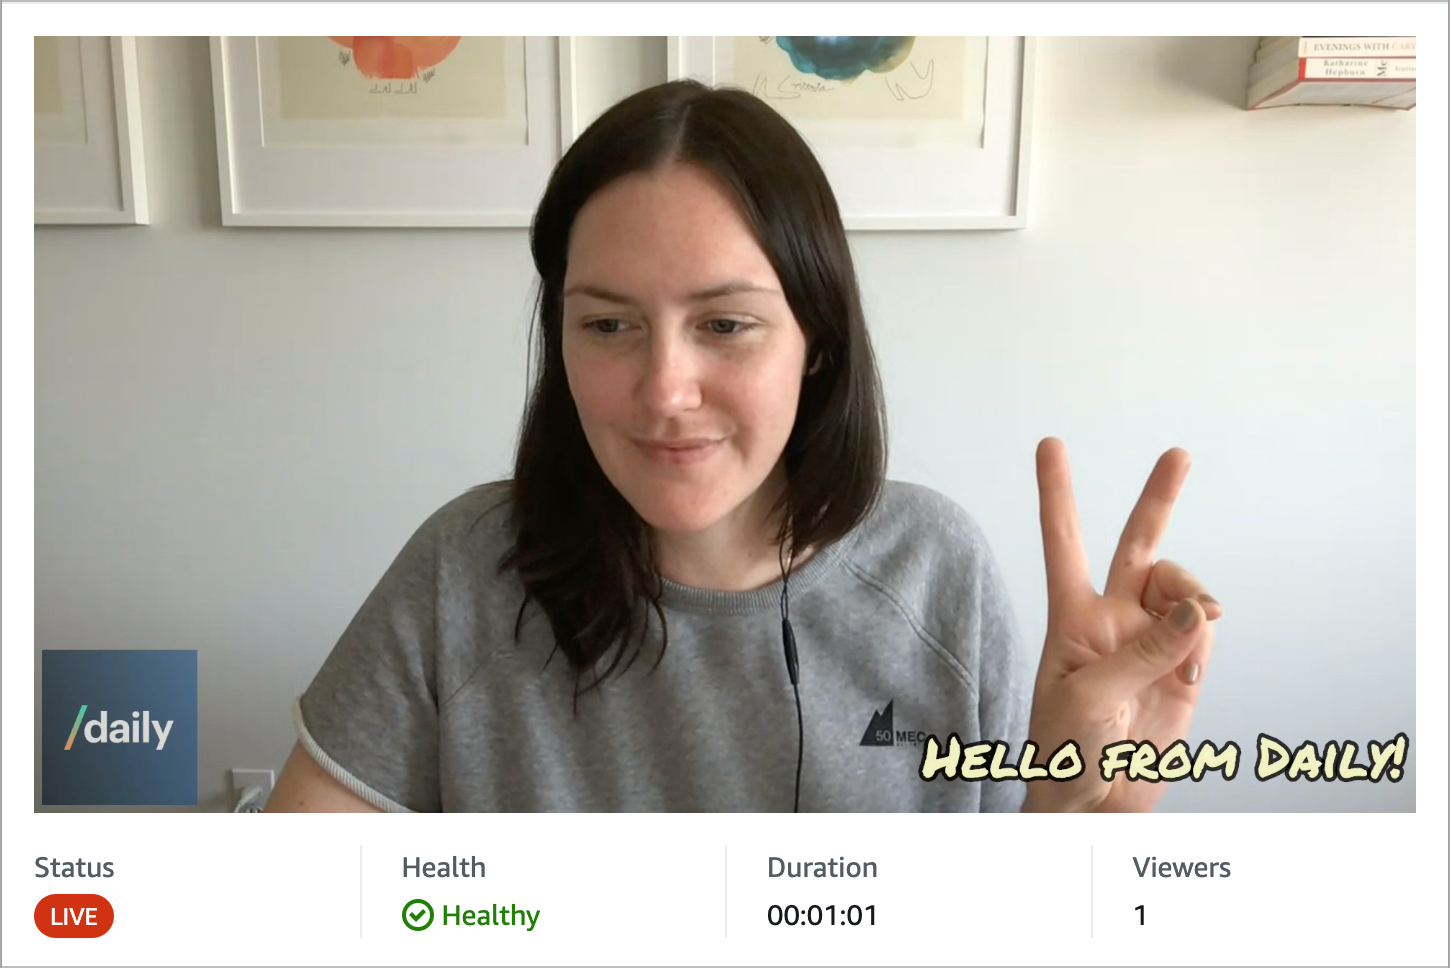
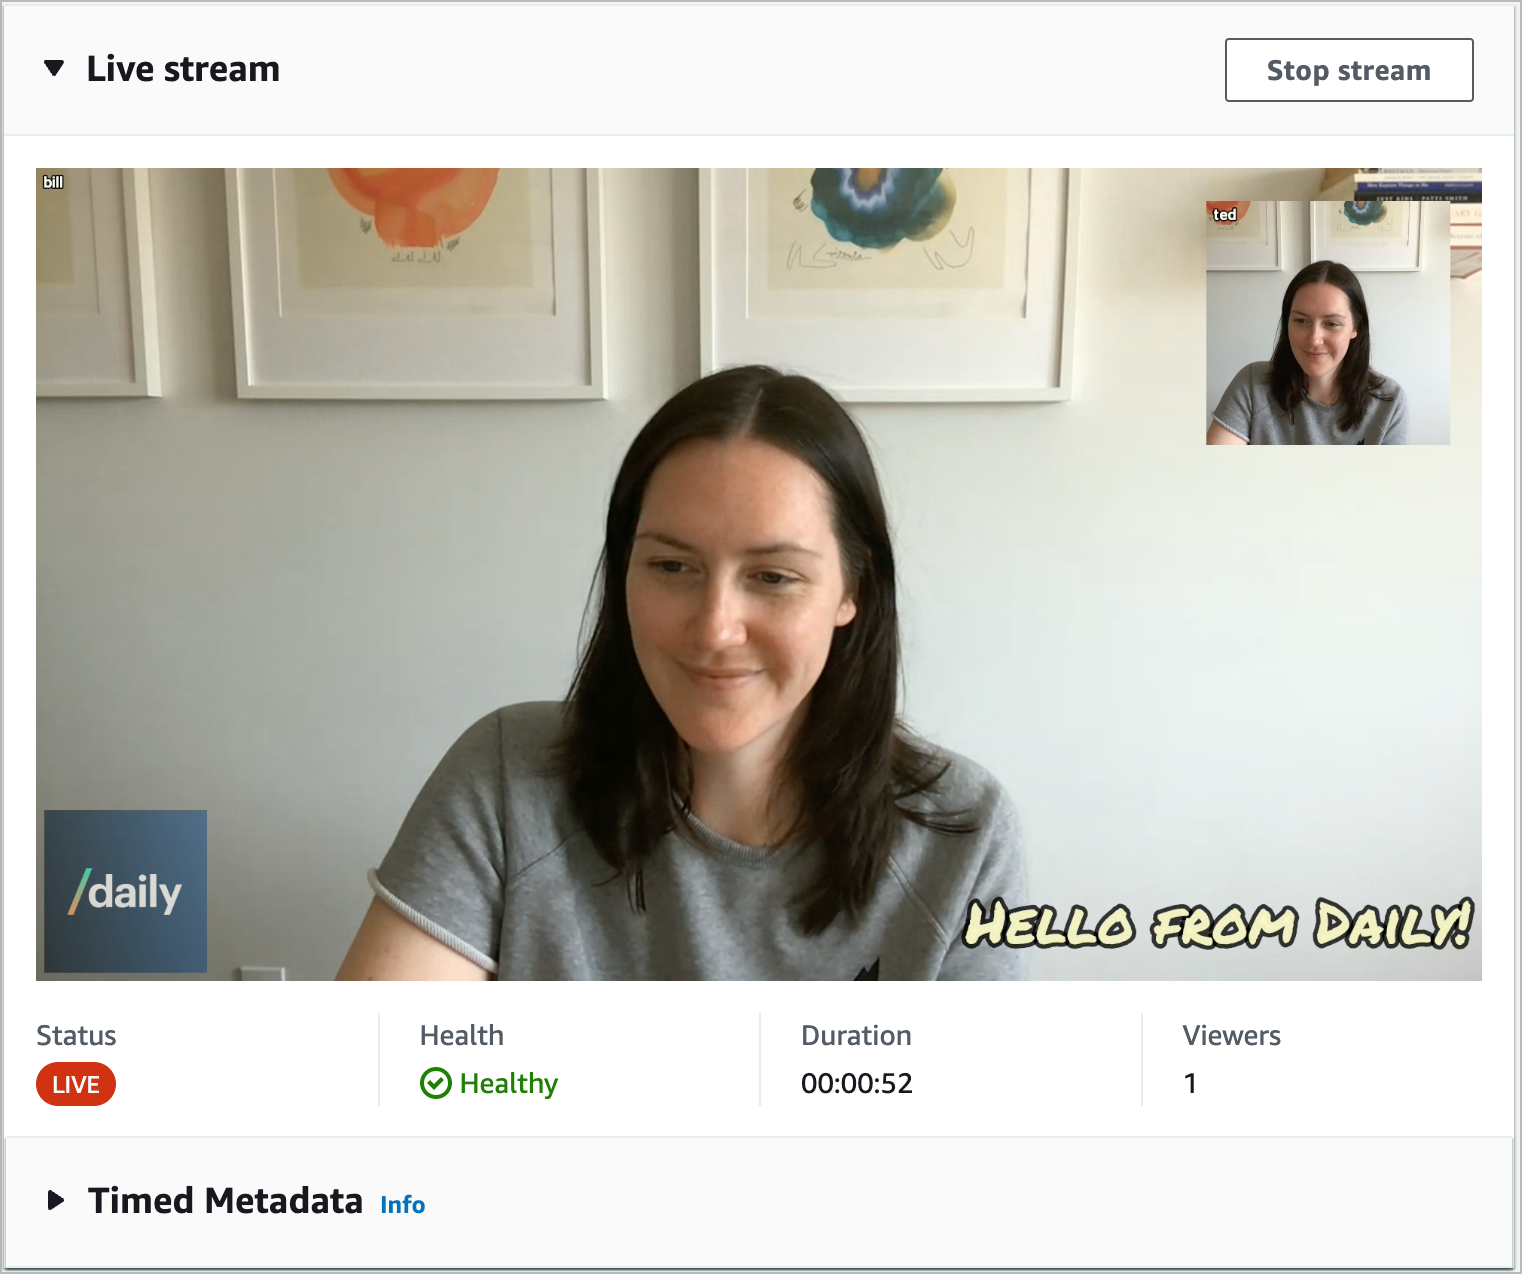
Once the “Apply custom VCS settings” button is clicked, we can see our custom updates reflected in the live stream feed shortly.
updateLiveStreaming() can be called multiple times during a live stream, which means you can change these parameters each time.
Stopping the live stream
All good things must come to an end and eventually you’ll need to stop live streaming. This function will look the same for any live stream, whether you’re using the baseline composition or not:
function stopLiveStreaming() {
 callFrame.stopLiveStreaming();
}
It’s as straight-forward as calling Daily’s stopLiveStreaming() method.
Once the live stream stops, you're back to a regular real-time Daily call. Use Daily Prebuilt's Leave button to leave the call when you're ready! 👋
Wrapping up
We hope this tutorial helps you get started for testing out all the options you have for customizing your live streaming and recording feeds. We encourage you to play around with the VCS Simulator to see more options you can use.
And in case you're curious, the baseline composition is available in our React Native library, react-native-daily-js, too!
In our next tutorial, we'll look at how to display a toast component in your live stream feed using the same demo app. (Spoiler: the code is already in the vcs-live-streaming branch! 😇) We’ll also be announcing even more ways to customize your video feeds soon, so keep an eye on our Twitter account.
In the meantime, be sure to review our streaming guides, as well as some related tutorials: