

2022-04-07: The code snippets in this post reference an older version of the examples repo prior to the release of Daily React Hooks. Any code not using Daily React Hooks is still valid and will work; however, we strongly suggest used Daily React Hooks in any React apps using Daily. To see the pre-Daily hooks version of the examples repo, please refer to the
pre-daily-hooksbranch. To learn more about Daily React Hooks, read our announcement post.
The Daily team spans many time zones. We’re a remote, global company (and we’re hiring, by the way!). We know firsthand the importance of recording meetings and training sessions so that everybody can be included.
Recording is a common feature request for our customers too, and not just for workplace applications: virtual conference platforms, fitness apps, and more often require this feature. Daily Prebuilt comes with recording built-in, but if you’re creating a custom application from scratch with the Daily call object, you’ll need to use Daily’s APIs to implement recording yourself.
This blog post walks through how to do that!
In this tutorial, we’ll add a recording feature to a Next.js demo app that we built in a previous post. For details on the foundation of the app, like participant, device, and track management, reference that intro.
To implement this feature, we will:
- Set up recording prerequisites and run the demo repository locally
- Add participant controls
- Use Daily recording methods and events to start and stop recording
- Handle output-byte-stream recordings
This post covers a React demo, so it includes React snippets. That said, you can still use the same Daily methods and events when working with other frameworks. Even if you have a read-only relationship with React, this post should still be helpful (we hope!).
Set up recording prerequisites and run the demo locally
First, we’ll need to create a Daily account on the Scale plan.
💡 Reach out to our Support team at
help@daily.coto learn about our free trial, or read more about our pricing.
We’ll also need to create a Daily room with recording enabled. If you’re using the dashboard to create rooms, toggle either "Local recording" or "Cloud recording" from the Create room page. If you’re creating rooms programmatically through the API), set the enable_recording property to the string representing the recording type you’d like to use. For example, this POST request sets "enable_recording": cloud:
curl --request POST \
     --url https://api.daily.co/v1/rooms \
     --header 'Accept: application/json' \
     --header 'Authorization: Bearer DAILY_API_KEY ' \
     --header 'Content-Type: application/json' \
     --data '{"properties": {"enable_recording": "cloud"}}'
The demo supports all recording types. cloud tends to cover most use cases, but check out the recording guide if you have specific needs.
With a Scale plan and a room equipped with recording, you’re ready to get building. You can head to your own codebase or, to test out the demo in this post:
-
Fork and clone the
daily-demos/examplesrepository. -
cd examples/custom/recording -
Set your
DAILY_API_KEYandDAILY_DOMAINenv variables (see env.example). -
yarn -
yarn workspace @custom/recording dev
With that, let’s go through the demo.
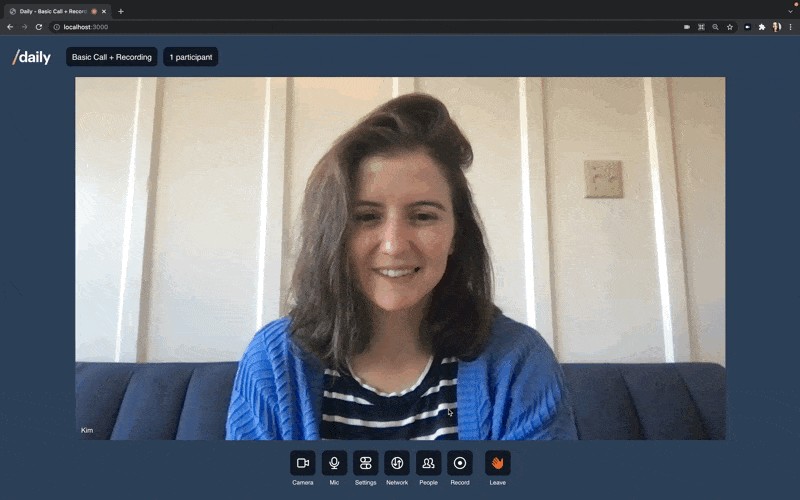
Add participant controls
We added a recording button to the tray of menu icons.

Tray.js renders the button:
// Tray.js

return (
    <TrayButton
      label={isRecording ? 'Recording' : 'Record'}
      orange={isRecording}
      onClick={() => openModal(RECORDING_MODAL)}
    >
      <IconRecord />
    </TrayButton>
  );
The label and button color vary depending on if a recording is happening. On click, the button opens a recording modal, defined in RecordingModal.js:
// RecordingModal.js

return (
  <Modal
    title="Recording"
    isOpen={currentModals[RECORDING_MODAL]}
    onClose={() => closeModal(RECORDING_MODAL)}
    actions={[
      <Button key="close" fullWidth variant="outline">
        Close
      </Button>,
      <Button
        fullWidth
        disabled={!disabled}
        key="record"
        onClick={() => handleRecordingClick()}
      >
        {renderButtonLabel()}
      </Button>,
    ]}
  >
<!-- Other components here render potential warnings -->
    </Modal>
);
Here's what the modal would look like if a recording is not happening:
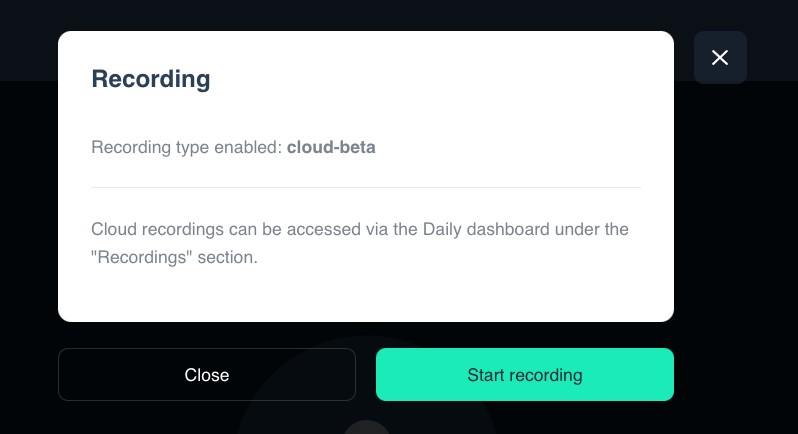
The modal display changes with recording state. If recording hasn’t started, the participant can select "Start recording". Or, they can click "Stop recording" to end a recording in progress. renderButtonLabel() changes the prompt dynamically:
// RecordingModal.js

function renderButtonLabel() {
    if (!enableRecording) {
      return 'Recording disabled';
    }

    switch (recordingState) {
      case RECORDING_COUNTDOWN_3:
        return '3...';
      case RECORDING_COUNTDOWN_2:
        return '2...';
      case RECORDING_COUNTDOWN_1:
        return '1...';
      case RECORDING_RECORDING:
        return 'Stop recording';
      case RECORDING_UPLOADING:
      case RECORDING_SAVED:
        return 'Stopping recording...';
      default:
        return 'Start recording';
    }
}
Recording state determines not only the text that the recording modal button displays, but also what function the button’s onClick={() => handleRecordingClick()} calls:
// RecordingModal.js

function handleRecordingClick() {
    if (recordingState === RECORDING_IDLE) {
      startRecordingWithCountdown();
    } else {
      stopRecording();
    }
  }
startRecordingWithCountdown(), stopRecording(), and all possible recording states are imported from the RecordingProvider context. Let’s head there next.
Use Daily recording methods and events to start and stop recording
Start recording on a custom Daily call
Our demo can start a recording in two different ways: the first allows any participant to start a recording, and the second automatically starts recording if a specific participant joins a call.
The CallProvider context handles both cases:
// CallProvider.js

useEffect(() => {
  if (!daily) return;
  const updateRoomConfigState = async () => {
    const roomConfig = await daily.room();
    const config = roomConfig?.config;
    if (!config) return;

    if (config.exp) {
      setRoomExp(config.exp * 1000 || Date.now() + 1 * 60 * 1000);
    }
    const browser = Bowser.parse(window.navigator.userAgent);
    const recordingType =
      roomConfig?.tokenConfig?.enable_recording ??
      roomConfig?.config?.enable_recording;


    const supportsRecording =
      ((browser.platform.type !== 'desktop' ||
        browser.engine.name !== 'Blink') &&
        recordingType === 'cloud-beta') ||
      (browser.platform.type === 'desktop' &&
          browser.engine.name === 'Blink');
    if (supportsRecording) {
      setEnableRecording(recordingType);
      setStartCloudRecording(
        roomConfig?.tokenConfig?.start_cloud_recording ?? false
      );
    }
  };
  updateRoomConfigState();
}, [state, daily]);
First, CallProvider checks that recording is enabled. It makes sure that there is a value on the enable_recording property at either the room or the participant meeting token level. It also confirms that the recording type is 'cloud-beta' if we’re trying to record on mobile or in Safari. Finally, it checks for a participant meeting token that has the start_cloud_recording property set to true that would indicate that recording should start automatically when that participant joins.
After all those checks are done, CallProvider sets the corresponding state values that we use throughout our app.
Back in RecordingProvider, startRecordingWithCountdown() depends on the enableRecording state that CallProvider sets. If recording is enabled, but hasn’t yet been started, and a participant clicks the recording modal button, then onClick={() => handleRecordingClick()} triggers startRecordingWithCountdown():
// RecordingProvider.js

const startRecordingWithCountdown = useCallback(() => {
  if (!callObject || !enableRecording) return;
  setIsRecordingLocally(true);
  setRecordingState(RECORDING_COUNTDOWN_3);
  callObject.sendAppMessage({
    event: 'recording-starting',
  });
}, [callObject, enableRecording]);
This function uses the Daily sendAppMessage() method to send a message that a recording is about to start. The app listens for that 'recording-starting' message to set the recording state to kick off the 3-2-1 countdown:
// RecordingProvider.js

const handleAppMessage = (ev) => {
      switch (ev?.data?.event) {
        case 'recording-starting':
          setRecordingState(RECORDING_COUNTDOWN_3);
          break;
        default:
          break;
      }
    };
The app listens for recordingState changes to update the countdown timer in the UI and call startRecording() when the time is right:
// RecordingProvider.js

useEffect(() => {
  let timeout;
  switch (recordingState) {
    case RECORDING_COUNTDOWN_3:
      timeout = setTimeout(() => {
        setRecordingState(RECORDING_COUNTDOWN_2);
      }, 1000);
      break;
    case RECORDING_COUNTDOWN_2:
      timeout = setTimeout(() => {
        setRecordingState(RECORDING_COUNTDOWN_1);
      }, 1000);
      break;
    case RECORDING_COUNTDOWN_1:
      startRecording();
      break;
    // RECORDING_ERROR and RECORDING_SAVED handlers
    default:
      break;
  }
  return () => {
    clearTimeout(timeout);
  };
}, [recordingState, startRecording]);
startRecording calls the Daily startRecording() method on the call object:
// RecordingProvider.js

const startRecording = useCallback(() => {
  if (!callObject || !isRecordingLocally) return;
  callObject.startRecording();
}, [callObject, isRecordingLocally]);
That covers clicking to start a recording. In case recording is meant to start automatically when a participant with a start_cloud_recording property on their meeting token joins the call, RecordingProvider listens for changes to the startCloudRecording state value, and automatically calls callObject.startRecording() if the property is set to true:
// RecordingProvider.js

useEffect(() => {
  if (
    hasRecordingStarted ||
    !callObject ||
    !startCloudRecording ||
    enableRecording !== 'cloud' ||
    state !== CALL_STATE_JOINED
  )
    return false;

  // Small timeout, in case other participants are already in-call.
  const timeout = setTimeout(() => {
    const isSomebodyRecording = participants.some((p) => p.isRecording);
    if (!isSomebodyRecording) {
      callObject.startRecording();
      setIsRecordingLocally(true);
      setHasRecordingStarted(true);
    } else {
      setHasRecordingStarted(true);
    }
  }, 500);

  return () => {
    clearTimeout(timeout);
  };
}, [
  callObject,
  enableRecording,
  hasRecordingStarted,
  participants,
  startCloudRecording,
  state,
]);
The app also handles other edge cases, like preventing participants from leaving the call before saving recordings and listening for the 'recording-error' event. For the sake of brevity we won’t dive into those here, but you can find them all and more in the full repository.
Stop recording on a custom Daily call
You might recall from above that if a recording is in progress, then the recording modal button onClick={() => handleRecordingClick()} calls stopRecording(). We’ll walk through each part of that function:
// RecordingProvider.js

const stopRecording = useCallback(() => {
  if (!callObject || !enableRecording || !isRecordingLocally) return;
  if (recordingState === RECORDING_RECORDING) {
    switch (enableRecording) {
      case RECORDING_TYPE_LOCAL:
      case RECORDING_TYPE_OUTPUT_BYTE_STREAM:
        setRecordingState(RECORDING_SAVED);
        setIsRecordingLocally(false);
        break;
      case RECORDING_TYPE_CLOUD:
      case RECORDING_TYPE_CLOUD_BETA:
      case RECORDING_TYPE_RTP_TRACKS:
        setRecordingState(RECORDING_UPLOADING);
        setRecordingState(RECORDING_SAVED);
        break;
      default:
        break;
    }
  } else if (recordingState === RECORDING_IDLE) {
    return;
  } else {
    setIsRecordingLocally(false);
    setRecordingState(RECORDING_IDLE);
  }
  setRecordingStartedDate(null);
  callObject.stopRecording();
}, [callObject, enableRecording, isRecordingLocally, recordingState]);
stopRecording() updates recordingState depending on the recording type. If a local or output-byte-stream recording has ended, then the recording state is set to RECORDING_SAVED. If it was a cloud-based recording (cloud, cloud-beta, or rtp-tracks), then the state is first set to RECORDING_UPLOADING.
After recordingState is set, the function calls the Daily stopRecording() method on the call object, callObject.stopRecording().
This triggers a recording-stopped event. A handler listens for the event and sets the app’s recordingState to RECORDING_IDLE when it fires, so the UI reflects that a recording is no longer in progress.
// RecordingProvider.js

useEffect(() => {
  if (!callObject || !enableRecording) return false;

  const handleRecordingStopped = (event) => {
    console.log(event);
    if (isRecordingLocally) return;
    setRecordingState(RECORDING_IDLE);
    setRecordingStartedDate(null);
  };

  callObject.on('recording-stopped', handleRecordingStopped);
  return () => callObject.off('recording-stopped', handleRecordingStopped);
}, [callObject, enableRecording, isRecordingLocally]);
There is one more recording event that we need to listen to in order to cover all Daily recording types.
Handle output-byte-stream recordings
The Daily recording-data event emits when an output-byte-stream recording has started. You can read more about this recording type and when it is a good fit for your application in our guide.
To handle this event in our demo app, we first check if a recording is an output-byte-stream type when the recording starts. If it is, we create a new TransformStream where we can log the data.
// RecordingProvider.js

if (event.type === 'output-byte-stream') {
  const { readable, writable } = new TransformStream({
    transform: (chunk, ctrl) => {
      chunk.arrayBuffer().then((b) => ctrl.enqueue(new Uint8Array(b)));
    },
  });
  window.writer = writable.getWriter();
  readable.pipeTo(window.streamSaver.createWriteStream('test-vid.mp4'));
}
In this case, we set up a file as the stream destination, but you can use the output-byte-stream recording type to send data to any third-party of your choice (reference the recording guide for more details).
Once the stream has been created, our handleRecordingData() event handler logs the data to the stream when the recording-data event emits:
// RecordingProvider.js

useEffect(() => {
  if (!callObject || !enableRecording) return false;

  const handleRecordingData = async (ev) => {
    try {
      console.log('got data', ev);
      await window.writer.write(ev.data);
      if (ev.finished) {
        console.log('closing!');
        window.writer.close();
      }
    } catch (e) {
      console.error(e);
    }
  };

  callObject.on('recording-data', handleRecordingData);

  return () => {
    callObject.off('recording-data', handleRecordingData);
  };
}, [callObject, enableRecording]);
Want to keep recording?
We hope this post helped you add recording to whatever app you’re building. If you want to keep experimenting, try adding a custom UI to start recording to the Daily webinar app (see this blog series for deep dives on the codebase), or head to the recording guide for more ideas.
Never miss a story
Get the latest direct to your inbox.