

This is post three in a tutorial series on how to build a custom Daily app with SvelteKit.
At Daily, we are always looking for new ways to help developers build and customize their video and audio apps. Often, developers will also want to build custom text-based chat components, especially for apps that need to accommodate larger meetings.
In this SvelteKit tutorial series, we’ve been looking at how to build a custom Daily video call app from scratch with Daily’s call object. In today’s post, we’ll focus on building a custom chat sidebar. We’ll also look at how to add a notification to your chat sidebar to ensure no one ever misses any new messages.
To start, let’s get ourselves set up locally with the completed custom Daily SvelteKit demo app available in GitHub.
Setting up our local environment
To run this project locally, first clone the repo.
Next, you will need to rename env.example to .env.local and add your Daily API key and Daily domain to it. (Visit the project’s README for more information on where to retrieve these values.)
Lastly, from the project’s root directory, run:
npm install
npm run dev
To view the project, open http://localhost:3000 in the browser of your choice.
Defining our chat feature
Before we dive into the code, let’s first decide exactly what we’re building. The custom chat sidebar will:
- Use Daily’s sendAppMessage method to send messages and Daily’s
'app-message'event to receive messages - Be represented by a “drawer” in the app UI which can be toggled to slide in and out of view
- The drawer, when open, will display all chat messages received since the local participant joined the call. That means if you join after messages are sent, you won’t see them. (Persistent chat history is covered in this React tutorial, though!)
- The drawer will also include a form for the local participant to submit new messages
- Show a red notification when new messages are received so the local participant knows to read them
For this tutorial, we’ll be looking specifically at the Chat.svelte and [roomId].svelte files to add these features.
Getting chatty
Before we get to sending messages, let’s start with our markdown in the Chat.svelte file to see what HTML elements we’re working with. (Since this is a Svelte component, it has some Svelte-specific syntax worked into it, too.)
<!-- Chat wrapper including drawer
	and button to toggle drawer -->
<div class={
	chatIsOpen
		? 'chat-open chat-container'
		: 'chat-container'}>
	<div class="chat-view-button">
		<!-- overlay notification animation
			on chat button -->
		{#if hasNewNotification}
			<span class="new-notification" />
		{/if}
		<!-- Show a button to toggle the chat
			in/out of view  -->
		<button on:click={toggleChat}
			>{#if chatIsOpen}
				<img src={close} alt="Close chat" />
			{:else}
				<img src={chat} alt="Open chat" />
			{/if}
		</button>
	</div>
	<div class="chat">
		<!-- Render each message in the existing
			chat history -->
		<div class="messages">
			{#each $chatMessages as message}
				<p
					transition:slide|local={{ easing: quintOut }}
					class="message">
					<span class="message-name">
						{message.name}
					</span>: {message.text}
				</p>
			{/each}
		</div>

		<!-- Render a form for the local user to
			write and send a chat message -->
		<form on:submit|preventDefault={sendMessage}>
			<input
				type="text"
				placeholder="Type a message..."
				bind:value={newText} />
			<button>
				<img src={send} alt="send message" />
			</button>
		</form>
	</div>
</div>
There are four main sections of the chat sidebar’s UI in our markdown, which we’ve color-coded in the screenshot below.
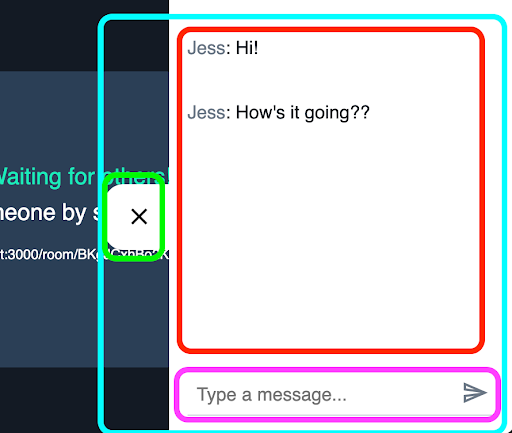
The highlighted sections include:
- The wrapper (or parent) element (blue)
- The button to toggle the chat sidebar into view, which will also conditionally show a notification (green)
- The chat messages received so far in the call (red)
- The form – including a button – to submit new messages (fuschia)
We’ll look at the button to toggle the chat sidebar into view first and come back to the wrapper:
<script>
  ...
 let chatIsOpen = false;
 const toggleChat = () => (chatIsOpen = !chatIsOpen);
 ...
</script>
...
<button on:click={toggleChat}>
     {#if chatIsOpen}
       <img src={close} alt="Close chat" />
     {:else}
       <img src={chat} alt="Open chat" />
     {/if}
</button>
...
Here, we declare chatIsOpen and assign false to it, since we don’t want the chat to show when the call loads — only when the participant wants to see it.
Then, each time our button is clicked, it calls toggleChat, which will invert chatIsOpen’s current boolean value.
Our wrapper component will then use the chatIsOpen value to conditionally set a CSS class on itself:
...
<div class={
    chatIsOpen
    	? 'chat-open chat-container'
    	: 'chat-container'}>
	...
</div>
<style>
 .chat-container {
   background-color: var(--white);
   position: absolute;
   top: 51px; /* header height */
   height: calc(100vh - 51px);
   z-index: 30;
   display: flex;
   width: 300px;
   right: -300px; /* move it off screen when it’s closed */
   transition: right 0.3s ease-out;
 }
 .chat-open {
   right: 0; /* move it on screen when it’s open */
 }
</style>
Our CSS styles will update the right property when the chat-open class gets added, giving us a sliding drawer effect.
Sending app messages
As mentioned, we’ll be using Daily’s sendAppMessage method to send messages and Daily’s 'app-message' event to receive messages.
To send the message, let’s start by looking at our chat <form> element again.
<script>
	...
	let newText = ‘’;
	...
</script>
	...
	<!-- Render a form for the local user
		to write and send a chat message -->
	<form on:submit|preventDefault={sendMessage}>
		<input
			type="text"
			placeholder="Type a message..."
			bind:value={newText} />
		<button type=”submit”>
			<img src={send} alt="send message" />
		</button>
	</form>
	...
We have an input to write the new chat message and a button to submit the message. The input value is bound to the newText variable declared at the top of the file so that we can easily access the input’s value in our component’s JavaScript.
We also have a submit event handler on the form, sendMessage.
Note: The preventDefault modifier on the submit event will prevent the page from refreshing.
Let’s take a look at sendMessage to see what happens next:
<script>
  import { chatMessages } from '../../store';
  export let callObject;
  ...
  let newText = '';
  ...
  const sendMessage = () => {
	if (!callObject) return;
	// get the participant’s username
	const local = callObject
		.participants()
		.local
		.user_name || 'Guest';
	// create our message object
	const newMessage = {
		name: local,
		text: newText
	};

	// Send the message to all participants
	callObject.sendAppMessage(newMessage);
	/**
	* Update chat history in store for the local user.
	* (Participants do not receive Daily 'app-message' events for
	* their own messages, btw!)
	*/
	$chatMessages = [...$chatMessages, newMessage];

	// Clear input value
	newText = '';
 };
...
</script>
...Once the form is submitted, sendMessage will:
- Get the local participant’s username so we can display it with the message in our chat
- Use the input’s value via
newTextas our message text - Send the message object to all other participants with Daily’s
sendAppMessage - Update our local chat message history (see
store.js), since we won’t receive an'app-message'event for our own messages - Reset our input’s value after sending
After the message has been successfully sent, the next step is to look at how remote participants will receive the message.
Receiving 'app-message's
As discussed in the previous post on building the video components for this app, we add Daily event listeners in createAndJoinCall ([roomId].svelte) after the call object is created.
<script>
    import { chatMessages } from '../../store';
    ...
    const handleAppMessage = (e) => {
       /*
       Don't update chat unless it's in the message format
       we're expecting.
        */
       if (!e?.data?.name && !e?.data?.text) return;

       // spread chat message into message history
       $chatMessages = [...$chatMessages, e?.data];
       hasNewNotification = true;
     };

    const createAndJoinCall = async () => {
       …
       callObject
       	.on('app-message', handleAppMessage);
       …
    }
...Here, we add an 'app-message' event listener with the callback handleAppMessage.
That means any time an 'app-message' event is received, handleAppMessage is called. Then, in handleAppMessage, we check to make sure the message object is in the format we expect. It needs to have a user name and message text. If not, we exit early.
Finally, we simply update our chatMessage array that’s in our store (store.js) by spreading in the new value so we can access it elsewhere in our app.
Okay, fine, there’s one more step – setting the hasNewNotification variable to true – but we’ll discuss that a bit later.
Displaying our chat messages
Now that we have our updated chatMessages array in our store, we are ready to display messages in our chat UI.
Back in Chat.svelte, we iterate over the chatMessages array in our markdown with Svelte’s each block, and render message UI for each one.
   <!-- Render each message in the existing chat history -->
   <div class="messages">
     {#each $chatMessages as message}
       <p transition:slide|local={{ easing: quintOut }} class="message">
         <span class="message-name">{message.name}</span>: {message.text}
       </p>
     {/each}
</div>Note: We added a Svelte slide transition to each message so it slides into view when it gets added, but we won’t go into those details here. Just being fancy. 💅
Displaying a notification
In the section above, we mentioned the hasNewNotification variable that gets set to true when a new message is received. This is part of our notification system for the app’s chat sidebar.
In [roomId].svelte, we pass the hasNewNotification variable as a prop to Chat and set it to true when new app-message events are received.
<Chat
	{callObject}
	{hasNewNotification}
	on:clear-notification={clearNotification}
/>We also set a custom Svelte event – clear-notification – which will reset hasNewNotfication back to false when triggered.
Now, let’s look how how this prop is used in Chat:
<script>
	import { createEventDispatcher } from 'svelte';
	...
	const dispatch = createEventDispatcher();

	export let callObject;
	export let hasNewNotification;
	...
	let chatIsOpen = false;

	$: {
		if (hasNewNotification && chatIsOpen) {
			dispatch('clear-notification');
		}
	}

	...
</script>

<!-- Chat wrapper including drawer and button to toggle drawer -->
<div class={
    chatIsOpen
    	? 'chat-open chat-container'
    	: 'chat-container'}>
	<div class="chat-view-button">
		<!-- overlay notification animation on chat button -->
		{#if hasNewNotification}
			<span class="new-notification" />
		{/if}
		...
Here, we’re doing a few things:
- We import the
hasNewNotificationvariable, which will stay up-to-date with whatever the current value is in[roomId].svelte - We create a reactive
ifstatement that will be triggered wheneverhasNewNotificationorchatIsOpenchange. The idea here is to clear the notification whenever the chat is open, since that indicates the message was read. To do this, we will dispatch our customclear-notificationevent mentioned earlier. - We conditionally render a chat notification in the chat UI any time
hasNewNotificationistrue
Note: The notification’s pulse effect is all done with CSS styling. We won’t go into details here, but it is a fun little effect for grabbing the user’s attention. 🌈
The end result is:
- The notification shows when the chat is closed and a new message is received
- The notification clears when when the chat is opened
And just like that, your call participants will be addicted attentive to chat!
Wrapping up
In today’s post, we covered how to build a custom chat sidebar in your Svelte video app, as well as how to show notifications for new messages. If you somehow got this far and thought, “I actually prefer Vue!”, you’re in luck: we have a similar post using our Vue demo app.
Next in our SvelteKit tutorial series, we’ll be looking at how to let call participants know when their devices are blocked from being used in the call. Stay tuned! 👀
Never miss a story
Get the latest direct to your inbox.