

This is post two in a tutorial series on how to build a custom Daily app with SvelteKit.
One of our primary goals at Daily is to help developers build video and audio apps as quickly as possible. To extend that lofty goal even further, we want developers to use whichever tech stack they prefer.
Recently, we’ve been focusing on working with Svelte and how integrating daily-js in Svelte apps can differ from other front-end frameworks.
In this SvelteKit series, we are specifically looking at how to build a full-stack video chat app with a fully customizable UI, including both video and text-based chat. To accomplish this fully custom UI, we will be using Daily’s call object.
The completed version of this demo app is available on GitHub. It can be used to follow along with this tutorial locally in your dev environment, or be forked and updated to fit your video app requirements.
In today’s tutorial, we’ll be reviewing the Daily-specific code as it relates to the actual video call UI in our app.
This includes:
- Rendering video and audio elements for each participant
- Rendering a control panel for the local participant to toggle their camera/microphone
- Providing the ability to share up to one screen at a time in the call. (This is a demo app limitation, and not a
daily-jslimitation!)
In a future post, we will walk through how to handle device permission errors and add chat messaging, which are both handled by Daily's JavaScript API.
Setting up our local environment
To run this project locally, first clone the repo.
Next, you will need to rename env.example to .env.local and add your Daily API key and Daily domain to it. (Visit the project’s README for more information on where to retrieve these values.)
Lastly, from the project’s root directory, run:
npm install
npm run dev
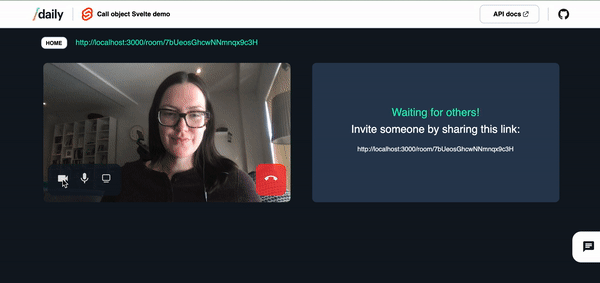
To view the project, open http://localhost:3000 in the browser of your choice.
Planning our video UI file structure
Now that we know what we’re planning on building today, let’s organize where we’re going to be building these features. We’ll focus on the project files in the GitHub repo that we’ll actually be interacting with in this part of the tutorial series.
Project_directory
│_  src
   │_  lib
      │_  call
          |_ Controls.svelte
          |_ NoVideoPlaceholder.svelte
          |_ VideoTile.svelte
   │_  routes
      │_  room
         │_  [roomId].svelte // in-call page
   |_ store.js
Since SvelteKit is a filesystem-based framework, the in-call view ([roomId].svelte) is located under /routes/room. Using our local setup as an example, this means any time someone goes to the path http://localhost:3000/room/[Daily-room-name], [roomId].svelte will be rendered.
When someone navigates to this path, we want to render our video call UI. Therefore, we will be building our Daily video call and will have most of our daily-js interactions within [roomdId].svelte.
To ensure our [roomId].svelte file doesn’t grow too long, we can take advantage of Svelte components by creating a series of video call UI components under the /lib/call directory.
To start, let’s focus on how to initialize a call with Daily.
Initializing and joining a new call
As mentioned, our Daily-specific code is mostly contained in [roomId].svelte, the parent component for our video call UI.
This page is shown after the room form has been submitted and a Daily room is available to use for our call. That means we should initialize the Daily call as soon as this parent component renders:
<script>
   import { browser } from '$app/env';
   …
   onMount(() => {
       if (!browser) return
       createAndJoinCall();

       // updates background colour
       if (!document) return;
       document.body.classList.add('in-call');
   });
Note: The browser check is a workaround to SvelteKit’s default server-side rendering. It helps us ensure daily-js is only interacted with client-side.
When [roomId].svelte first mounts, we immediately call createAndJoinCall.
<script>
   import { page } from '$app/stores';
   import daily from '@daily-co/daily-js';
   ...
   let callObject;
   let participants = [];
   …
   const createAndJoinCall = async () => {
       const roomName = $page.params.roomId;
       const domain = import.meta.env.VITE_DAILY_DOMAIN;
       if (!roomName || !domain) {
           // You could show a UI error here
           return;
       }

       const url = `https://${domain}.daily.co/${roomName}`;
       // Create instance of Daily call object
       callObject = daily.createCallObject({ url, userName: $username });
       // Add call and participant event handler
       // Visit https://docs.daily.co/reference/daily-js/events
       // for more event info
       callObject
           .on('joining-meeting', updateParticpants)
           .on('joined-meeting', handleJoinedMeeting)
           .on('participant-joined', updateParticpants)
           .on('participant-left', updateParticpants)
           .on('participant-updated', updateParticpants)
           .on('error', handleError)
           // camera-error = device error
       	   // like device in use or permissions issues
           .on('camera-error', handleDeviceError)
           .on('app-message', handleAppMessage);

       // Join the call
       try {
           await callObject.join();
           // reset possible existing error message
           dailyErrorMessage.set('');
       } catch (e) {
           dailyErrorMessage.set(e);
       }
   };
We can then break createAndJoinCall down into the following steps:
- Retrieve our Daily room’s name from the URL using Svelte’s
$pathstore.
const roomName = $page.params.roomId; - Next, we get our Daily domain from our app’s environment variables:
const domain = import.meta.env.VITE_DAILY_DOMAIN; - Both of these values are used to know which room URL to join via Daily’s
createCallObjectfactory method.createCallObjectwill initialize the DailyIframe that can be interacted with via Daily’s API. - Once the call object instance is created, we add all our event listeners to it.
daily-jswill send events to the client for any call or participant updates, so we can listen for specific events to update our call UI. - Finally, we join our call with Daily’s
joinmethod. If there’s an error with joining – like if the Daily room URL is invalid – we’ll return to the home screen and see an error message.
Once createAndJoinCall is done, we have a callObject we can interact with via daily-js methods and will have a local participant joined to the call.
But how do we get information about our participants? Our Daily events!
Keeping track of participants
In createAndJoinCall, we added a bunch of Daily event listeners, like so:
callObject
    .on('joining-meeting', updateParticpants)
    .on('joined-meeting', handleJoinedMeeting)
    .on('participant-joined', updateParticpants)
    .on('participant-left', updateParticpants)
.on('participant-updated', updateParticpants)We also declared a participants variable at the top of the file:
let participants = [];
When the local participant joins the meeting (joined-meeting), remote participants join (participant-joined), or remote participants update (participant-updated), we update our participants array that we track locally.
const updateParticpants = (e) => {
    console.log('[update participants]', e);
    if (!callObject) return;

    participants = Object.values(callObject.participants());
};
More specifically, we get the current participants object from our callObject with the participants getter method, convert it to an array, and replace the local participants array with it.
Note: Since the updated participant is available in the event (e.participant), you could alternatively update that specific participant instead of updating the whole array. This is sometimes preferable with large meetings to help improve app performance.
Once the participants array is updated, we have access to our participants’ most current state to use in our component.
Now that we know who’s in the call, we’re ready to render some videos!
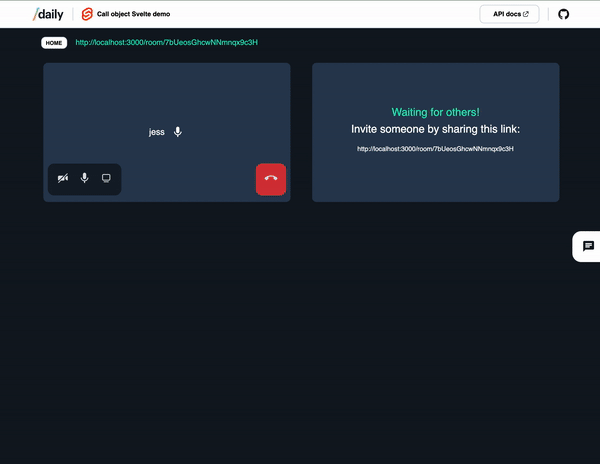
“Can you see me?”: Rendering a video tile
There are a number of UI components rendered conditionally in [roomId].svelte (e.g. a screen share tile, chat, etc.) but let’s focus on participant video tiles for now.
<div class="call-container">
    <!-- Render a video tile for each participant -->
    {#each participants as participant}
        <VideoTile
           {callObject}
           {participant}
           {screensList}
        />
    {/each}
    …
</div>Svelte offers the #each syntax to iterate through an array and return a component for each array item. Using #each, we can take our participants array, iterate through it and render a VideoTile component for each participant.
You may also notice we’re passing three props:
callObjectparticipantscreensList(our screen share array, which hasn’t been mentioned yet)
These props will be used by the VideoTile component.
Get to the video already
Okay! Now that we are rendering a VideoTile component for each participant in the call, we can look at how the video and audio actually get rendered.
In VideoTile, we’ll render:
- A
<video>element when the video track is ready - An
<audio>element when the audio track is ready - A
NoVideoPlaceholderif the participant turns off their camera Controlsfor handling your devices if theVideoTileis for the local participant. (Participants can only control their own camera and microphone in this call.)
When a participant’s VideoTile is first rendered, the media tracks are sometimes still in a loading state. To avoid trying to render the tracks before they’re playable, we’ll take advantage of Svelte’s reactive declarations. This allows us to wait until the tracks are playable before trying to set the <video> and <audio> element sources.
Let’s use our video track as an example, since the audio track follows a similar pattern.
 let videoTrackSet = false;
 let videoSrc;
 $: videoTrack = participant?.tracks?.video;
 $: screenTrack = screen?.tracks?.screenVideo;
 $: {
   // videoSrc could be a participant track or a screen share so we
   // check for both possibilities.

   // In either case, we wait until the track is playable and then only
   // set it once to avoid rerendering it
   if (!screen && videoTrack.state === 'playable' && !videoTrackSet) {
     videoSrc = new MediaStream([videoTrack.persistentTrack]);
     videoTrackSet = true;
   } else if (screen && screenTrack.state === 'playable' && !videoTrackSet) {
     videoSrc = new MediaStream([screenTrack.track]);
     videoTrackSet = true;
   }
 }
There are a few things to be aware of before digging through this code:
- Each participant object returned from
daily-jswill have its track information attached, including the video, audio, and screen share tracks. These tracks are used as the sources for our<video>and<audio>elements. - In the
VideoTilecomponent, the video might be a participant video or a screen share video. We’ll rely on thescreenprop to know whether it’s a screen share. - We typically recommend using the video and audio tracks’
persistentTrackbecause it helps avoid some Safari bugs. (Trust us on this one!) - Because we’re using the
persistentTrack, we can set it once and avoid rerendering it regardless of whether the participant is toggling their video or audio.
With that in mind, let’s step through what’s happening here.
- First we set our reactive
videoTrackandscreenTrackvariables, which will update (or react) to anyparticipantandscreenchanges. - Then, we determine if we need to set a participant video or screen share track. Since both use a
<video>element, we’ll check if thescreenprop is truthy to know whether it’s a screen share tile.-
In the first case, we want to confirm it’s not a screen share, check if the track is playable, and ensure the track hasn’t already been set:
(!screen && videoTrack.state === 'playable' && !videoTrackSet)If this is all true, we can set our video source (
videoSrc) using the video track’spersistentTrackand toggle ourvideoTrackSetvariable to now be true.
-
videoSrc = new MediaStream([videoTrack?.persistentTrack]);
videoTrackSet = true;
-
In the second case, we want to know if it is a screen, if the track is playable, and if the track hasn’t already been set:
(screen && screenTrack.state === 'playable' && !videoTrackSet)If this is all true, we’ll use the participant’s screen share track as our video source.
videoSrc = new MediaStream([screenTrack?.track]);
videoTrackSet = true;
- In any other case, we don’t need to do anything. We’re either waiting for the track to load or it’s already set.
We then do a nearly identical check for the audio track, too.
Once we have our video and audio MediaStreams, we can use them to set the sources for our <video> and <audio> elements.
The video is rendered like so:
  {#if !videoSrc}
       <NoVideoPlaceholder {participant} />
   {:else}
    <!-- participant video or screen share video -->
       <video
           id={`video-${participant?.session_id
               || screen?.session_id}`}
           autoPlay
           muted
           playsInline
           use:srcObject={videoSrc}
       />
{/if}Here, we load a placeholder element until the videoSrc is set. In practice, it will typically flash for a second or two while the video track is loading, assuming the video is on to start.
For our <audio> element, we don’t need a visual placeholder, so we can just wait until the audioSrc is available before rendering it.
{#if !participant?.local && audioSrc}
    <audio
 	   id={`audio-${participant?.session_id}`}
	   autoPlay
	   playsInline
	   use:srcObject={audioSrc}>
           <track kind="captions" />
    </audio>
{/if}Note: The local participant (you!) doesn’t get an <audio> element rendered. This is because you don’t need to hear yourself speak via the app, and it helps avoid feedback issues.
One Svelte-specific detail here is how the source is getting set for both the <audio> and <video> elements. We’re using Svelte’s use action to handle setting the srcObject properly instead of just directly setting the srcObject video attribute.
<script>
   function srcObject(node, stream) {
       node.srcObject = stream;
       return {
           update(newStream) {
               if (node.srcObject != newStream) {
                   node.srcObject = newStream;
               }
           }
       };
   }

</script>
<video
   id={`video-${participant?.session_id || screen?.session_id}`}
   autoPlay muted playsInline
   use:srcObject={videoSrc}
/>
If you look at the last attribute on the <video> element, it says use:srbObject={videoSrc}. This will use the srcObject function shown above to ensure the track stays current.
Once the media sources are set, you should be able to hear and see the participant! That is, assuming their devices are on. 😉
Using device controls to toggle device settings
We never want people to feel like they don’t have control of their devices, so we need to add a Controls component to let the local user toggle their camera and microphone on and off. We’ll also let them screen share and leave the call from Controls.
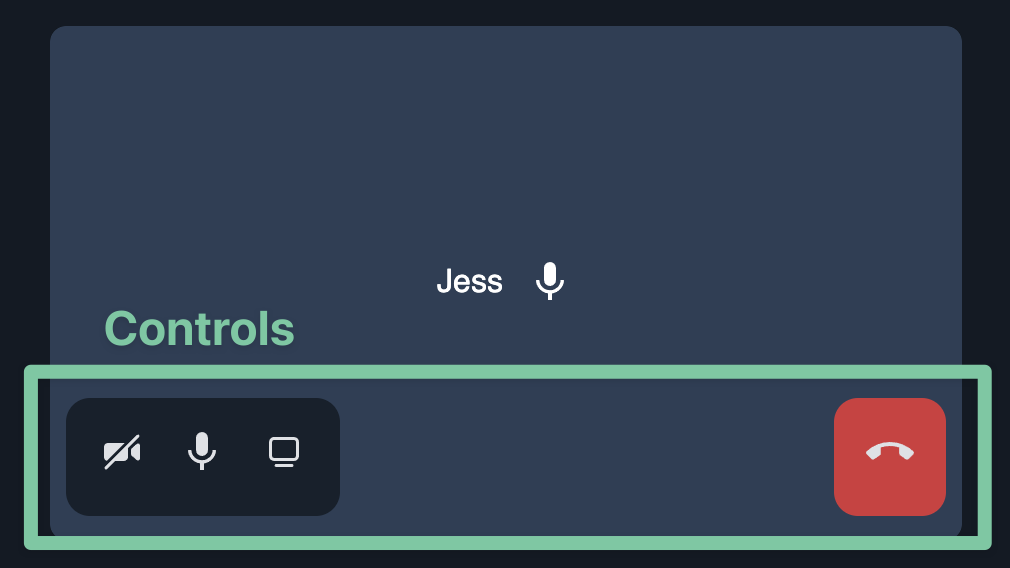
In VideoTile, we render a Controls component for the local participant only, so people can control their own devices.
   <!-- Display device controls for the local user -->
   {#if participant?.local}
       <Controls {callObject} />
{/if}We pass the callObject prop down because we’ll need to interact with daily-js to update our device settings.
Note: In larger projects, you’d likely set callObject in the store to avoid passing it around as a prop. You could also create the methods to interact with callObject where that variable is assigned and pass those methods as props instead. It’s up to you!
In Controls, we render four <button>s for each action. To toggle your camera on and off, for example, we render this button:
<button on:click={toggleVideo}>
    <img
	   src={camOn ? camOnIcon : camOffIcon}
	   alt="Toggle local video" />
</button>The icon that is rendered will depend on the current state of the camera, which is initialized onMount.
When the component mounts, we decide which icon to render based on the participant’s initial camera and microphone state using daily-js’s localVideo and localAudio methods. These will retrieve the local user’s device state for us.
onMount(() => {
    if (!callObject) return;
    camOn = callObject.localVideo();
    micOn = callObject.localAudio();
});
Then, when the button is clicked, we’ll toggle the video on or off with toggleVideo:
   const toggleVideo = () => {
       if (!callObject) return;
       const currentVid = callObject.localVideo();
       camOn = !currentVid;
       callObject.setLocalVideo(!currentVid);
   };
We get the local video state via localVideo again and then set the inverted value with setLocalVideo. This will update your local video’s state to be either on or off.
Note: You could use camOn to get the current state rather than using localVideo again, but this preserves the call object as the source of truth. Again, it’s up to you!
Local audio is nearly identical, so let’s use the screen share button as an additional example.
“Can you see my screen?”: How to screen share with Daily
One thing that makes screen sharing unique is that not all browsers support it. That means we want to conditionally show the screen share button if the browser does support it.
Thankfully, you don’t need to worry about figuring out if screen sharing is supported yourself. daily-js has a class method that can tell you: supportedBrowser.
import daily from '@daily-co/daily-js';

let browserSupport;

onMount(() => {
    if (!browser) return;
    browserSupport = daily?.supportedBrowser();
});
When the Controls component mounts (and we’ve confirmed it’s client-side rendered), we can check what the local user’s browser supports.
Then, when we go to render the screen share button, we can then make it conditional on whether the supportsScreenShare key is true:
{#if browserSupport?.supportsScreenShare}
     <button
        on:click={toggleScreenShare}
        disabled={disableScreenShare}>
           <img src={screenIcon} alt="Toggle screen share" />
      </button>
{/if}That way we know for sure if someone tries to share their screen it will actually work!
But hold on a minute, there’s a disabled attribute set on the screen share button too.
disabled={disableScreenShare}
This is because we have decided to only allow one screen share at a time (though you could support more if you want). To enforce this, we get the current screen shares (screensList) passed as a prop from the parent component and create a new variable (disableScreenShare) which will react and update itself anytime screensList changes.
That means if someone starts a screen share, the screen share button will be disabled for everyone else until the sharer stops.
export let screensList;
$: disableScreenShare = screensList?.length > 0 && !screensList[0].local;Wrapping up
Today, we covered rendering media for participants in a call and giving them control over their devices. So far in this SvelteKit series, we’ve also looked at using SvelteKit’s filesystem-based routing and endpoints to create Daily rooms.
In our next posts, we will look at how to expand this app even further by adding chat messages, handling device permissions, and more!
In the meantime, keep an eye on our Twitter to stay up to date on all our Svelte content.
Never miss a story
Get the latest direct to your inbox.