

This post is part of Daily's webinar blog series on how to build your own webinar platform using Daily Prebuilt and a custom chat widget.
At Daily we put a lot of thought into simplifying the steps it takes to get your WebRTC video calls up and running as fast as possible. If you’ve been following our webinar tutorials, you’ll know building your own webinar app can be done in just a few steps with Daily.
So far in this series, we’ve initialized a new React app, distinguished between webinar admins and attendees with Daily meeting tokens, added a custom chat input, and taken a closer look at all the available settings for Daily broadcast calls. At this point, we have a fully functional webinar app using React.
One step that can be simplified even more is how we’re creating our admin meeting tokens. The current implementation—discussed here—relies on using a cURL command to create a new token.
curl --request POST \
--url https://api.daily.co/v1/meeting-tokens \
--header 'Authorization: Bearer <API KEY>' \
--header 'Content-Type: application/json' \
--data '{"properties":{"room_name":"webinar","user_name":"Admin name", “is_owner”: true}}'To help streamline this step, in this tutorial we’ll create a separate React app with a single form to create new admin meeting tokens. The app will be hosted by Netlify and use Netlify redirects to proxy Daily API calls.
Proxy Daily endpoints with Netlify
Since this app is meant to just be a simple form, we want to be able to make Daily REST API calls without having to build out an entire backend to use. Netlify helps us solve this issue (and a couple others) by:
- Hosting the app’s frontend code.
- Proxying the Daily endpoint requests with redirects. Note: These proxied endpoints are publicly available so this solution should be considered for demo purposes only.
- Providing password protection in the client to avoid having to build authentication. This means your admins can use the form without making the app completely public.
To accomplish step one, be sure to deploy your copy of this repo to a personal Netlify account. Netlify does a great job of explaining how to accomplish this. (We've also added a deploy button to the demo README to make these even faster.)
To proxy the Daily endpoint calls, refer to the netlify.toml file in the demo app to see how we’ve set up a proxy for the /meeting-tokens and /rooms Daily endpoints.
Note: the /rooms endpoint will not be used in this tutorial.
Next, take a look at the package.json for the netlify-build script, which is required to get your endpoints working.
"netlify-build": "sed -i s/DAILY_API_KEY_PLACEHOLDER/${REACT_APP_DAILY_API_KEY}/g netlify.toml && yarn build",package.json netlify-build script.You’ll also need to update your Netlify environment variables to look like this but with your own Netlify domain and Daily API key.
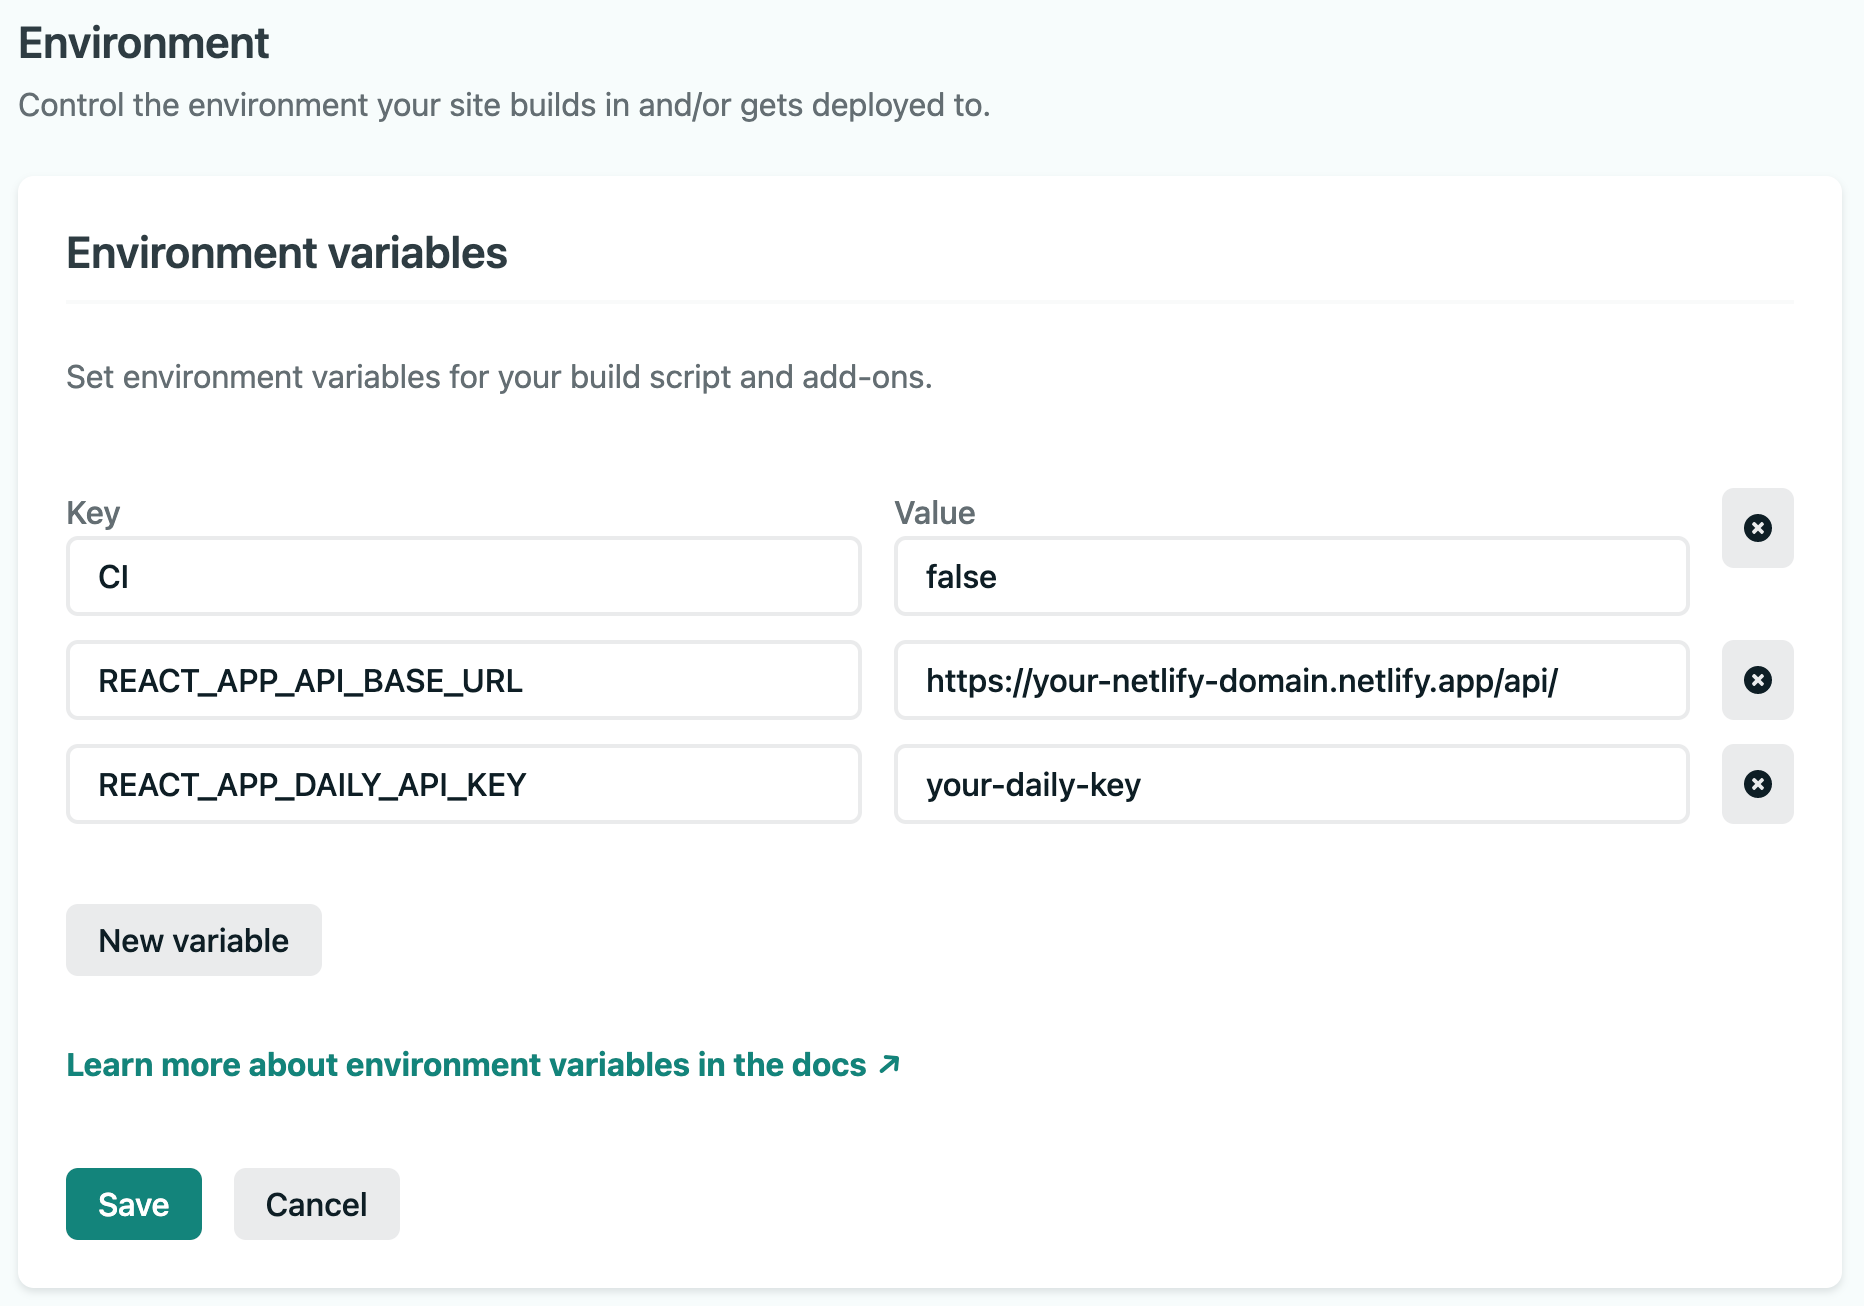
To add password protection in Netlify, go to Site settings > Access control and add a password. This will add a password form for anyone trying to access the deployed site.
In terms of the Netlify side of things, that should cover it! Let’s take a look at building our admin app now.
cURLs just want to have fun
Using a cURL command for creating meeting tokens has worked well for testing account types in our webinar app. However, if you’re planning on creating multiple tokens or having several people creating their own tokens, this process doesn’t scale well. (Lots of people aren’t comfortable running cURL commands in the terminal, so it’s not the most accessible option.)
Instead, let’s build a custom form in a React app. Following the instructions from React, create a new app with the following commands:
npx create-react-app daily-admin-app
cd daily-admin-app
npm start
Once you’ve initialized a Create React App, you have the foundation for building out the form component. Since this tutorial is focused on the meeting token form and not the specifics of building a React app, refer to our sample code for the full, completed version of this app.
Let’s jump to TokenForm.jsx to take a closer look at how to create a Daily meeting token.
Building a form in React
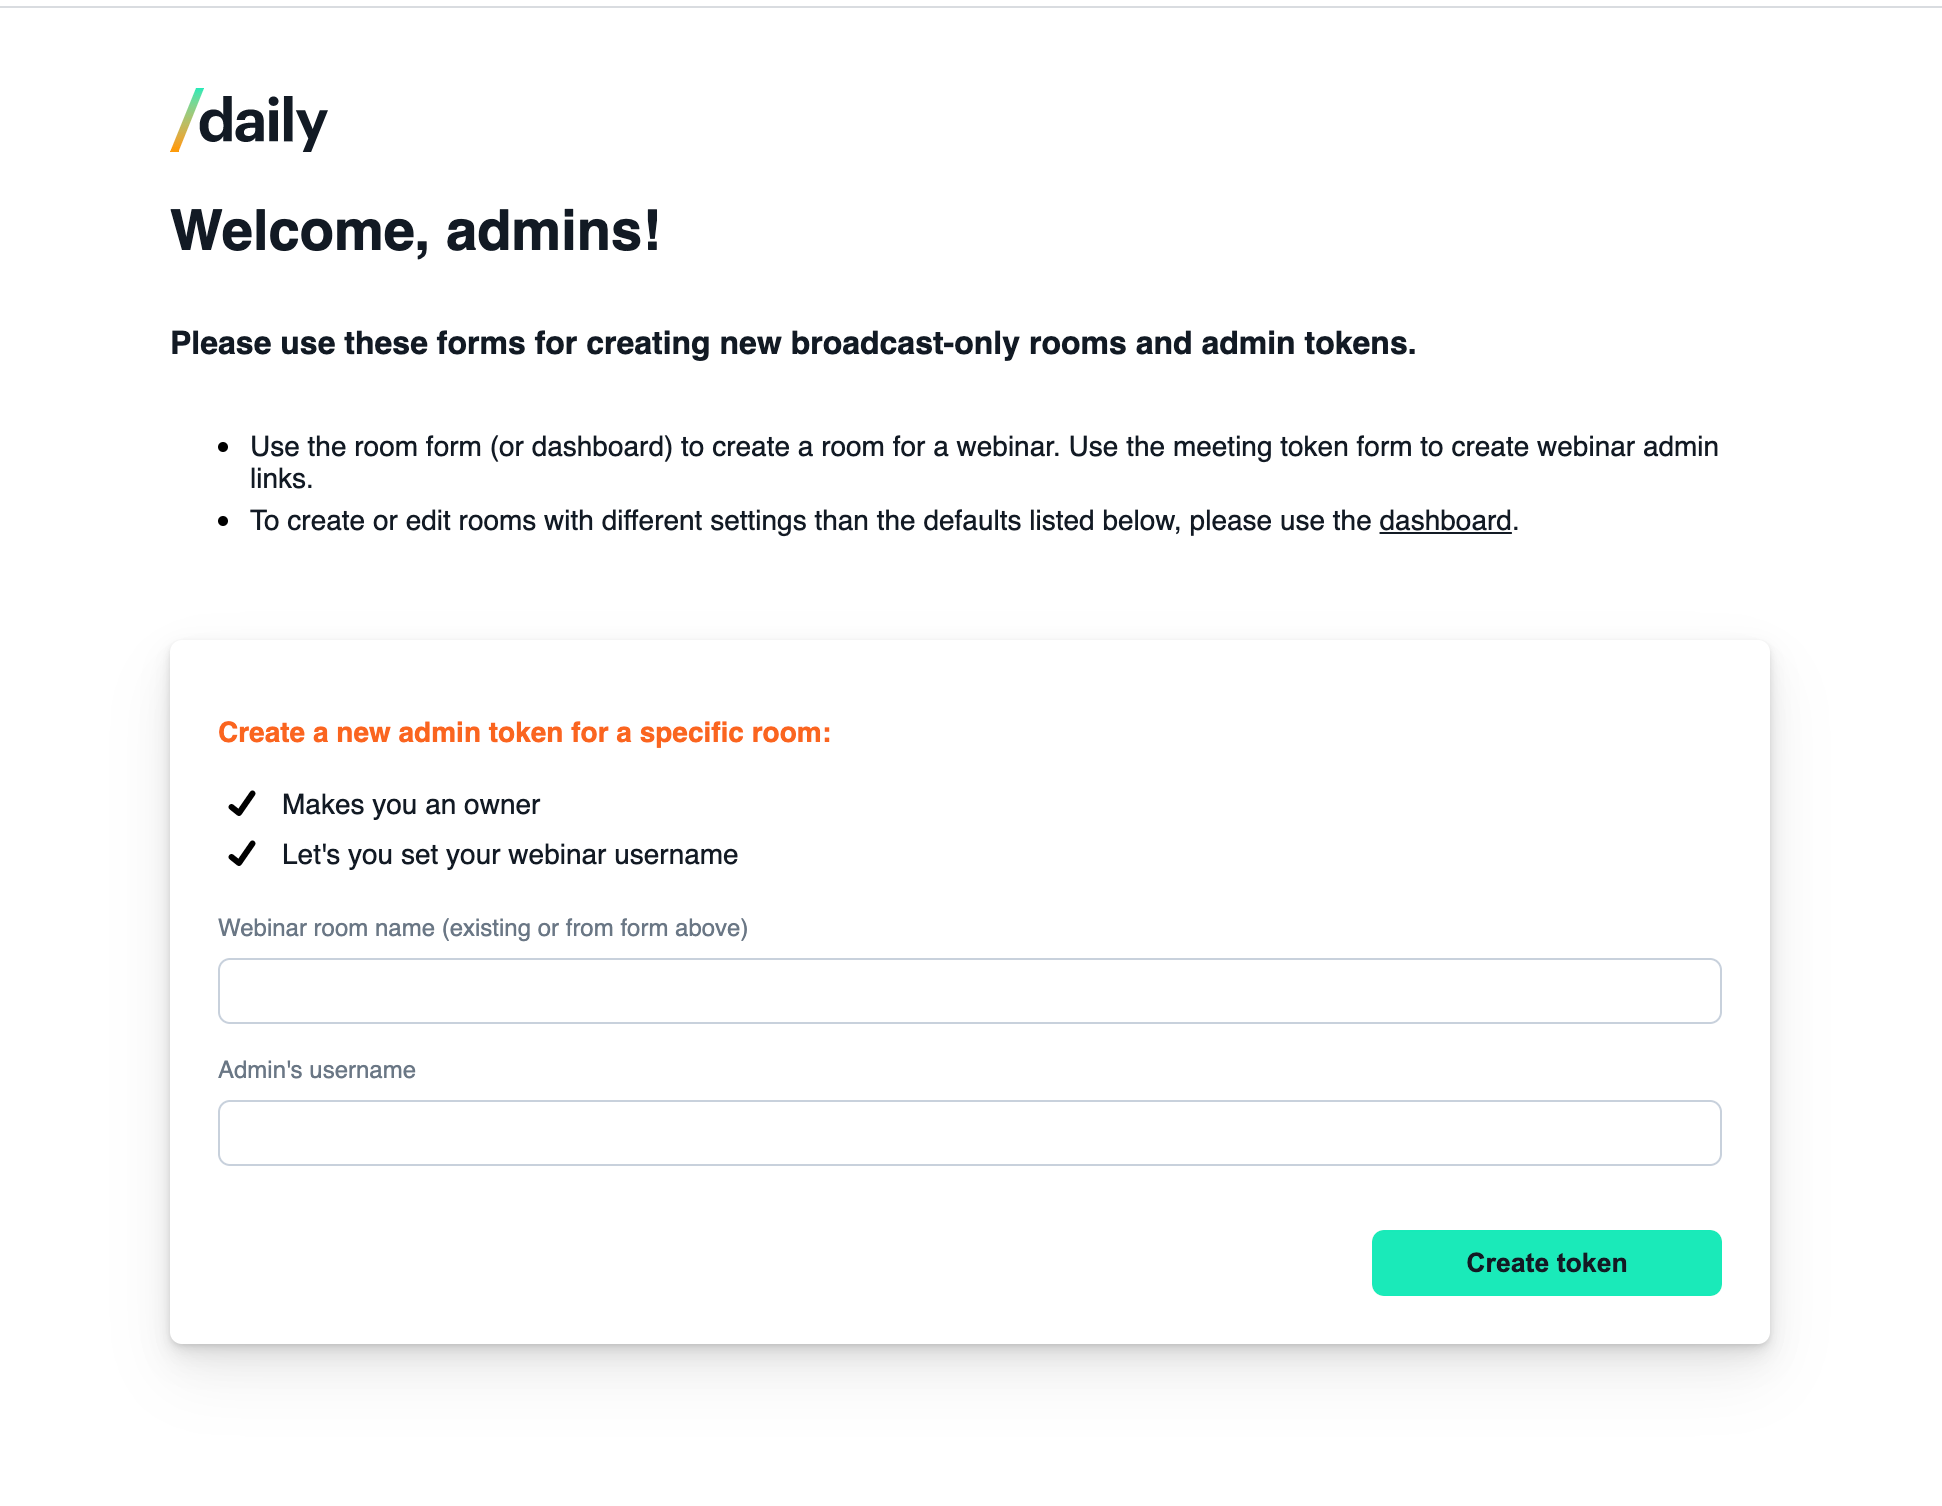
To start, let’s build a React component to create our token form.
To create an “owner” meeting token, which will authenticate our webinar admins, we’ll need:
- The Daily room name. (Be sure to create a Daily room before trying to create the token.)
- The webinar admin’s username. This is not required for token creation but we’ll need it set for our webinar app.
That means we’ll need a total of two inputs in our form to create our Daily meeting tokens.
Note: The source code uses styled-components but the code examples below will use plain HTML for clarity.
  <form onSubmit={submitTokenForm}>
     ...
     <label htmlFor="roomName">
       Webinar room name (existing or from form above)
     </label>
     <input
       onChange={handleRoomNameChange}
       id="roomName"
       type="text"
       required
       defaultValue={roomName}
     />
     <label htmlFor="userName">Admin's username</label>
     <input
       defaultValue={username}
       onChange={handleUsernameChange}
       id="userName"
       type="text"
       required
     />
     <input type="submit" value="Create token" disabled={submitting} />
     ...
   </form>
Let’s step through this form:
- There’s a form element with an
onSubmitevent handler. - There are two labelled inputs: one for the room name and one for the admin’s username. The room name must be a valid Daily room name but the username can be any string.
- There’s an input to handle submitting the form. This input is disabled when the
submittingstate istrue.
In terms of local state, the token form keeps track of the room name and username—which both have inputs, as mentioned— as well as the submitting state, token information (i.e. the Daily token), and any errors received.
const TokenForm = () => {
 const [roomName, setRoomName] = useState("");
 const [username, setUsername] = useState("");
 const [submitting, setSubmitting] = useState(false);
 const [tokenInfo, setTokenInfo] = useState(null);
 const [errorMessage, setErrorMessage] = useState(null);
 ...
The form inputs both update onChange, which means the username and roomName state will match the value of the associated input.
Example:
const handleUsernameChange = (e) => {
   setUsername(e?.target?.value);
 };
Submitting your form to create a meeting token
To create the Daily “owner” meeting token that will authenticate admins, we need to submit the form shown above with the following event handler:
const submitTokenForm = (e) => {
   e.preventDefault();
   // ...
   const url = `${process.env.REACT_APP_API_BASE_URL}meeting-tokens`;

   const dailyTokenConfigOptions = {
     properties: {
       is_owner: true,
       user_name: username,
       room_name: roomName,
     },
   };

   const options = {
     method: "POST",
     headers: {
       "Content-Type": "application/json",
       Authorization: `Bearer ${process.env.REACT_APP_DAILY_API_KEY}`,
     },
     mode: "no-cors",
     body: JSON.stringify(dailyTokenConfigOptions),
   };

   fetch(url, options)
     .then((res) => res.json())
     .then((json) => {
       // handle response
     })
     .catch((err) => {
       // handle error
     });
 };
There are a few important details to note here:
- The API base URL is your Netlify domain, which is created when you deploy this app on Netlify. That means you’ll need to deploy this app to Netlify before it’s actually ready to use. It should look something like:
https://your-domain.netlify.app/meeting-tokens. As a reminder, this is a proxy for the Daily REST API endpointhttps://api.daily.co/v1/meeting-tokens, which is handled by thenetlify.tomlfile. - The
dailyTokenConfigOptionsobject sets theis_ownerproperty totrue, and sets the username and room name supplied by the form. Again, the room name must be a valid Daily room name. The username can be whatever you want to show in the webinar chat. - Your Daily API key needs to be set in the POST request’s headers to authenticate the request.
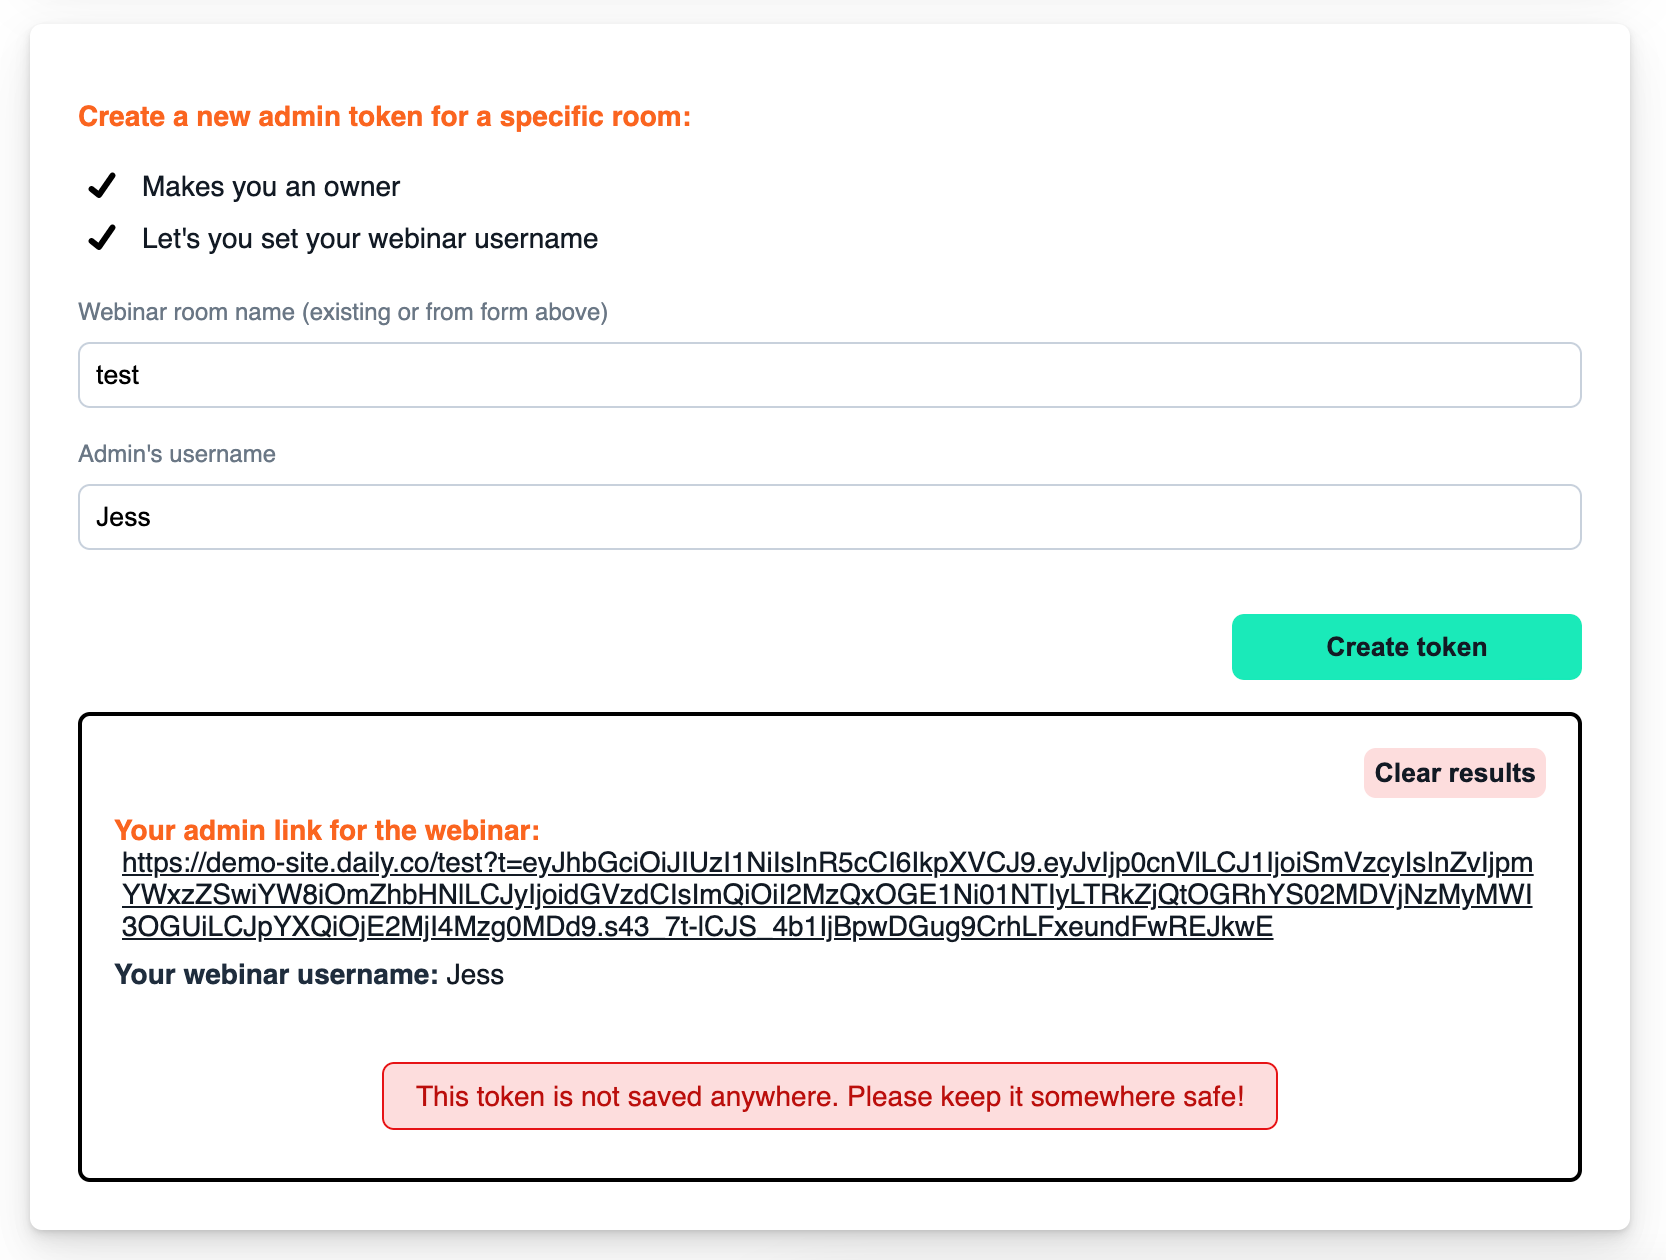
Once this is submitted, it will either return an error or a token in this format:
{
    "token": "eyJhbGciOiJIUzI1NiIsInR5cCI6IkpXVCJ9.eyJvIjp0cnVlLCJ1IjoiYWRtaW4iLCJ2byI6ZmFsc2UsImFvIjpmYWxzZSwiciI6InRlc3QiLCJkIjoiNjM0MThhNTYtNTUyMi00ZGY0LThkYWEtNjA1YzczMjFiNzhlIiwiaWF0IjoxNjE1OTE5Mzc1fQ.N6QvYVTJ7lBe918ZgTH09F06V1GGIV-IhsrlSzZqHDx"
}
From there, you can display the token in the UI. To keep things simple, we’ve opted to create a link in the required format for the webinar app: https://www.example-webinar-domain.com/room-name?t=token.
Wrapping up
Once you have this working, you officially have a functional admin app for creating Daily admin meeting tokens. In this case, we’ve built this form to be used with the webinar app but it can be used for any Daily calls that need meeting tokens.
This app can be expanded even more for any Daily REST API requests (e.g. creating Daily rooms, which we’ve already added to the sample repo for you.)
Some additional ideas for expanding functionality include:
- Adding error states to the UI
- Expanding the forms to accommodate all meeting token property options
- An “add to calendar” integration that will add an event to your calendar based on the meeting token’s optional “not before” property.
- Add custom authentication to the app to avoid using Netlify’s password protection.
To learn more about Daily meeting tokens, check out our introduction to room access control.
Never miss a story
Get the latest direct to your inbox.