

2022-04-07: The code snippets in this post reference an older version of the examples repo prior to the release of Daily React Hooks. Any code not using Daily React Hooks is still valid and will work; however, we strongly suggest used Daily React Hooks in any React apps using Daily. To see the pre-Daily hooks version of the examples repo, please refer to the pre-daily-hooks branch. To learn more about Daily React Hooks, read our announcement post."All invited call participants are alike, but every not invited call participant is not invited in their own way." - Leo Tolstoy on meeting permissions, probably.
Developers often need to account for different participant roles in their applications. This is especially true for anybody working with real-time audio and video. Webinars, moderated audio-only social platforms, and virtual classrooms all require different call experiences for different attendees. A teacher, for example, should typically have more control over a call than a student does.
While we’ve covered meeting access control at a high level on the blog before, today we’ll go deeper and implement that control in a demo app.
This post covers how to:
-
Make a private room and run the demo locally
-
Create a lobby for participants to
requestAccess()to the meeting and await the verdict -
Set up a meeting owner to grant (or deny) access to the call via
updateWaitingParticipant()
Heads up! The demo was built in React, so the code snippets in this post are in React. We wrote the tutorial with readers who have a read-only relationship with React in mind; we hope it’s still digestible even if the framework isn’t your first choice. That said, you can use all the same Daily methods and events to build a lobby in your language of choice:
accessState(),requestAccess(), waiting participant events,updateWaitingParticipant().
Make a private room and run the demo locally
The first step to building a Daily chat application that restricts call access is to create a private room. Unlike public rooms, private rooms are not open to everyone. They can be entered either when a participant has a meeting token with a matching room_name property, or if a meeting owner grants access to the participant (more on that later).
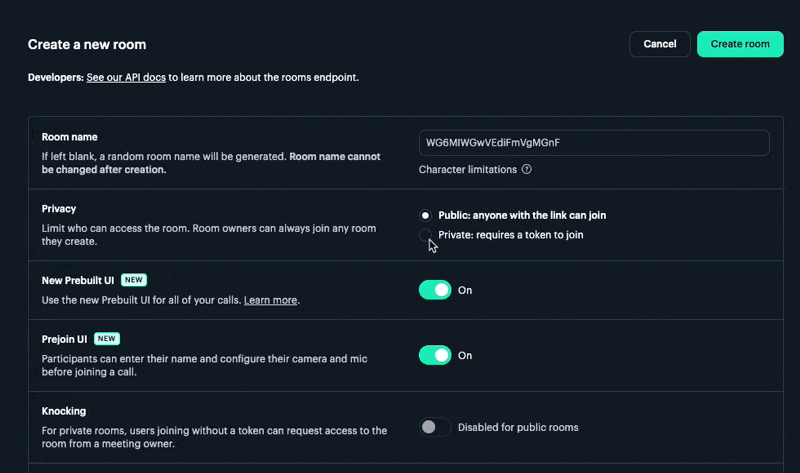
To create a private room, make sure you’ve signed up for a Daily account if you don’t have one already. Then head to the Daily dashboard Create room page, and toggle "Privacy" to "Private: requires a token to join".
If you prefer to create rooms dynamically via the API, send a POST request to the /rooms endpoint with the privacy property set to "private", for example:
curl -H "Content-Type: application/json" \
     -H "Authorization: Bearer $TOKEN" \
     -XPOST -d \
     '{"name": "private-room",
       "privacy": "private",
       "properties" : {
          "start_audio_off":true,
          "start_video_off":true}}' \
     https://api.daily.co/v1/rooms/
Once you have a private room, you’re ready to run this demo.

This app builds on top of a Daily Next.js demo. For foundational details like how a call is created and how participant events are managed, see our intro post. We’re just focusing on the meeting permissions part in this one.
To run the demo:
- Fork and clone the daily-demos/examples repository
-
cd examples/custom/basic-call - Set your
DAILY_API_KEYandDAILY_DOMAINenv variables, and comment out theDAILY_DEMO_MODEvariable that would create a room automatically (seeenv.example). yarnyarn workspace @custom/basic-call dev
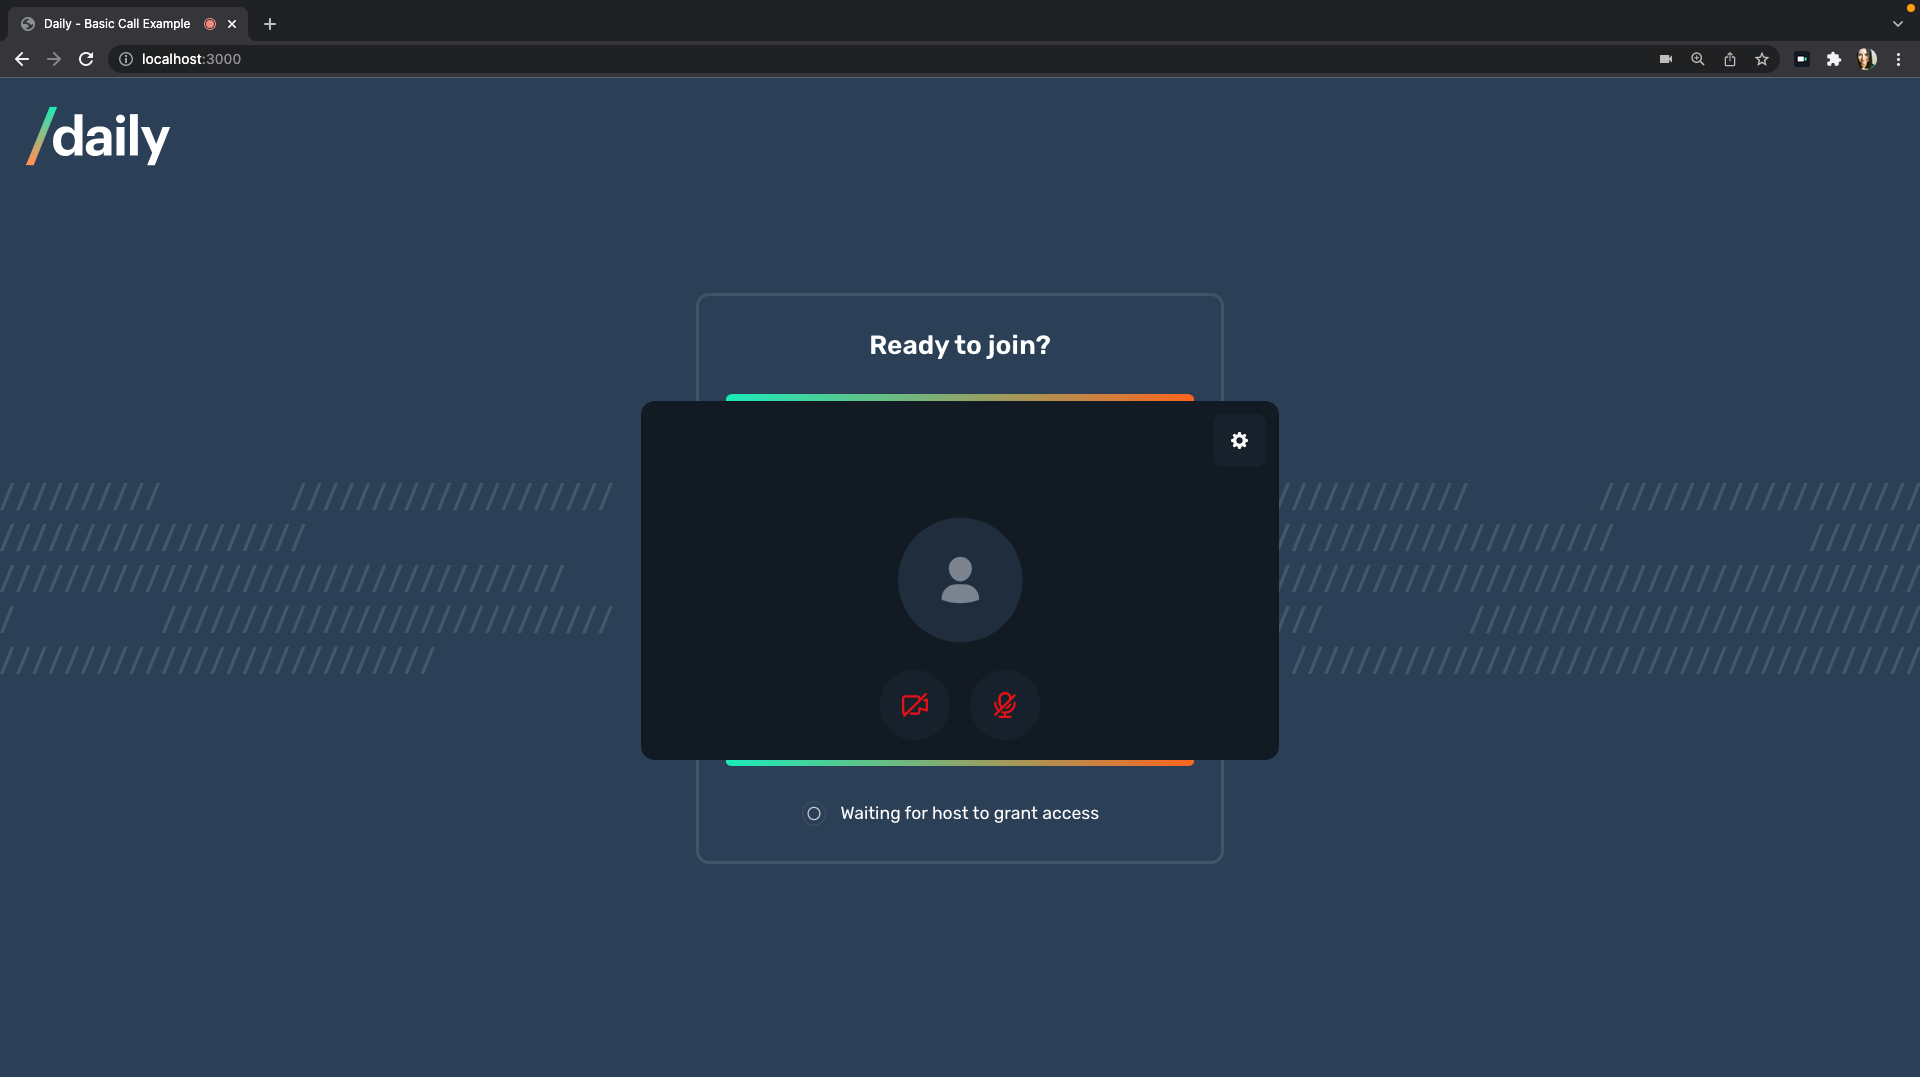
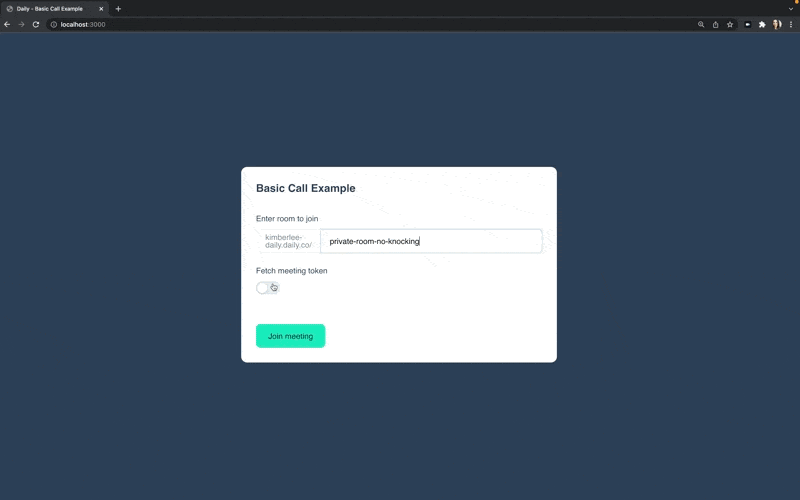
http://localhost:3000 should display a page that prompts you to enter the name of a room on your domain and join a meeting:
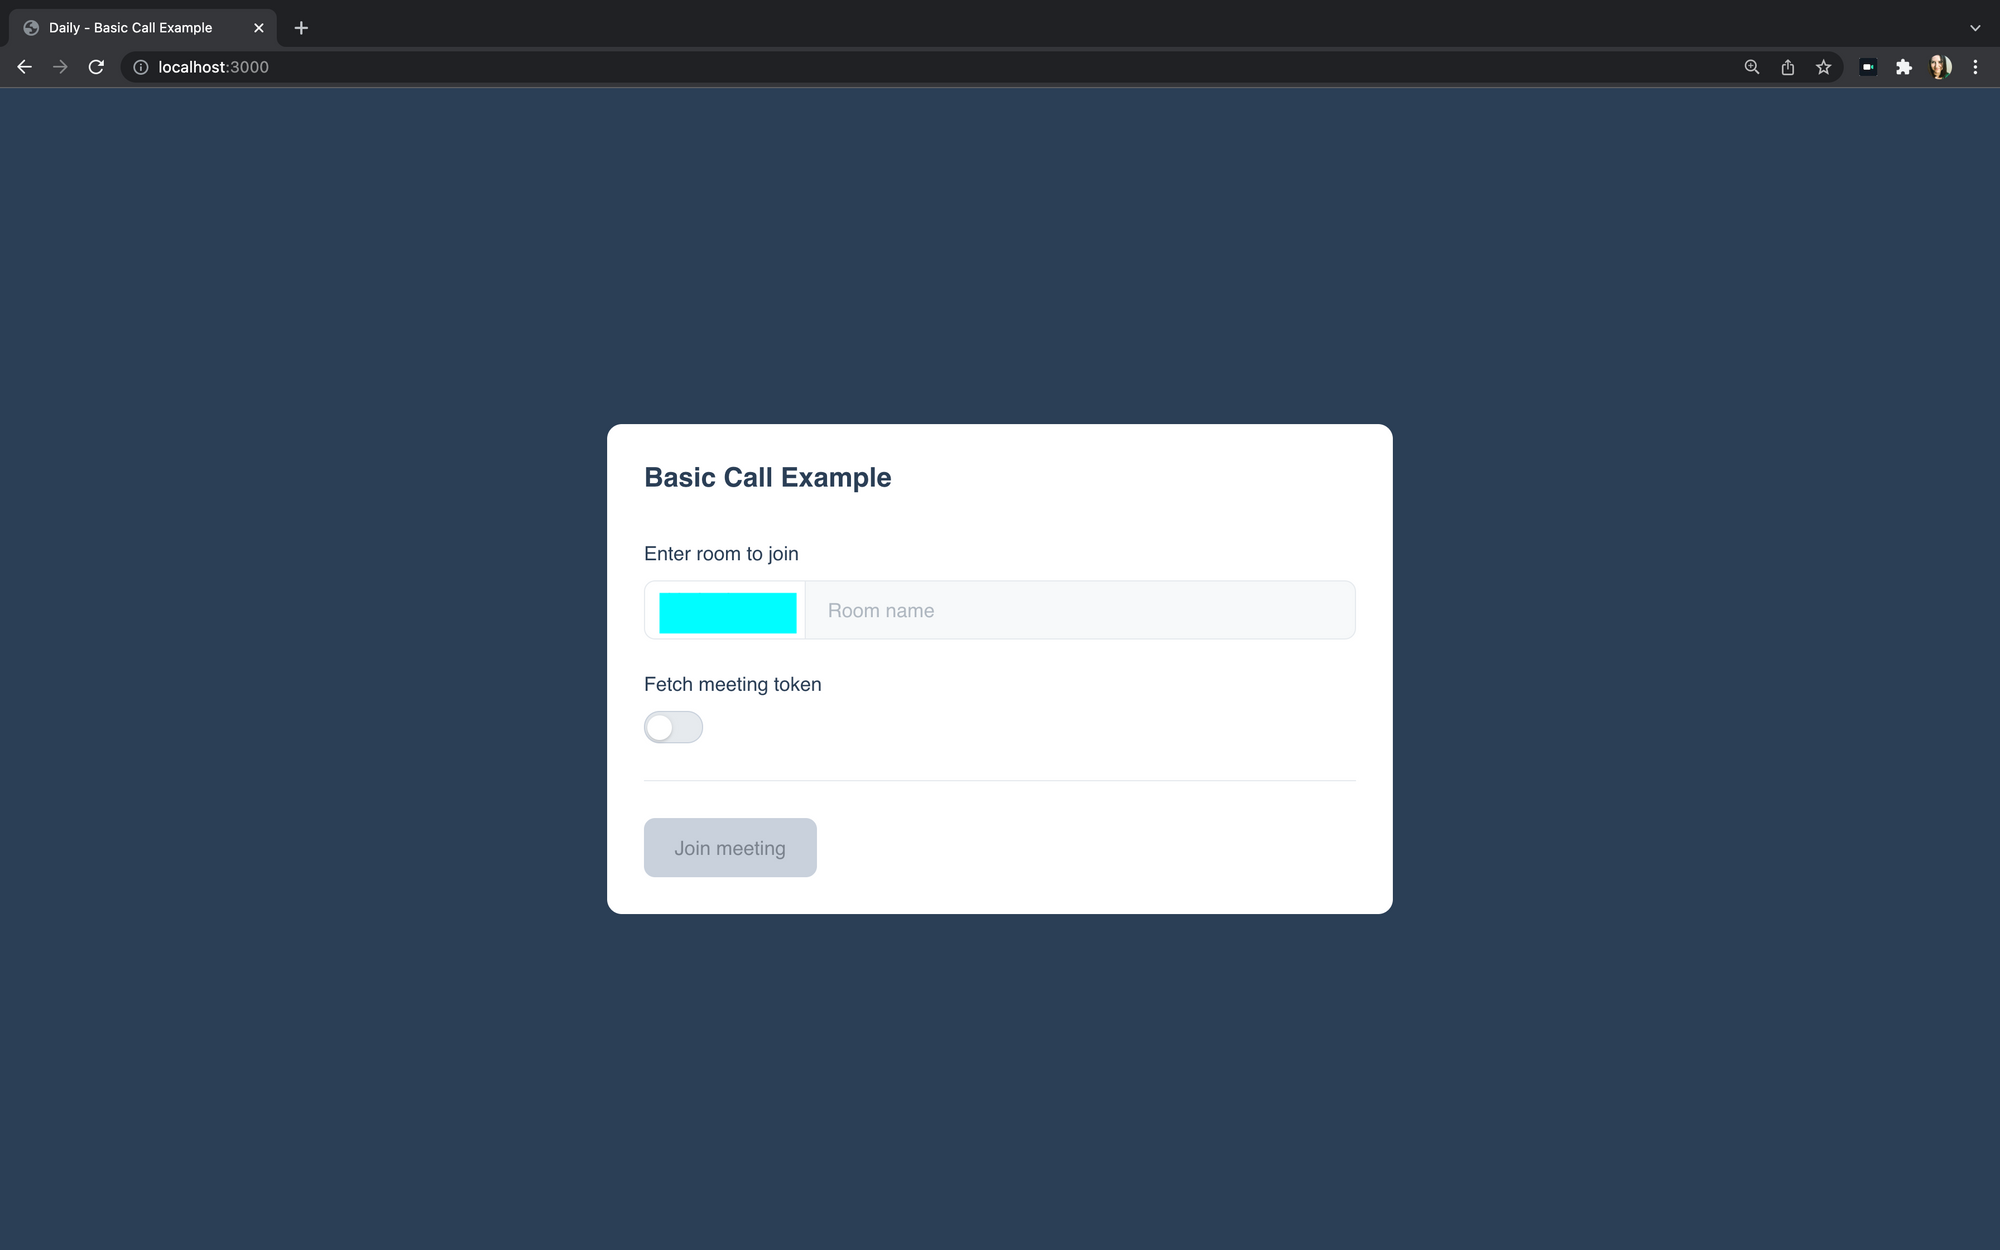
Enter the name of the private room you created earlier. Click "Join meeting". (Don’t worry about the "Fetch meeting token" option for now!) Set up your camera, enter your name, and you should see a prompt that reads "Waiting for host to grant access."
Let’s dive into the code that sent the request to the meeting host.
Create a lobby for participants to requestAccess()
Clicking "Join meeting" from the home screen initiates a pre-join screen, the <HairCheck /> component. This component prompts a participant to enter their name, set up their devices, and click "Join call". This click triggers joinCall().
Here’s the full joinCall() function, but don’t sweat, we’ll go through it all in pieces.
// HairCheck.js

const joinCall = async () => {
  if (!callObject) return;

  setJoining(true);

  await callObject.setUserName(userName);

  const { access } = callObject.accessState();
  await callObject.join();

  if (access?.level === ACCESS_STATE_LOBBY) {
    setWaiting(true);
    const { granted } = await callObject.requestAccess({
      name: userName,
      access: {
        level: 'full',
      },
    });

    if (granted) {
      console.log('👋 Access granted');
    } else {
      console.log('❌ Access denied');
      setDenied(true);
    }
  }
};
After confirming that a call object has been created and updating that object with the entered username, joinCall() checks a participant’s meeting access level by calling the Daily accessState() method.
// HairCheck.js

const { access } = callObject.accessState();
accessState() returns an object detailing the current permissions a participant has been granted. When we started the demo, we opted not to toggle "Fetch meeting token", so the method returns { level: 'lobby' }. This matches the constant ACCESS_STATE_LOBBY that we set up in our app. The waiting state value gets set to true, setWaiting(true), rendering the message about waiting for the host:
// HairCheck.js

<footer>
    {waiting ? showWaitingMessage : showUsernameInput}
</footer>
Back in joinCall(), after the waiting UI is set, the Daily requestAccess() method is called. requestAccess() asks to upgrade this participant’s accessState to 'full':
// HairCheck.js

const { granted } = await callObject.requestAccess({
  name: userName,
  access: {
    level: 'full',
  },
});
If access is granted, await callObject.join(); executes, and the participant is admitted to the call.
For a refresher on the flow of what happens under the hood of joining a call in the demo app, see this blog post.
If access is denied, the denied state value is set to true, and the participant is removed from the lobby.
That covers the participant’s perspective. Now we’re ready to dive into granting permissions as owners.
Set up a meeting owner to grant (or deny) access to the call
Only meeting owners can grant access to private rooms. Meeting owners are designated with meeting tokens that have the is_owner property set to true for either a specific room, or for the entire domain if no room is specified. A POST request to the Daily /meeting-tokens endpoint generates a meeting token, for example:
curl -H "Content-Type: application/json" \
     -H "Authorization: Bearer $API_KEY" \
     -XPOST -d '{"properties":
                  {"room_name":”private-room”,
                   "is_owner":true}}' \
     https://api.daily.co/v1/meeting-tokens
You can implement meeting token generation in your app however you like. In this demo, if the "Fetch meeting token" and "Join as owner" toggles are switched on, then clicking "Join meeting" triggers a request to a Next API route that queries the Daily /meeting-tokens endpoint. This automatically admits the participant to the call as an owner. (We covered using Next API routes to query the Daily API in a previous post, so we won’t go into those details here).
The owner is not only automatically admitted, but also sees any participant requests to join the meeting.
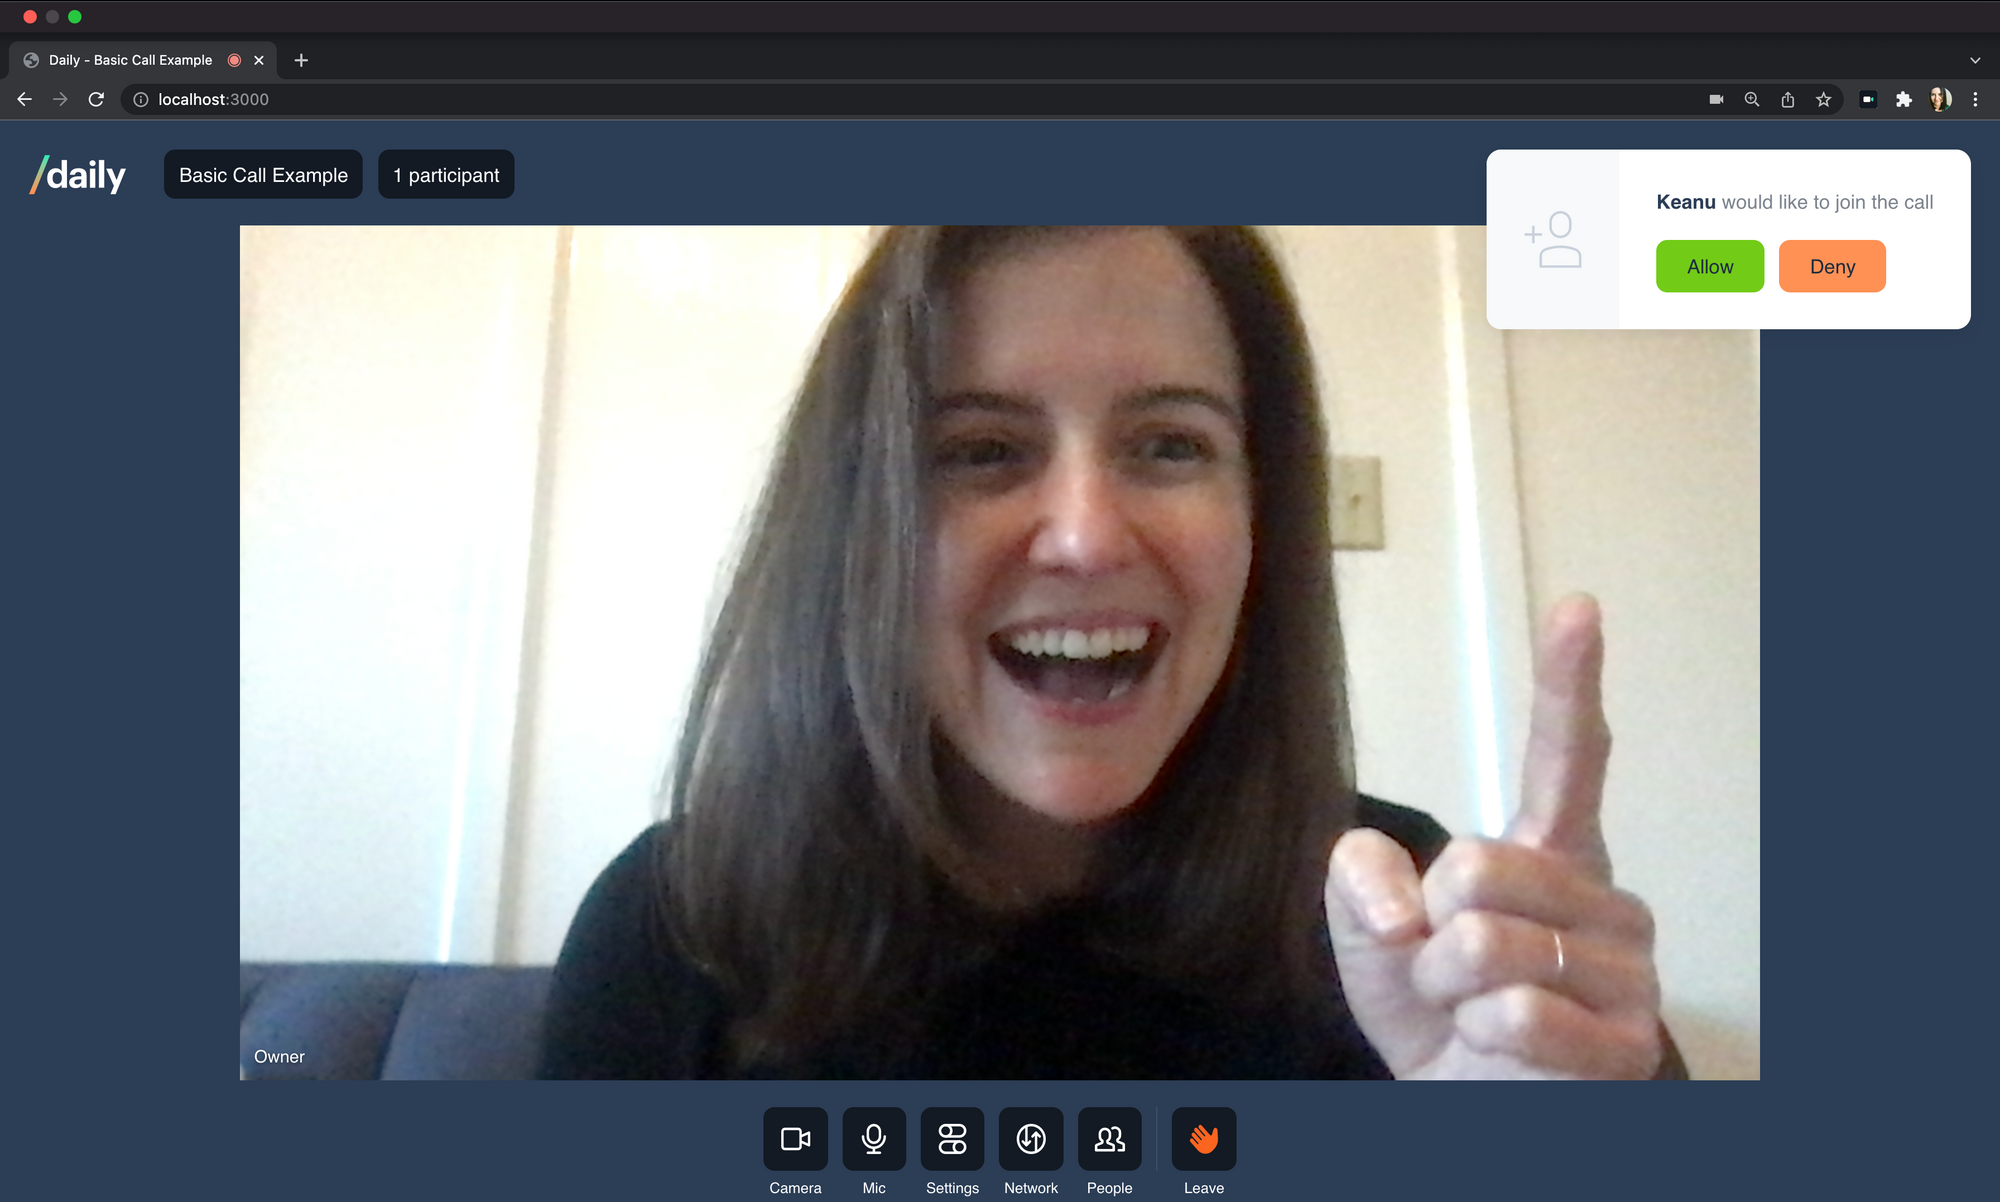
You might remember from the <HairCheck /> component that a participant calls requestAccess() when they ask to be admitted to a call. This method fires a waiting-participant-added event. The app listens for this event to display the notification to the meeting owner:
//WaitingRoomNotification.js

useEffect(() => {
  if (showModal) return false;

  const handleWaitingParticipantAdded = () => {
    setShowNotification(
      Object.keys(callObject.waitingParticipants()).length > 0
    );
  };

  callObject.on('waiting-participant-added', handleWaitingParticipantAdded);
  return () => {
    callObject.off(
      'waiting-participant-added',
      handleWaitingParticipantAdded
    );
  };
}, [callObject, showModal]);
The notification varies depending on the number of waiting participants. If it’s just one, only the single name will be displayed. If multiple are in limbo, the app gives the owner the choice to either see the full list of participant names and admit entry one by one, or to grant immediate access to everyone all at once:
// WaitingRoomNotification.js

const showMultipleParticipants = useMemo(() => {
  return (
    <CardBody>
      <p>
        <strong>{waitingParticipants.length}</strong> people would like to join the call
      </p>
      <CardFooter>
        <Button onClick={handleViewAllClick} size="small" variant="success">
          View all
        </Button>
        <Button onClick={handleDenyClick} size="small" variant="warning">
          Deny all
        </Button>
      </CardFooter>
    </CardBody>
  );
}, [waitingParticipants, handleDenyClick, handleViewAllClick]);


const showSingleParticipant = useMemo(() => {
  return (
    <CardBody>
      <p>
        <strong>{waitingParticipants[0]?.name}</strong> would like to join the call
      </p>
      <CardFooter>
        <Button onClick={handleAllowClick} size="small" variant="success">
          Allow
        </Button>
        <Button onClick={handleDenyClick} size="small" variant="warning">
          Deny
        </Button>
      </CardFooter>
    </CardBody>
  );
}, [waitingParticipants, handleAllowClick, handleDenyClick]);

return (
    <Card className="waiting-room-notification">
      {multipleWaiting ? showMultipleParticipants : showSingleParticipant}
    </Card>
  );
};
handleAllowClick() passes the id of the first waiting participant to a grantAccess() function:
// HairCheck.js

const { access } = callObject.accessState();
grantAccess(), imported from WaitingRoomProvider.js, admits all participants or a specific participant to the call, depending on what the owner decides.
// WaitingRoomProvider.js

const grantAccess = (id = 'all') => {
  if (id === 'all') {
    updateAllWaitingParticipants(true);
    return;
  }
  updateWaitingParticipant(id, true);
};
updateAllWaitingParticipants() calls the Daily updateWaitingParticipant() method, passing the * to indicate all participants, and then an object that sets grantRequestedAccess to true.
// WaitingRoomProvider.js

const updateAllWaitingParticipants = (grantRequestedAccess) => {
  if (!waitingParticipants.length) return;
  callObject.updateWaitingParticipants({
    '*': {
      grantRequestedAccess,
    },
  });
  setWaitingParticipants([]);
};
Once that call has been made, the waiting participants list is reset to empty.
The option that admits one participant at a time, updateWaitingParticipant(), specifies a single participant id to update (instead of everyone):
// WaitingRoomProvider.js

const updateWaitingParticipant = (id, grantRequestedAccess) => {
  if (!waitingParticipants.some((p) => p.id === id)) return;
  callObject.updateWaitingParticipant(id, {
    grantRequestedAccess,
  });
  setWaitingParticipants((wp) => wp.filter((p) => p.id !== id));
};
The denyAccess function works much the same way, but instead sets grantedAccess to false:
// WaitingRoomProvider.js

const denyAccess = (id = 'all') => {
  if (id === 'all') {
    updateAllWaitingParticipants(false);
    return;
  }
  updateWaitingParticipant(id, false);
};
When a participant is denied access, a waiting-participant-removed event fires.

WaitingRoomProvider.js listens for this event, in addition to the waiting-participant-updated and waiting-participant-added events, to keep the list of waiting participants up to date.
// WaitingRoomProvider.js

const handleWaitingParticipantEvent = useCallback(() => {
  if (!callObject) return;

  const waiting = Object.entries(callObject.waitingParticipants());

  setWaitingParticipants((wp) =>
    waiting.map(([pid, p]) => {
      const prevWP = wp.find(({ id }) => id === pid);
      return {
        ...p,
        joinDate: prevWP?.joinDate ?? new Date(),
      };
    })
  );
}, [callObject]);

useEffect(() => {
  if (!callObject) return false;

  const events = [
    'waiting-participant-added',
    'waiting-participant-updated',
    'waiting-participant-removed',
  ];

  events.forEach((e) => callObject.on(e, handleWaitingParticipantEvent));

  return () =>
      events.forEach((e) => callObject.off(e, handleWaitingParticipantEvent));
}, [callObject, handleWaitingParticipantEvent]);
Wait for it
With a few Daily methods and events, we’ve added more granular control over meeting access to a Daily app. We hope this helps you do the same whenever you need to set up different participant permissions levels.
If you’re looking for more ideas to keep building:
- Replace toggle owner creation with a more sophisticated system (you probably don’t want to let anybody make themselves a meeting owner in production!)
- Add owner-to-owner exclusive features, like a private chat just between meeting owners (this post might help you get started)
- Customize the waiting room interface
Or, to dive into the docs for all the events and methods we used:
And, of course, please reach out to us with any questions!