

This post is part seven of a series on how to build an app with spatialization features using Daily's real time video and audio APIs.
Introduction
Welcome to the final post in our spatialization series!
In our previous posts, we covered our core application structure, how our app interacts with Daily, world configuration, spatial video and audio implementation, interacting with focus zones in the world, and adding a screen sharing feature.
Now, we'll talk about some approaches we used to help us test our demo during development.
As a quick recap, our demo is written in TypeScript, uses the PixiJS rendering framework, and relies on the Web Audio API for spatial audio features.
So, how do we test all of these elements?
Our intention with this post is to outline how to test the most interesting parts of the demo application, rather than how to test every single feature. We have two different methods of testing our spatialization demo:
- Robots which help us to test in-world features manually
- Automated unit and integration tests written in Jest which help us test collision, proximity calculation, and our audio graph
Robots
Robots are WebDriver instances hosted in AWS which can join any Daily room. You can read more about making your own headless robots here.
We have a set of handy utilities in our Daily core repository which makes spinning up a few robots and having them join a Daily room quick and easy.
But of course, these WebDriver instances don't actually use our custom demo client. They simply connect to the call and sit there, sending test audio and video feeds to all the participants.
To make the robots useful in testing our custom application, we decided to have the client take responsibility for recognizing robot participants and directing their in-world behavior.
It's important to note that for this demo, we decided to hard code robot behavior that we felt was the most useful for our testing. We could extend this with additional functionality in the world — such as providing robot controls for human participants to control client-side robot traversal. But for now, we decided that was out of scope of this demo project and did everything in code.
It all starts in our Room
You might recall that our Room class is responsible for handling all communication with daily-js. This means it will be the first thing to encounter a robot.

All the action happens when we receive a "participant-joined" event from Daily. Our handler for the event tries to detect if the participant that just joined is a robot:
  private handleParticipantJoined(event: DailyEventObjectParticipant) {
    const sID = event.participant.session_id;
    if (this.isRobot(event.participant.user_name)) {
      world.createRobot(sID);
      return;
    }
    // The rest of the function here...
  }
Robot detection is quite rudimentary and based on the participant's user name. Our robots always have an IP address as the name, so that's what we check for in our isRobot() method:
 private isRobot(userName: string): Boolean {
    return /^(25[0-5]|2[0-4][0-9]|[01]?[0-9][0-9]?)\.(25[0-5]|2[0-4][0-9]|[01]?[0-9][0-9]?)\.(25[0-5]|2[0-4][0-9]|[01]?[0-9][0-9]?)\.(25[0-5]|2[0-4][0-9]|[01]?[0-9][0-9]?)$/.test(
      userName
    );
  }
If the participant appears to be a robot, the Room instance calls a special createRobot() method on our World instance. If it was a human, it'd call initRemoteParticipant() instead.
We'll go through robot creation in a moment. But first, we need to know a little about our demo's robot roles.
Robot roles
We have quite a few different interaction types in our spatial video/audio app, all of which we want our robots to help us test. For this reason, we've created roles for our robots. They are defined in an enum as follows:
export enum RobotRole {
  World = 0,
  Desk = 1,
  Broadcast = 2,
}
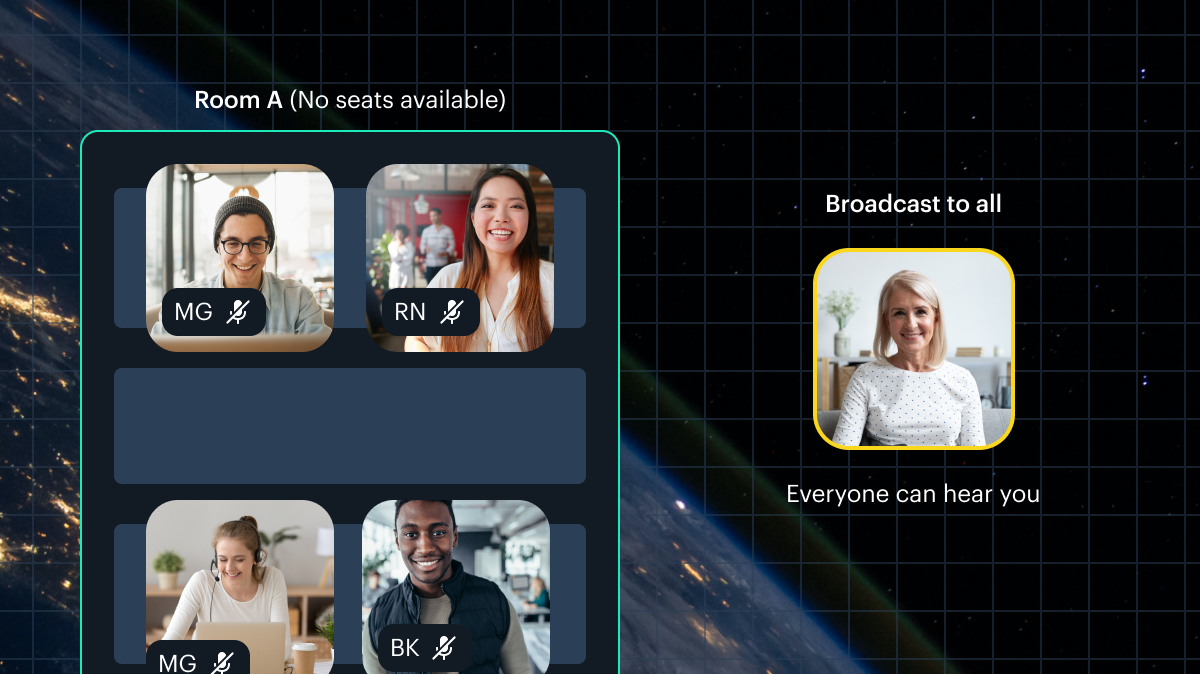
- A robot in the World role is tasked with traversing the world. It'll pick a position in the world, go there, wait ten seconds, and then pick another position.

- A robot in the Desk role will pick a desk spot to navigate to. It will repeatedly leave and enter the spot, staying in each position for ten seconds at a time.
- A robot in the Broadcast role will move to our broadcast spot and, just as with the desk role, repeatedly leave and enter the spot for ten seconds at a time.
As a human, we can then use these behaviors to navigate around the robots and test things like volume gain, panning, zone entry, and broadcast functionality.
Now that we know a little bit about our robot roles, we can dig into the actual implementation and instantiation of the robots.
Creating the robot in the world
Let's go back to that createRobot() world instance method we mentioned earlier:
 createRobot(userID: string) {
    console.log("Creating Robot", userID);

    let foundDesk = false;
    let foundBroadcast = false;

    // Check if we already have a desk and broadcast robot
    for (let robot of this.robots) {
      if (robot.role === RobotRole.Desk) {
        foundDesk = true;
        continue;
      }
      if (robot.role === RobotRole.Broadcast) {
        foundBroadcast = true;
        continue;
      }
    }
	// The rest of the function...
}
We start by checking if we already have any robots in a Desk or Broadcast role. For our purposes, we only require one instance of a robot in each of these roles.
To do this, we simply iterate through all existing robots and check their public role property.
Next, we use this information to select a role for the current robot being created:
 createRobot(userID: string) {
    // ...Existing robot detection here, which we went through above...

    // World traversal is the default robot role
    let role = RobotRole.World;

    // A persistent position that this robot will keep
    // coming back to.
    let persistentPos: Pos;

    // Try to find a desk to assign this robot to
    if (!foundDesk) {
      for (let item of this.focusZonesContainer.children) {
        if (item instanceof DeskZone) {
          const desk = <DeskZone>item;
          role = RobotRole.Desk;
          const spot = desk.getSpots()[0];
          persistentPos = { x: desk.x + spot.x, y: desk.y + spot.y };
          break;
        }
      }
    }

    // Try to find a broadcast spot to assign this robot to
    if (!foundBroadcast && !persistentPos) {
      // Find a broadcast position
      for (let item of this.focusZonesContainer.children) {
        if (item instanceof BroadcastZone) {
          role = RobotRole.Broadcast;
          const spot = <BroadcastZone>item;
          persistentPos = { x: spot.x, y: spot.y };
          break;
        }
      }
    }

    // The rest of the function
}
Above, we follow our role check of existing robots by trying to find relevant positions for the next robot. We do this by looping through our focus zones until we find one of the expected type (either a DeskZone or BroadcastZone).
Finally, we actually instantiate our new robot:
 createRobot(userID: string) {
    // ...Prior code we already went over above here...

    // Instantiate the robot with its ID, the size of the world,
    // and its role.
    const robot = new Robot(
      userID,
      defaultWorldSize,
      defaultWorldSize,
      role
    );

    if (persistentPos) {
      robot.persistentPos = persistentPos;
    }
    this.robots.push(robot);

    // Robot are just an extension of User, so
    // we add them to the same display container.
    this.usersContainer.addChild(robot);
  }
Above, we create an instance of the robot. We pass a few pieces of data to the constructor:
- The ID of the robot
- The maximum
xposition it can traverse to - The maximum
yposition it can traverse to (each of these being the size of our world) - The role we set for the robot in our previous checks
If the robot has the Desk or Broadcast role and therefore a persistent set of coordinates to toggle between, we set those on the instance. We then push the robot to our robots array, and then to the user container.
Updating the robots
Our robots are updated with every tick of the world:
    // Update all robots
    for (let robot of this.robots) {
      robot.update();
      robot.checkFocusZones(this.focusZones);
    }
The checkFocusZones() method referenced above simply iterates over the zone collection we pass to the robot and calls tryInteract() on the zone object, to handle the robot joining or leaving various zones.
The update() method sees how far the robot is from its target position and attempts to move toward it:
  update() {
   const distance = this.distanceTo(this.targetPos);
    if (distance > 5) {
      this.stepToTarget();
      return;
    }
    if (!this.reachedTargetAt) {
      this.reachedTargetAt = Date.now();
      return;
    }
    if (Date.now() - this.reachedTargetAt < 1000 * 10) {
      return;
    }
    this.pickNewTargetPos();
    this.reachedTargetAt = null;
  }
Above, we first get the distance from the robot to the robot's target position.
If the robot is more than 5 pixels away from its target position, we have it step towards the target:
  private stepToTarget() {
    const dx = this.targetPos.x - this.x;
    const dy = this.targetPos.y - this.y;
    const angle = Math.atan2(dy, dx);

    const velX = this.speed * Math.cos(angle);
    const velY = this.speed * Math.sin(angle);

    this.x += velX;
    this.y += velY;
  }
Above, we calculate what angle and velocity the robot needs to travel at to step towards its target position at its given speed. Because the Robot class extends User, it uses the same default speed of 4. This value can of course be tweaked as desired.
If the robot is less than 5 pixels away from the target position, we register that it has reached its designated spot. If it has been in that spot for less than ten seconds, we early out. If ten seconds have passed, we pick a new target position for the robot and reset its reachedTargetAt timestamp.
When the time comes to pick a new position, we call pickNewTargetPos():
  private pickNewTargetPos() {
    if (this.role === RobotRole.World) {
      // In the world role, pick any random spot in the world
      this.targetPos = {
        x: rand(0, this.maxCoords.x),
        y: rand(0, this.maxCoords.y),
      };
      return;
    }

    // If not in world role, toggle target between persistent
    // position and a spot just above it
    if (this.distanceTo(this.persistentPos) <= 5) {
      this.targetPos = {
        x: this.x,
        y: this.targetPos.y - this.width * 3,
      };
      return;
    }
    this.targetPos = this.persistentPos;
    return;
  }
It is important to remember that if the robot was given the World role it will not have a persistent position passed to it. If it was given a Desk or Broadcast role, it will always have a persistent position passed to it.
So, in case of a World role, we pick a new target position by picking a random x and y within the bounds of the world.
In case of any other role, we have the target position switch between the persistent position (that is, the desk or broadcast spot we assigned to the robot when instantiating it) and a position just above it. This results in our robot moving back and forth every ten seconds just like we saw in the GIFs above, allowing us to test zone entry and leave logic.
And that's it for our robots! This kind of client-side behavior faking is certainly not an all-encompassing way to test in-app logic, but it can help find pesky issues with user and zone interaction.
Unit and integration tests
In testing our spatialization demo, we make use of both unit and integration tests.
Unit tests are written to help validate behavior of single application components. Components tested by unit tests are intended to be small ("units", if you will 😊): a single function, for example.
Integration tests usually involve validating interaction between components. Integration tests can execute multiple functions as well as test interaction between classes and other larger components. Whereas a unit test might test a single method, an integration test might test an entire feature.
Running the tests
To run our automated tests, clone the demo repository and run the following from its root:
npm i
npm run test
You should see output that looks like this:
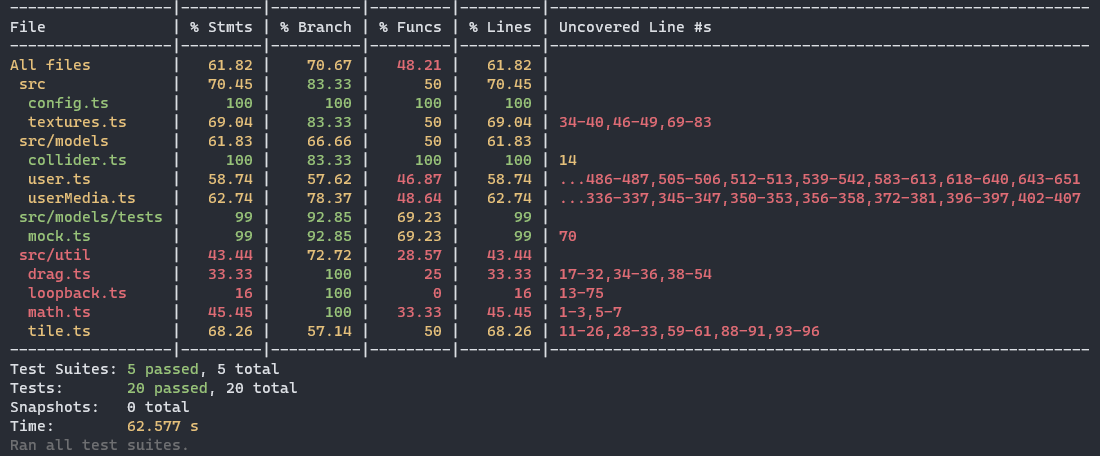
Note: You might notice a warning log in the console saying WebGL not available for compressed textures. Silently failing. This is coming from PixiJS and can be safely ignored for the purpose of our tests. You can see more information about this issue here.But running tests isn't the fun part — writing them is!
Challenges
There was one main challenge we ran into when testing the functionality of our spatialization app: Current testing frameworks don't yet seem to provide very comprehensive support for the Web Audio API as well as peripheral types like MediaStreamTrack. To test parts of our code which interact with these types, we ended up having to implement a few of our own mocks.
In this part of the post, we'll cover what we had to mock, how we mocked it, and how we utilized our mocks to test our code.
Jest and jsdom
Jest is a testing framework, allowing us to run automated tests on our code. However, our application uses DOM elements, which would normally require a browser. We aren't going to be running our tests with a browser open. This is where jsdom comes in. jsdom allows us to simulate DOM elements in our tests, without needing to have real DOM elements.
However, jsdom does not yet support some DOM elements that we use in our application and hit with our tests. These include:
MediaStreamTrack, which are our user video and audio tracksMediaStream, which contains the user's tracks in one streamRTCPeerConnection, which we use for our Chrome loopback workaround for echo cancellation.- The
play()method on anHTMLMediaElement, which is used when playing our audio and video tags.
Luckily, we can extend jsdom by creating our own mocks for these before running our tests. Let's go through how we mocked MediaStreamTrack and RTCPeerConnection. The rest of the mocks are very similar in their implementation and can be seen here.
Mocking MediaStreamTrack
In the mock.ts file of our tests folder, we define a new property on our window object:
Object.defineProperty(window, "MediaStreamTrack", {
  writable: true,
  value: jest.fn().mockImplementation(() => ({})),
});
That's it! We don't need to mock any other part of this class for our purposes.
Mocking RTCPeerConnection
RTCPeerConnection requires some extra handling. Because we directly call to some methods on the class in our code, we need to be sure to mock those, too:
Object.defineProperty(window, "RTCPeerConnection", {
  writable: true,
  value: jest.fn().mockImplementation((query) => ({
    start: jest.fn(),
    createOffer: jest.fn(),
    createAnswer: jest.fn(),
    setLocalDescription: jest.fn(),
    setRemoteDescription: jest.fn(),
  })),
});
Mocking the Web Audio API
Unfortunately, jsdom does not currently support mocking the Web Audio API. To aid us, we used the standardized-audio-context-mock package. It provides mocks for various Web Audio API classes and allows us to instantiate a mock AudioContext.
However, standardized-audio-context-mock doesn't seem to provide a full mock of the StereoPannerNode, which is a node we rely on for our left-right pan. This means we need to extend the mock with some of our own logic.
Note that our main goal here isn't to test the Web Audio API itself, but to test our usage of it. So when mocking StereoPannerNode, we're not worried about correctness of the class methods and properties past what we need to test our own code.
In mock.ts, we created a MockAudioContext class that extends AudioContext from the aforementioned standardzed-audio-context-mock package:
class MockAudioContext extends AudioContext {
If we step into AudioContext from the standardized-audio-context-mock package, we can see that it provides a createStereoPanner() method, but this method simply returns an empty object that doesn't actually implement any of the expected StereoPannerNode properties.
By contrast, if you look at that AudioContext's createGain() method, you can see that it creates a real mock of the gain node.
So in our MockAudioContext class, we'll override createStereoPanner() to create something that actually contains the expected members:
  createStereoPanner(): IStereoPannerNode<IAudioContext> {
    const node : any = {
      pan: <AudioParam>{
        value: 0,
      },
      channelCount: 1,
      channelCountMode: <TChannelCountMode>{},
      channelInterpretation: <TChannelInterpretation>{},
      context: <IAudioContext>{},
      numberOfInputs: 1,
      numberOfOutputs: 1,
      connect: () => {},
      disconnect: () => {},
      addEventListener: () => {},
      removeEventListener: () => {},
      dispatchEvent: (): boolean => {
        return true;
      },
    };

    node.pan.setValueAtTime = (pan: number, time: number) => {
      node.pan.value = pan;
    }

    return node;
  }
These are all the elements we'll need to get a StereoPannerNode that behaves appropriately for our testing purposes.
We'll use the same approach to mock (much more simplistic) stubs of createMediaStreamSource() and createMediaStreamDestination().
Mocking a body
One other thing that we do need to mock is some HTML for our window body, because some of our import code paths will be retrieving broadcast and zonemate elements from the DOM. We do so by defining a function which generates a small stub in mock.ts
document.body.innerHTML =
  '<div id="focus">' +
  '<div id="broadcast"></div>' +
  '<div id="zonemates"></div>' +
  '</div>';
We'll then call this function before importing User in our tests.
And that's it! We're finally ready to write some tests.
The tests
We have tests written to test the following parts of our functionality, mostly focused on the user:
We won't go through every test case in this post, but don't hesitate to contact us if you have any questions.
Instead, let's go through just one test case of the panner tests. In this test, we will position the speaker at the maximum earshot distance to the left of the listener. This should result in the pan value of the speaker's audio being set to -1, indicating maximum left pan. Our test case looks like this:
  test("Pan: speaker on the max left of listener", () => {
    const audioCtx = new MockAudioContext();
    window.audioContext = audioCtx;

    const local = new User({ id: "local", x: 100, y: 100, isLocal: true });
    local["earshotDistance"] = 100;

    const remote = new User({ id: "remote", x: 0, y: 100 });
    remote.media["audioTrack"] = new MediaStreamTrack();

    const wantPan = -1;
    const pannerMod = local["getAudioMod"](100, remote.getPos());
    expect(pannerMod.pan).toBe(wantPan);

    local.processUsers([remote]);

    const nodeChain = remote.media["nodeChain"];
    expect(nodeChain.getPan()).toBe(wantPan);
  });
Alright, let's see what's going on here.

Above, we first instantiate the MockAudioContext() we went through above and set our global window.audioContext variable to it.
Next, we create a local user and place it at position (100, 100) in the world.
For the test, we set our earshot distance 100.
Then, we'll create a remote user (which will be the speaker) in position (0, 100): so 100 pixels to the left of the local user/listener.
The UserMedia instance on the remote user will need a valid audio track to set up any panning, so we assign a dummy MediaStreamTrack() to it. Remember that we mocked this earlier on!
Note: We reference the remote user'saudioTrackvariable via bracket notation. This is becauseaudioTrackis a private variable, and TypeScript will (as it should!) not compile if we try to access it via dot notation. Accessing private variables through bracket notation is a purposeful escape hatch.
We set our expected pan value: -1 and then call the user's private getAudioMod() method (also via string index notation), passing in our distance between users (100) as well as the remote user's position.
We check that the pan value we got from the function is what we expect via the first expect() call.
Finally, in the test case above, we call the local user's processUsers() method, which will go through the proximity check logic we went over in previous posts in the series. This includes calculating pan values and modifying the StereoPannerNode in our node chain to match.
To ensure that this happens correctly, we access the private nodeChain variable in the user's UserMedia instance and call getPan() to retrieve the pan value on the StereoPannerNode. We then confirm that the pan value is -1 as expected via another expect() call.

Conclusion
We hope this post gave you some useful insight into potential ways to test some of the functionality in your spatial video and audio app built with Daily.
This concludes our first spatialization series! Thank you for joining us on a journey to build a traversable 2D world for video call participants to interact in. If you're curious to learn more about building spatial video/spatial audio applications with Daily, please check out our introductory spatialization guide.
Never miss a story
Get the latest direct to your inbox.