

Daily’s React Native library allows developers to build mobile apps compatible with both Android and iOS with one codebase. It also means your web developers, who have likely crossed paths with React at some point, can write code that will get compiled into native mobile code with a smaller learning curve, since React and React Native are fairly similar.
Recently on the Daily blog, we discussed how to build your own audio call app in React Native. That tutorial specifically looked at Daily’s Party Line demo app, which was built to handle the use case where every call is always audio-only.
Today's agenda
In today’s tutorial, we’ll take a look at Daily’s React Native Playground demo app, which uses more of a traditional video call format; call participants have the option to turn on and off both audio and video.
More specifically, we’ll cover:
- How to build a multi-participant video call in React Native with
react-native-daily-js - How to give call participants control of their devices in the video call to toggle their local microphone and camera
Who is this tutorial for?
If you are interested in building a mobile app with video calls and have some React Native (or even React) knowledge, this tutorial is for you. React Native projects can be a little more finicky to run locally than web apps because of the platform-specific setup requirements, so having some comfort with React Native is a big plus.
We won’t cover every section of the Playground demo app code base in this tutorial since a lot of the functionality is similar to daily-js (web) apps, which we swear have a bunch of existing tutorials.📚
A note on today’s stack and React Hooks
Since this app is written in React Native, we’ll be looking at React Native code examples and React hooks from the demo codebase. We recommend familiarizing yourself with React Hooks before reading on to get the most out of this tutorial.
We’ve also used TypeScript in this demo app. TypeScript isn’t specifically discussed below, but having some familiarity with it will help you review the code examples.
Getting started
For anyone new to React Native app development, we’ll quickly cover some basics.
Typically, you’ll want to test on both Android and iOS mobile or tablet devices to ensure your app is working in both operating systems. To test on iOS devices, you’ll need to download XCode, which is only available to download on Mac computers. (You’ll also want to pour yourself a coffee or two while it downloads and hope you’re not on deadline. ☕)
Note: This means you will need a Mac to access XCode for iOS development.
Android, however, can be tested with Android Studio, which is available on a range of operating systems.
In terms of running the Daily Playground demo app locally, thorough instructions for both Android and iOS development are included in the repo’s README.
Note: You’ll need to use real devices instead of a device emulator when you’re testing the video/audio features. In terms of which OS to start with, if you don’t have a personal preference, it’s typically faster to get this app running on an Android device.
App features and functionality
As mentioned, we won’t cover every part of this codebase. To start, let’s discuss the overall structure and functionality of the app so you know how to navigate it.
The App component is the top-level parent component. It renders either the home screen or the in-call view.
Let’s quickly review how the home screen works.
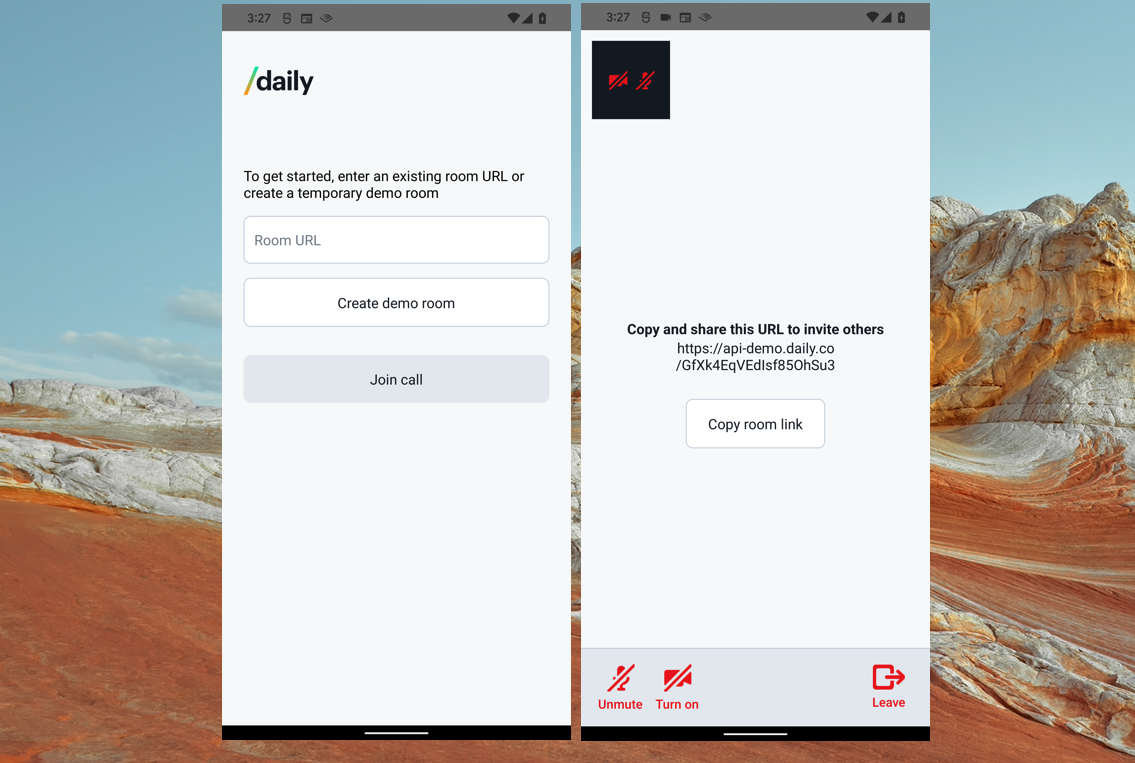
When you first land on the home screen, there’s an empty room URL text input, a “Create demo room” button, and a disabled “Join call” button.
If you know which Daily room you want to join, you can enter the room URL in the text input and press “Join call”, which will be enabled once the input has a value.
If you do not have a room URL, we’ve set up an endpoint that will create a new room for you using Daily’s REST API. This endpoint is called when the “Create room” button is pressed, which calls the method createRoom, defined in App:
<Button
    type="secondary"
    onPress={createRoom}
    label={
       appState === AppState.Creating
          ? 'Creating room...'
          : 'Create demo room'
    }
/>
 const createRoom = () => {
   setRoomCreateError(false);
   setAppState(AppState.Creating);
   api
     .createRoom()
     .then((room) => {
       setRoomUrlFieldValue(room.url);
       setAppState(AppState.Idle);
     })
     .catch(() => {
       setRoomCreateError(true);
       setRoomUrlFieldValue(undefined);
       setAppState(AppState.Idle);
     });
 };
Here, we update our appState state value to be in a temporary “creating” state, call api.createRoom(), and, if it’s successful, set our roomUrlFieldValue value and appState. (Both appState and roomUrlFieldValue are component state values initialized in App.)
Note: Take a look at api.ts to see the api.createRoom() method.
Whether you use your own Daily room URL or one created in the app, when you press the “Join call” button, it will take the roomUrlFieldValue, set the roomUrl state value with it, and kick off creating the Daily call object.
Here we have the “Join call” button:
/**
  * “Join call” button will call startCall on press
  */
<StartButton
   onPress={startCall}
   disabled={startButtonDisabled}
   starting={appState === AppState.Joining}
/>Next, we call startCall:
/**
  * Join the room provided by the user or the
  * temporary room created by createRoom
 */
 const startCall = () => {
   setRoomUrl(roomUrlFieldValue);
 };
And lastly, a useEffect hook is triggered by the roomURL value getting updated, which creates our Daily call object (the brain of this operation!)
 /**
  * Create the callObject as soon as we have a roomUrl.
  * This will trigger the call starting.
  */
 useEffect(() => {
   if (!roomUrl) {
     return;
   }
   const newCallObject = Daily.createCallObject();
   setCallObject(newCallObject);
}, [roomUrl]);The following line is where the call object is actually created:
const newCallObject = Daily.createCallObject();
Then, by setting that value in our component’s state, the call object instance can be referred to later:
setCallObject(newCallObject);
After the call object has been created, we can then actually join our room (finally! Considering we pressed the “Join call” button 😉)
 useEffect(() => {
   if (!callObject || !roomUrl) {
     return;
   }
   callObject.join({ url: roomUrl }).catch((_) => {
     // Doing nothing here since we handle fatal join errors in another way,
     // via our listener attached to the 'error' event
   });
   setAppState(AppState.Joining);
 }, [callObject, roomUrl]);
Here, in another useEffect hook in App, when the callObject and roomUrl state values are truthy, which they now are, we can actually join our call by passing the roomUrl to our call object instance.
This step is also where our app view will change from the home screen to the in-call view. This happens because of this line in the effect above: setAppState(AppState.Joining);
 const showCallPanel = [
   AppState.Joining,
   AppState.Joined,
   AppState.Error,
].includes(appState);When showCallPanel — shown above — is truthy, our in-call view will render instead of the home screen:
<View style={styles.container}>
    {showCallPanel ? (
         <View style={[
             styles.callContainerBase,
             	orientation === Orientation.Landscape
             		? styles.callContainerLandscape
             		: null,
         ]}>
             <CallPanel roomUrl={roomUrl || ''} />
             <Tray
                onClickLeaveCall={leaveCall}
                disabled={!enableCallButtons}
             />
    	</View>
	) : (
	… //home screen
    )
...We’ll leave it at that for the home screen and focus on the CallPanel component — our in-call view — for the rest of this tutorial. If you have any questions about this section, please reach out! We’re happy to help. 🙌
Displaying video tiles in your Daily React Native app
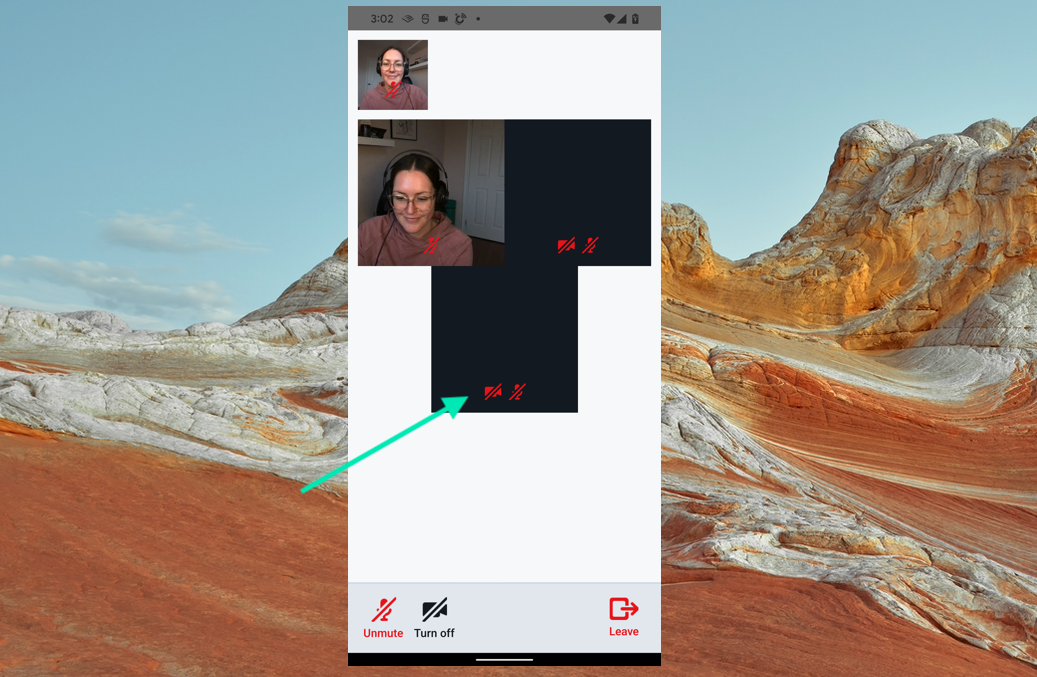
Let’s start by familiarizing ourselves with what our in-call app UI is supposed to look like:
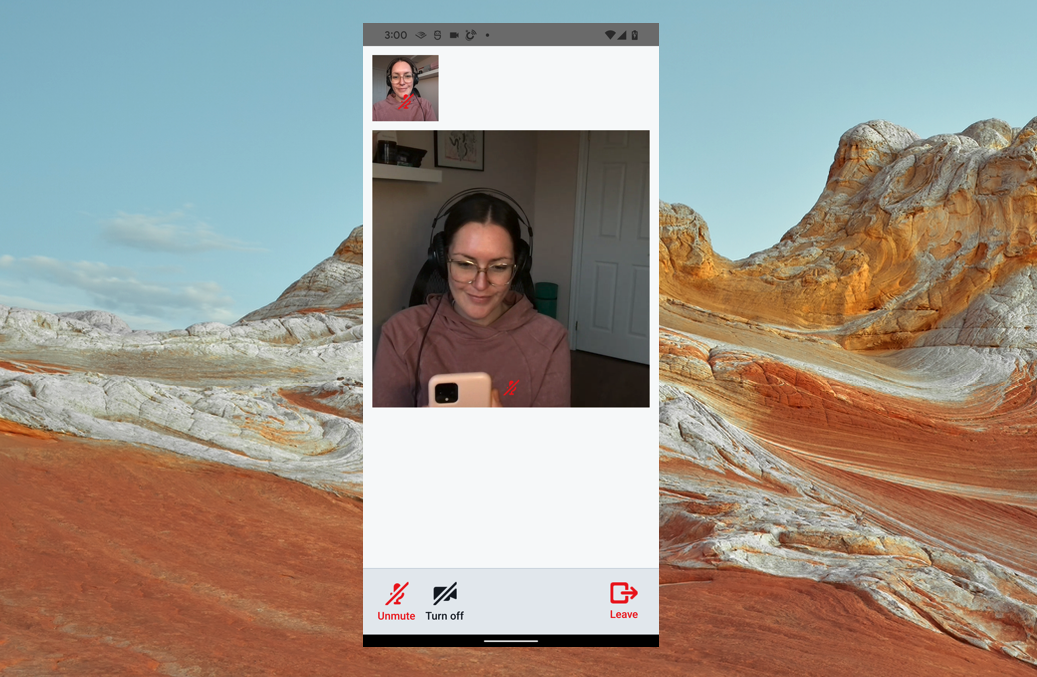
We have the local participant’s camera feed at the top left corner, the room URL and a button to copy it to your clipboard in the middle of the screen, and our tray at the bottom. If anyone is screen sharing, they’ll also be included as a small thumbnail at the top.
Note: Screen sharing can’t be initiated in this app but call participants can join the room from any platform, including a web app using daily-js, where screen sharing is permitted.
The tray (i.e. the Tray component) has buttons to toggle the local participant’s audio, video, and to leave the call.
When more participants join, their videos are shown in the middle of the screen, replacing the room URL information.
Iterating over our participant list
Now that we know what we’re talking about, let’s jump right to where we’re actually creating our participant videos with react-native-daily-js.
In CallPanel.tsx, we render an array called largeTiles, which represents the remote participants.
<ScrollView
     alwaysBounceVertical={false}
     alwaysBounceHorizontal={false}
     horizontal={orientation === Orientation.Landscape}
 >
     <View
        style={[
            styles.largeTilesContainerInnerBase,
                orientation === Orientation.Portrait
                 ? styles.largeTilesContainerInnerPortrait
                 : styles.largeTilesContainerInnerLandscape,
         ]}
      >
         {largeTiles} // <- our remote participants
      </View>
</ScrollView>Note: We’ve put this in a ScrollView but you may prefer a FlatList component if you know you will be having larger calls. (A FlatList will only render the visible tiles, which should help with performance. It’s less of a concern in 1-on-1 video calls.)
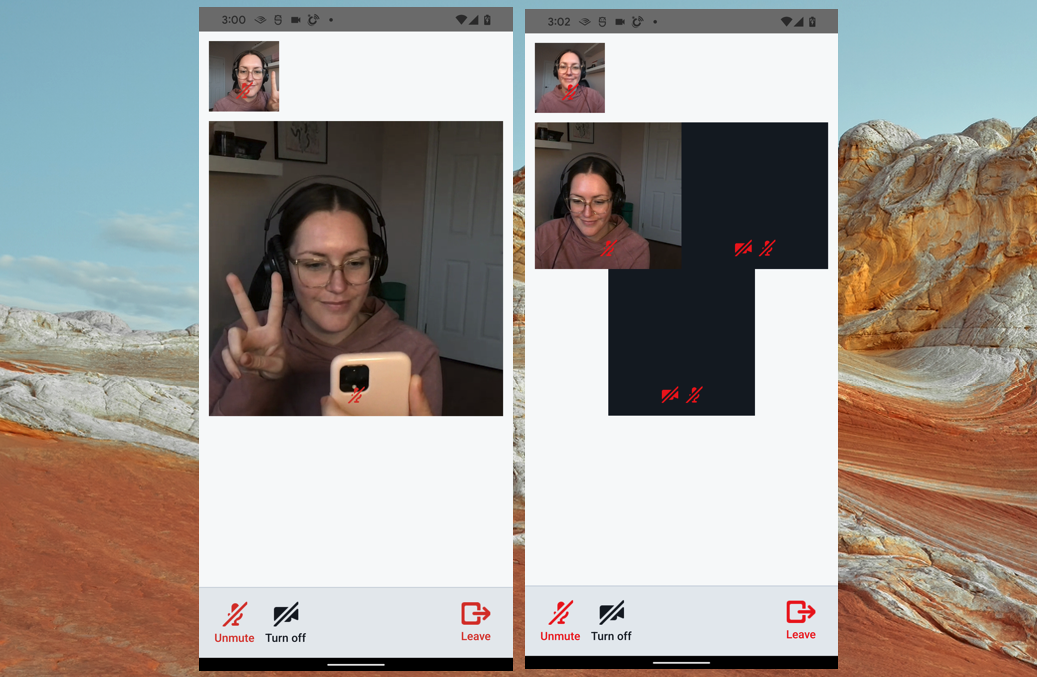
Our largeTiles (remote participants) and thumbnailTiles (the local participant or screen sharer) are determined by the same memoized function. The tiles in largeTiles can be either full size or half size depending on the number of participants.
 /**
  * Get lists of large tiles and thumbnail tiles to render.
  */
 const [largeTiles, thumbnailTiles] = useMemo(() => {
   let larges: JSX.Element[] = [];
   let thumbnails: JSX.Element[] = [];
   Object.entries(callState.callItems).forEach(([id, callItem]) => {
     let tileType: TileType;
     if (isScreenShare(id)) {
       tileType = TileType.Full;
     } else if (isLocal(id) || containsScreenShare(callState.callItems)) {
       tileType = TileType.Thumbnail;
     } else if (participantCount(callState.callItems) <= 3) {
       tileType = TileType.Full;
     } else {
       tileType = TileType.Half;
     }
     const tile = (
       <Tile
         key={id}
         videoTrackState={callItem.videoTrackState}
         audioTrackState={callItem.audioTrackState}
         mirror={usingFrontCamera && isLocal(id)}
         type={tileType}
         disableAudioIndicators={isScreenShare(id)}
         onPress={
           isLocal(id)
             ? flipCamera
             : () => {
                 sendHello(id);
               }
         }
       />
     );
     if (tileType === TileType.Thumbnail) {
       thumbnails.push(tile);
     } else {
       larges.push(tile);
     }
   });
   return [larges, thumbnails];
 }, [callState.callItems, flipCamera, sendHello, usingFrontCamera]);
Let’s step through this function:
- We declare two arrays that we’ll be updating in this function:
largesandthumbnails - We get an array of our call participants (
Object.entries(callState.callItems)) and do the following for each (orforEach, if you will):- _Note: The
tileTypecan beTileType.Full,TileType.Half, orTileType.Thumbnail. The latter is the local participant, and the first two options are for remote participants (ourlargeTiles). - If the “participant” is actually a screen share, we make it a full size tile
- If the participant is local or currently sharing their screen, we make them a thumbnail
- If the call has 3 or less participants total, remote participants will have full size tiles; otherwise, they’ll have half size tiles.
- We then render a
Tilecomponent for each participant and update ourlargesandthumbnailsarrays
- _Note: The
Okay, we’ve come pretty far but we still need to render our actual video and audio for the participants, so bear with us!
Rendering participant media
The most important part of the Tile component is the mediaComponent, a memoized instance of the DailyMediaView component imported from react-native-daily-js:
import { DailyMediaView } from '@daily-co/react-native-daily-js';
...
const mediaComponent = useMemo(() => {
   return (
     <DailyMediaView
       videoTrack={videoTrack}
       audioTrack={audioTrack}
       mirror={props.mirror}
       // Assumption: thumbnails should appear layered on top of other tiles
       zOrder={props.type === TileType.Thumbnail ? 1 : 0}
       style={styles.media}
       objectFit="cover"
     />
   );
}, [videoTrack, audioTrack, props.mirror, props.type]);The videoTrack and audioTrack are props passed to Tile from CallPanel but are actually set in callState.ts:
function getCallItems(participants: { [id: string]: DailyParticipant }) {
 let callItems = { ...initialCallState.callItems }; // Ensure we *always* have a local participant
 for (const [id, participant] of Object.entries(participants)) {
   callItems[id] = {
     videoTrackState: participant.tracks.video,
     audioTrackState: participant.tracks.audio,
   };
   if (shouldIncludeScreenCallItem(participant)) {
     callItems[id + '-screen'] = {
       videoTrackState: participant.tracks.screenVideo,
       audioTrackState: participant.tracks.screenAudio,
     };
   }
 }
 return callItems;
}
We’re jumping around here a bit but the important thing to understand is that our Daily callObject provides our participant information (see: callObject.participants()) and our participant information contains their media (video/audio) tracks. We can then pass those tracks to the DailyMediaView component to actually play those tracks in the app.
Jumping back to the Tile component, we get the videoTrack and audioTrack values from the videoTrackState and audioTrackState props.
 const videoTrack = useMemo(() => {
   return props.videoTrackState && props.videoTrackState.state === 'playable'
     ? props.videoTrackState.track!
     : null;
 }, [props.videoTrackState]);

 const audioTrack = useMemo(() => {
   return props.audioTrackState && props.audioTrackState.state === 'playable'
     ? props.audioTrackState.track!
     : null;
}, [props.audioTrackState]);This means we use the tracks from the individual participant information if they’re available, and otherwise set that corresponding props to null. Both are valid types for the DailyMediaView videoTrack and audioTrack props.
Tile also has an overlay with the audio and camera muted icons when they apply (i.e. when there’s no track to play), but we won’t review that code here. Again, let us know if you have any questions. 🙏
Controlling your local devices in-call
As a final note, let’s see how our Tray component interacts with the Daily call object. As a reminder, it’s rendered in App.tsx at the same time the CallPanel component is rendered.
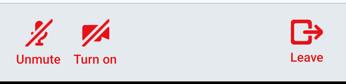
Tray component on an Android deviceAs mentioned, the tray lets up control our local camera and microphone, as well as leave the current call to return to the home screen.
To toggle our local camera, we can call setLocalAudio on the call object instance.
 const toggleCamera = useCallback(() => {
   callObject?.setLocalVideo(isCameraMuted);
}, [callObject, isCameraMuted]);Similarly, we can toggle our microphone on or off with setLocalAudio.
 const toggleMic = useCallback(() => {
   callObject?.setLocalAudio(isMicMuted);
}, [callObject, isMicMuted]);Lastly, pressing the “Leave” button will call the leaveCall function call, a prop passed from App.
/**
  * Leave the current call.
  * If we're in the error state (AppState.Error),
  * we've already "left", so just
  * clean up our state.
  */
 const leaveCall = useCallback(() => {
   if (!callObject) {
     return;
   }
   if (appState === AppState.Error) {
     callObject.destroy().then(() => {
       setRoomUrl(undefined);
       setRoomUrlFieldValue(undefined);
       setCallObject(null);
       setAppState(AppState.Idle);
     });
   } else {
     setAppState(AppState.Leaving);
     callObject.leave();
   }
 }, [callObject, appState]);
Here, we’re destroying our call object instance and resetting the state in App to get back to our initial values.
Resources
We hope this helps you navigate building your own video call apps with Daily’s React Native library. We covered the most important aspects of our Playground app but we’re always happy to answer any questions you may have! 😁
If you’re looking to learn more about building with Daily’s React Native library, check out our beloved docs or read our previous tutorial on building a Clubhouse clone app. 📱
Never miss a story
Get the latest direct to your inbox.