

Putting the dot in Daily.co
We design Daily APIs to help you customize your video experience as much as possible. Every once in a while, though, you might find yourself wanting to add a custom feature without having to dig into your code base. When this happens, Chrome extensions can be a perfect solution for features you only want to be able to turn on from the browser.
We had this very situation come up recently at Daily. Our team has a company-wide video call every day–“water cooler”– where we chat about our goals and take turns updating the team on what we’ve been working on. The first person gives their update and then they pass the metaphorical mic to the next person, and the next. The only trouble is if you’re one of the last people to go you have to remember who has already gone.
Like many project ideas, this one is rooted in being too lazy to complete the task manually. Remember a list of over a dozen people everyday? I don’t think so.
Instead of having to remember who has given their update already, what if each person could be marked as having gone already right in the call?
Thankfully, this turned out to be fairly quick to implement with Chrome extensions.
Building a custom Chrome extension
Prep work
Before diving in, let's clarify who will find this tutorial helpful. The instructions below are for building a Chrome extension using a Daily call as an example website, but the focus is the Chrome extension. If you're building a Chrome extension for the first time, this tutorial should be helpful for getting familiar with the basics.
Now that we know who this tutorial is for, let's decide what our requirements are for this project. We want to:
- Create a tool that anyone could use without updating Daily's code base directly.
- Update Daily's pre-built video call UI so each video has a button appended to it that changes colour on click.
- Make sure anyone who joins the call has a button added to their video. Since people will join at different times, a button will need to get added whenever there's a new participant.
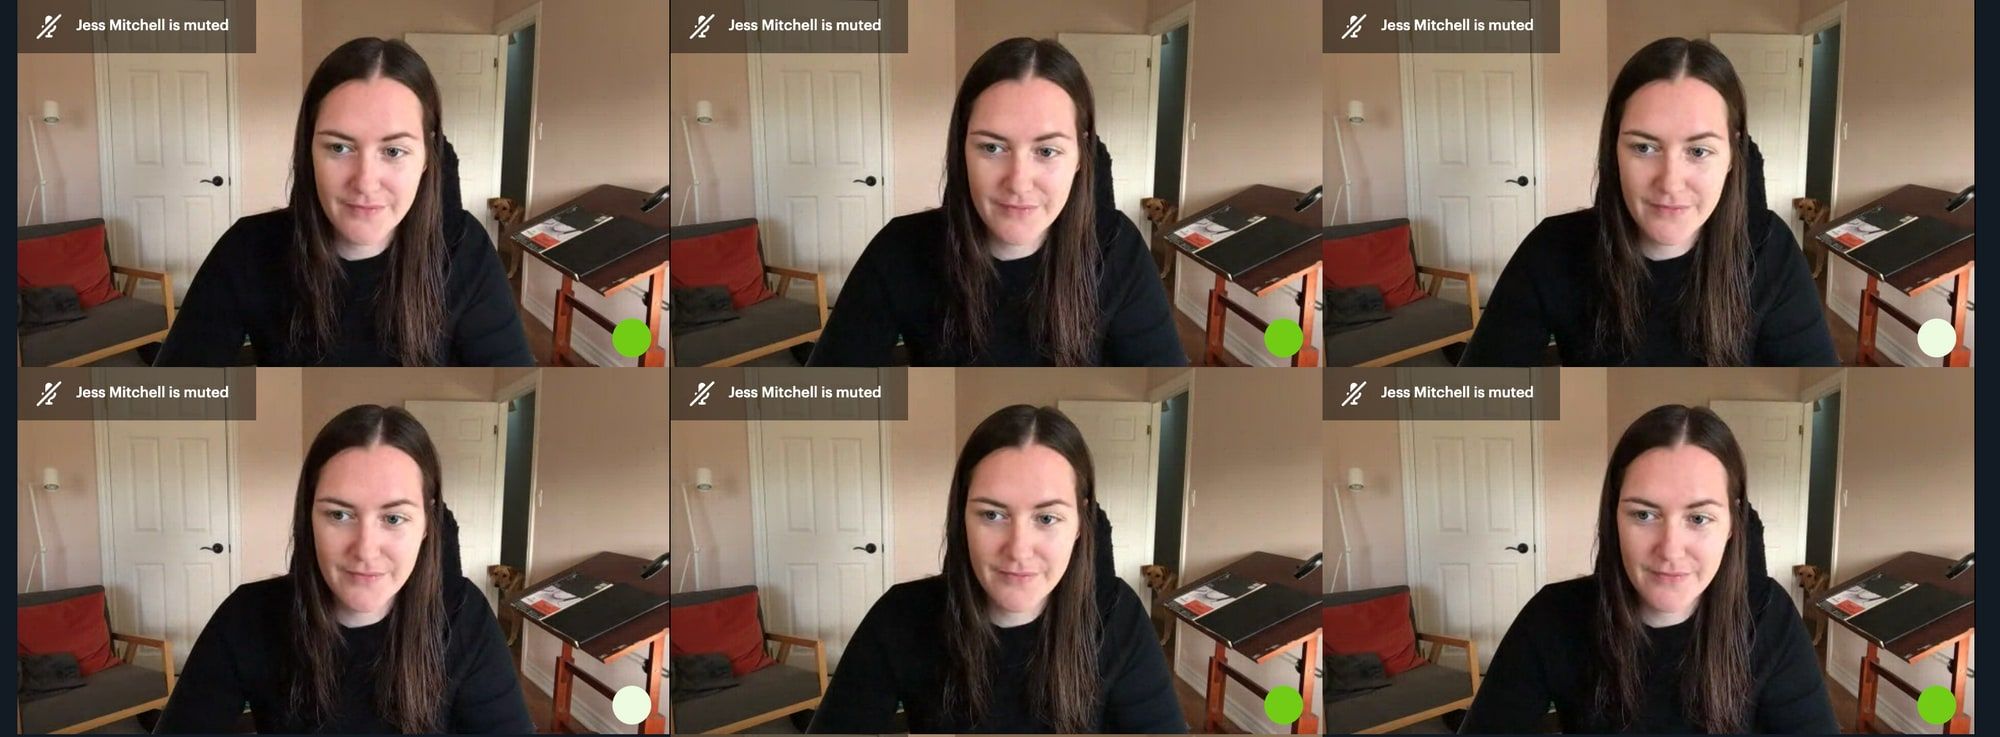
In the end, we want something like this:
File structure cheatsheet
Your final project file structure should look like this:
Project_directory
│_  README.md (optional)
│_  manifest.json
│_  highlight.js
│_  highlight.css
│_  128.png
Getting Started
Let's start by taking a look at Google's getting started docs for building your own Chrome extension.
At a minimum, we'll need the following:
manifest.jsonto configure our extension.highlighter.jsto add the buttons and define what they do on click.highlighter.cssto style the buttons.- An image (128 x 128px) to be displayed in Chrome as our extension's icon.
Google's Chrome extension docs give us a very basic version of the manifest.json:
{
  "name": "Daily Video Highlighter",
  "version": "0.1",
  "description": "Highlight individual videos in Daily calls",
  "manifest_version": 2
}
From here we can update it to include the additional files we'll be using:
{
  "name": "Daily Video Highlighter",
  "version": "0.1",
  "description": "Highlight individual videos in Daily calls",
  "manifest_version": 2,
  "icons": {
    "128": "128.png"
  },
  "content_scripts": [
    {
      "css": ["highlight.css"],
      "js": ["highlight.js"],
      "matches": ["https://*.daily.co/*"]
    }
  ]
}
Under icons, we include the name of the icon we want to use. (Remember: it needs to be 128 x 128px).
We also need to include the highlight.js and highlight.css files we will create shortly under content_scripts. Any files included in content scripts can access the webpages visited in Chrome, or in our case Daily calls, so we can use those to update the DOM. Since the js and css keys accept arrays you can include multiple JavaScript and CSS files. For our purposes, though, we'll just include the ones we need.
Lastly, we need to let Chrome know when to actually run these files included in content_scripts. Since we're specifically updating Daily calls, we only want this extension to run when we're visiting a Daily URL.
If there was one specific URL we always used, we could hardcode it here. Since I expect the URL will change sometimes, let's make it a little more flexible with the wildcard (*) symbol.
The * in https://*.daily.co/* will match any string used for a subdomain or path but the rest of the URL needs to be an exact match. For example, https://test.daily.co/hey will match but http://test.daily.ca will not.
Updating the DOM
Next we need to create and add our buttons that will be appended to each video in the Daily call we're in.
We can create a highlight.js file and include the following:
const url = window.location.href;

if (url.indexOf("dashboard.") < 0) {
  setInterval(() => {
    const videos = document.getElementsByTagName("video");
    for (let i = 0; i < videos.length; i++) {
      if (
        videos.length > 2 &&
        videos[i].parentElement &&
        videos[i].parentElement.childNodes &&
        videos[i].parentElement.childNodes.length <= 2
      ) {
        const button = document.createElement("button");
        button.textContent = "x";
        button.classList.add("chrome-extension-button");
        button.onclick = function (e) {
          e.stopPropagation();
          if (button.classList.contains("highlight")) {
            button.classList.remove("highlight");
          } else {
            button.classList.add("highlight");
          }
        };
        videos[i].parentElement.appendChild(button);
      }
    }
  }, 5000);
}
Let's going through this block of code section by section:
- First we want to get the current URL we're visiting.
- Then we want to make sure we're not looking at the dashboard (i.e.
https://dashboard.daily.co). The dashboard will actually match our definition from themanifest.jsonfile (https://*.daily.co/*). Since it's not a call, we don't want to run the proceeding code. Note: there is no way to selectively exclude URLs in themanifest.json. - Create an interval that runs every 5 seconds (or
5000milliseconds) to catch any new participant videos. - Select all the videos in the call by their tag name (
<video>). - If there are more than two videos in the call, create a button for any video that doesn't already have one. If you inspect a pre-built Daily call in Chrome DevTools, the
<video>elements will only have one sibling element. Given that, we know if the video's parent element has two child elements it doesn't have a button yet. - Add an
onclickevent handler that adds or removes a class to each button. This new classhighlightwill change the button's colour, but we'll handle that with CSS.
Styling our new buttons
Now that every video has a button appended to it, we need to add some CSS styles to our highlight.css file. The default colour will be a light green and the clicked or "highlighted" colour will be a bright green. We'll place the buttons on the bottom right corner of the video so they don't interfere with any other features.
.chrome-extension-button {
  background-color: #eefae0;
  color: #eefae0;
  font-size: 0;
  position: absolute;
  bottom: 0.5rem;
  right: 0;
  padding: 1rem;
  border-radius: 50%;
  margin: 1rem 1rem 0 0;
  z-index: 99999;
}

.chrome-extension-button.highlight {
  background-color: #72cc18;
  color: #72cc18;
}
Using your new Chrome extension
Now that we have all our code written, we need to somehow add our Chrome extension to Chrome. 🤔 Thankfully, Google has made this pretty straightforward.
- First go to
chrome://extensions/. Make sure developer mode is turned on. - Click the button
Load unpacked. - Select your project's directory from where you saved it locally.
If everything worked as planned, you'll see it in your list of currently installed Chrome extensions.
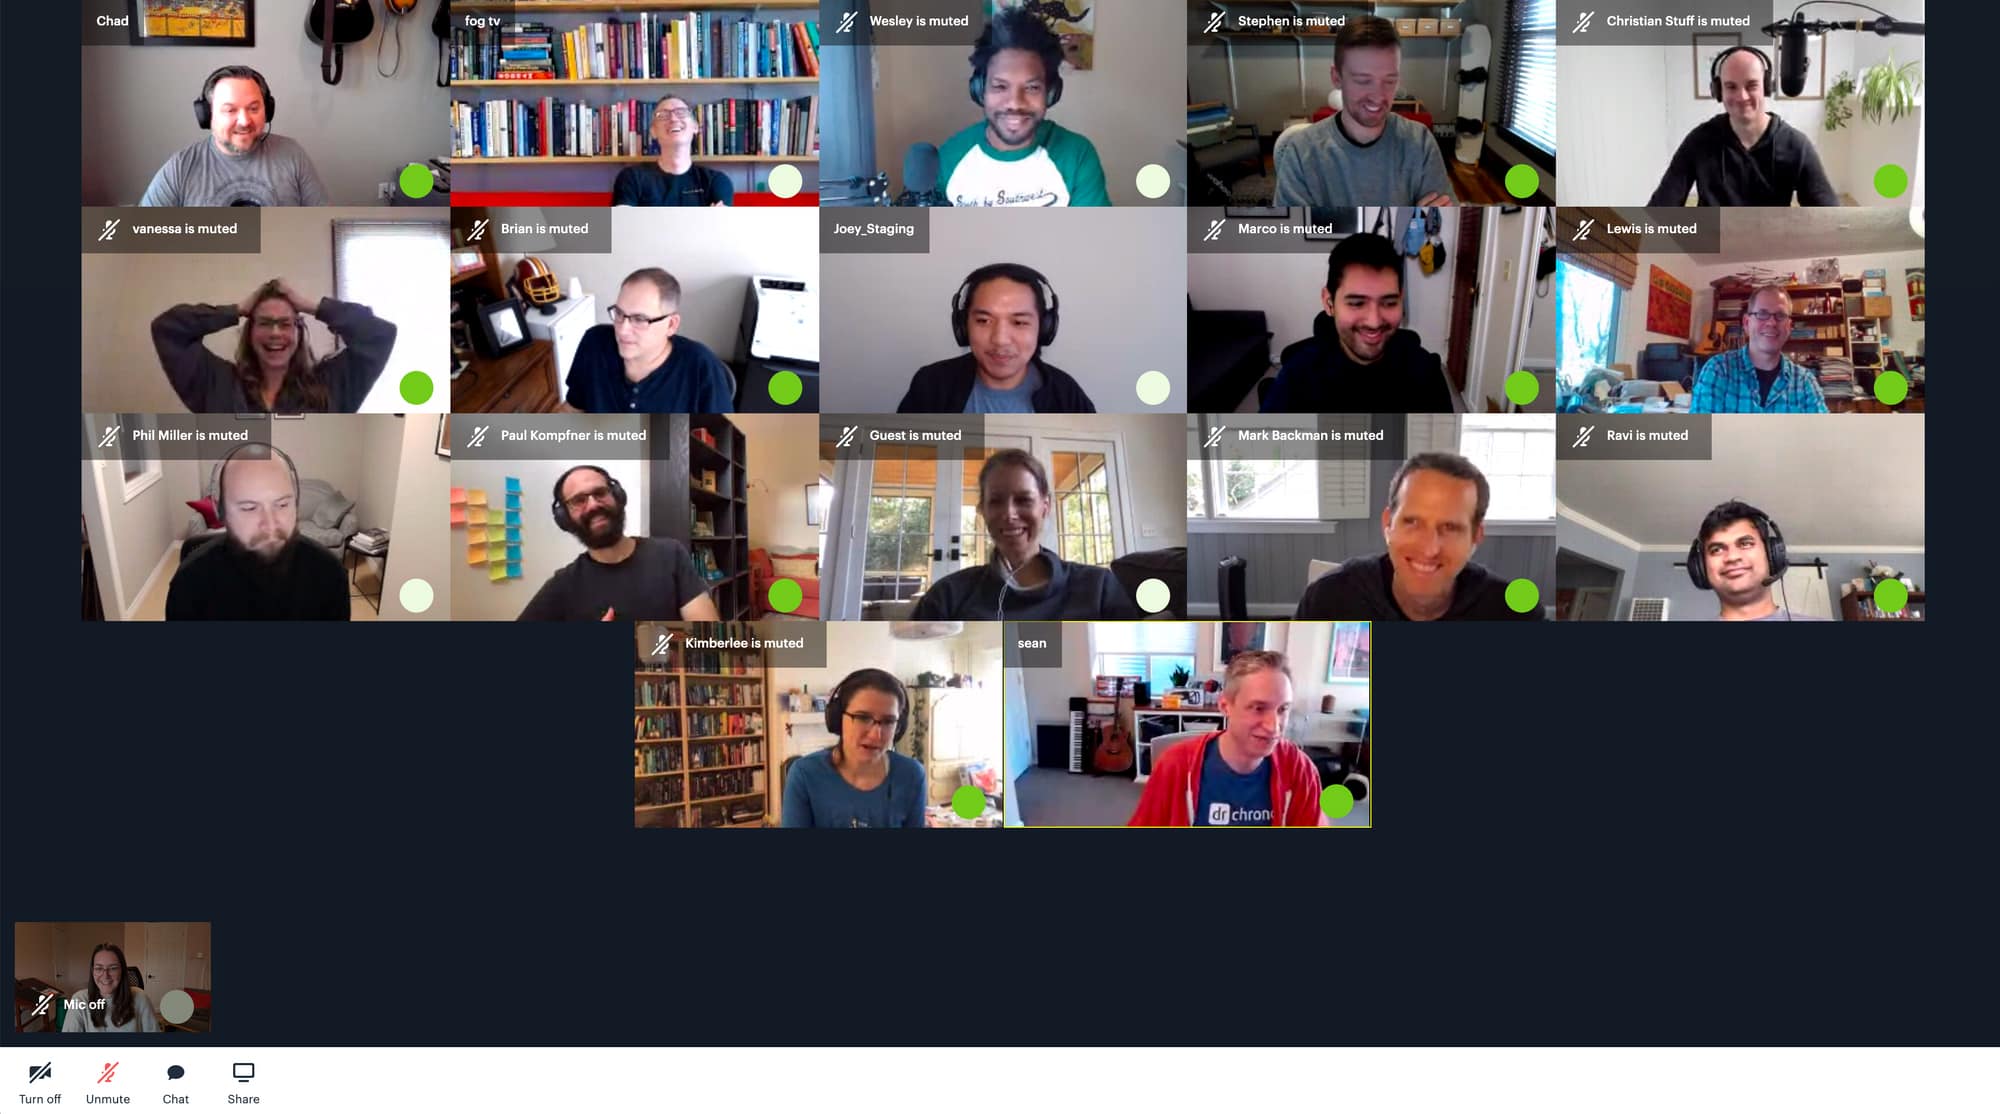
And there you have it! Buttons for everyone!
Never miss a story
Get the latest direct to your inbox.