


Yesterday, we posted an overview of Twilio features and how they map to Daily’s call API.
Now, it’s time to get our hands into some code. In this post, I’ll walk you through a migration of Twilio’s quickstart demo to Daily’s WebRTC video API. We’ll cover server and client-side components and go through a full diff of the conversion. By the end of this post, you should have a mental model of Daily’s Client SDK for JavaScript and feel comfortable mapping Twilio features to Daily’s paradigms.
In this walkthrough, I’ll focus on migration of the core features in Twilio’s quick-start demo to Daily's API. These include:
- Creating a room and retrieving a meeting token for it.
- Configuring video send and receive settings.
- Joining the Daily-powered video call.
- Mapping Twilio events to Daily equivalents.
- Responding to active speaker changes.
- Handling media tracks with Daily.
After getting a call up and running, we’ll take a look at some of Daily’s powerful call quality analytics dashboard features to get you up to speed with monitoring Daily sessions.
In future walk-throughs, I’ll delve into migrating the more specific feature examples that come with the original demo repository, so keep an eye out for follow-up posts.
Getting started
To see the full diff of all the code changes that went into this migration, refer to the migration tag diff on GitHub.
You can also try the deployed version of the migrated demo.
To get the demo video app running locally, follow these steps:
- Sign up for a free Daily account
git clone git@github.com:daily-demos/twilio-daily-conversion.gitcd twilio-daily-conversionnpm icp .env.template .env- In the resulting
.envfile, setDAILY_API_KEYto the API key from your Daily developer dashboard npm start- Open your browser and go to
https://localhost:3000
The application flow
If you’re not already familiar with Twilio’s quick-start demo, let’s go through it now.
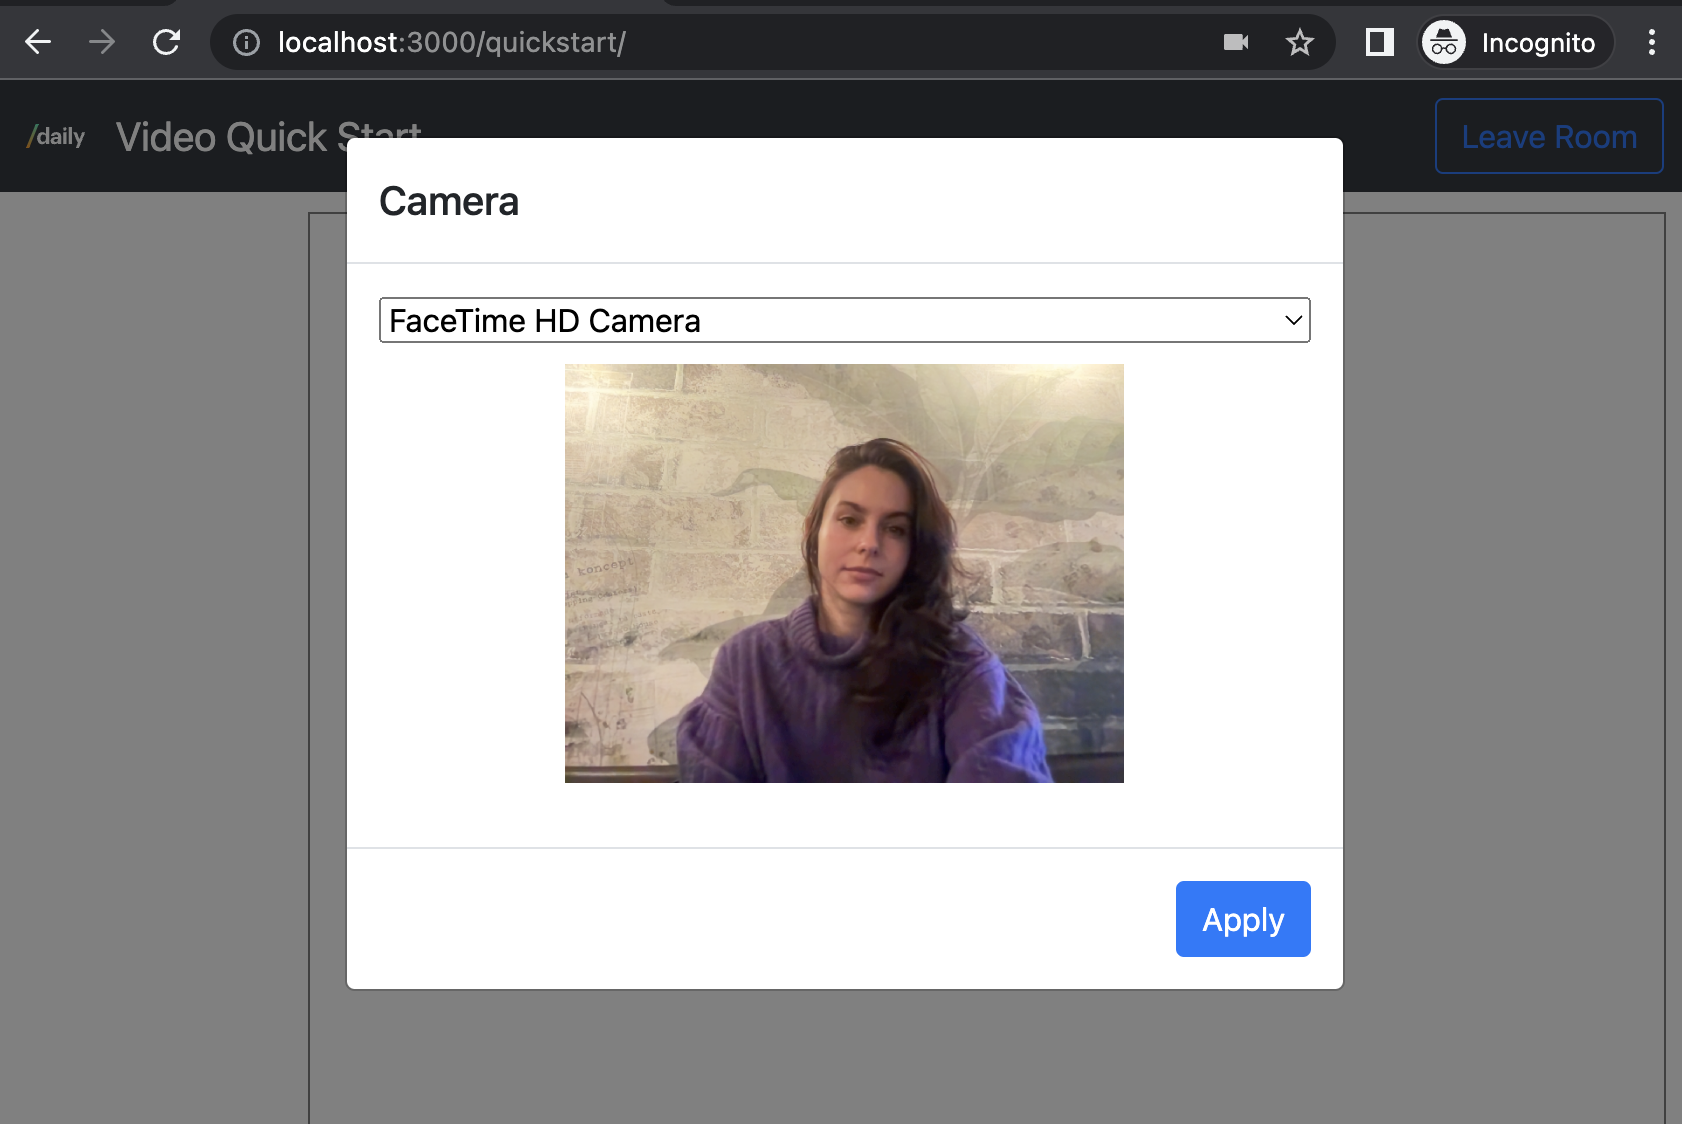
When you first open the demo app in your browser, you’ll be asked to choose your camera and microphone.
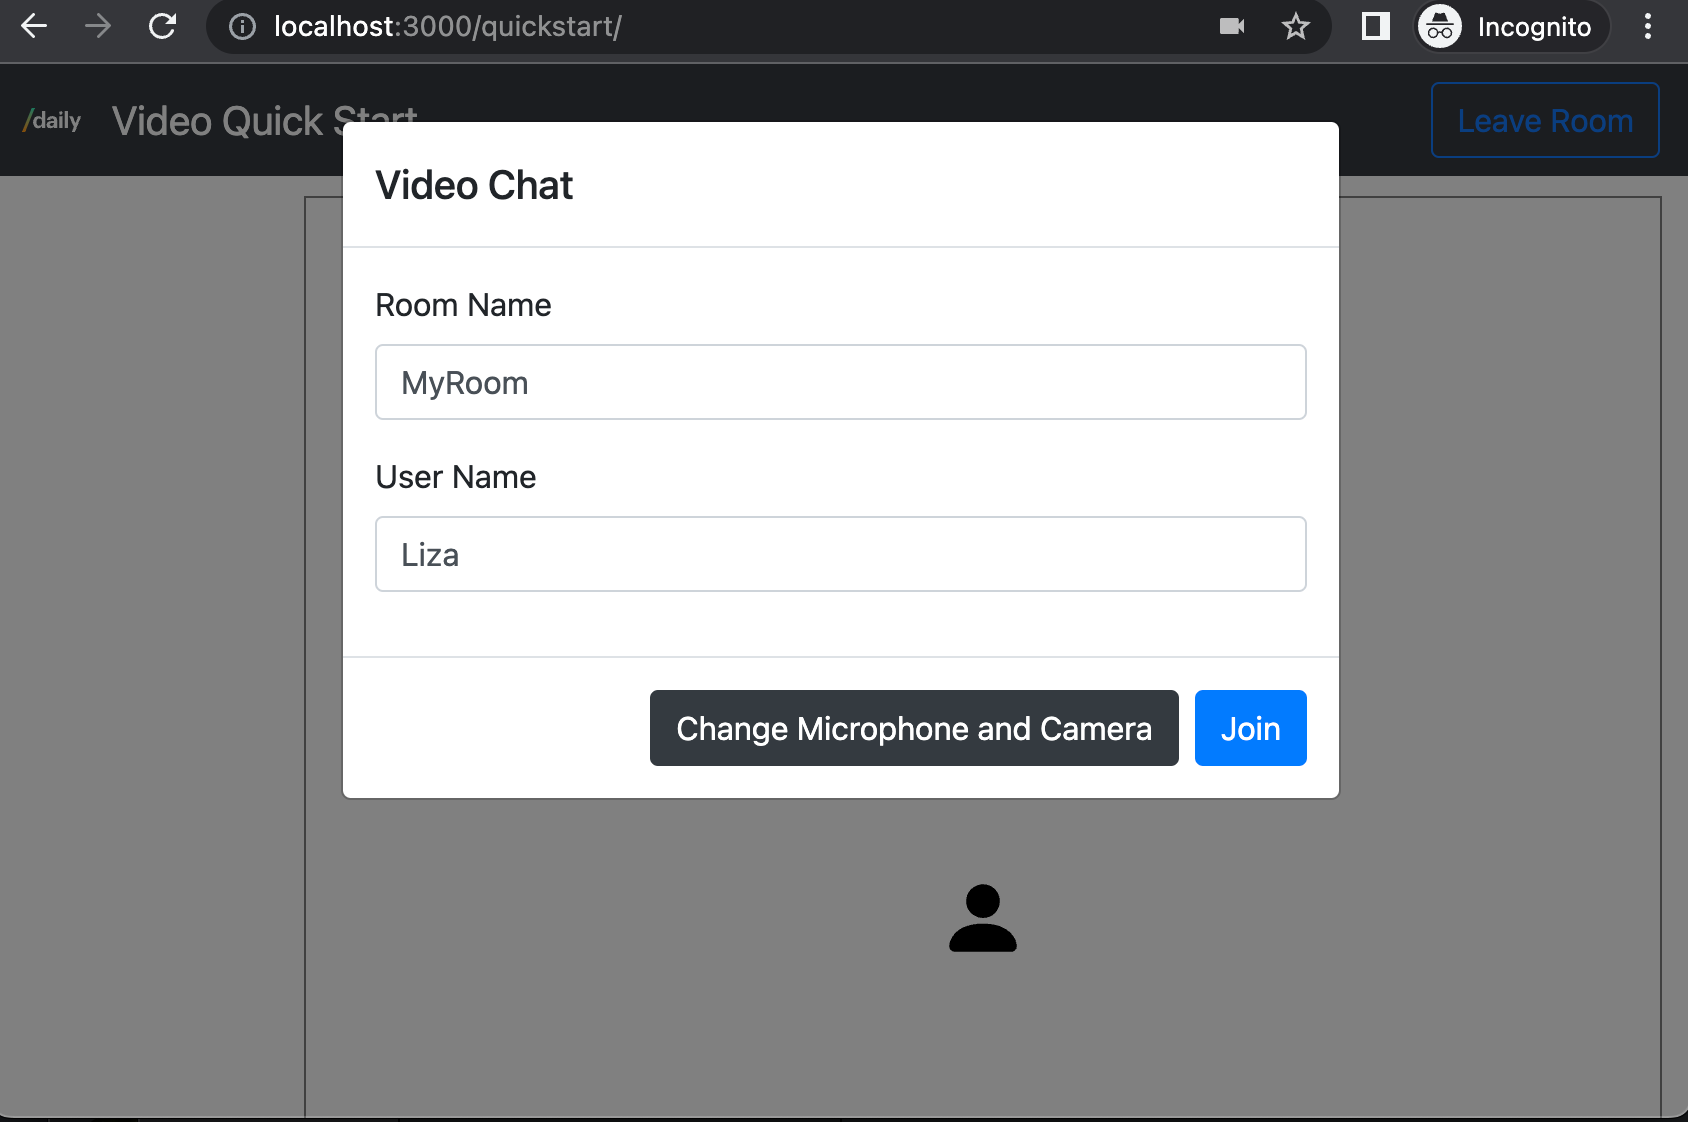
After device selection is complete, you’ll be prompted to enter your name and the name of the room you want to join. This room may or may not already exist—as a user, you don’t have to care.
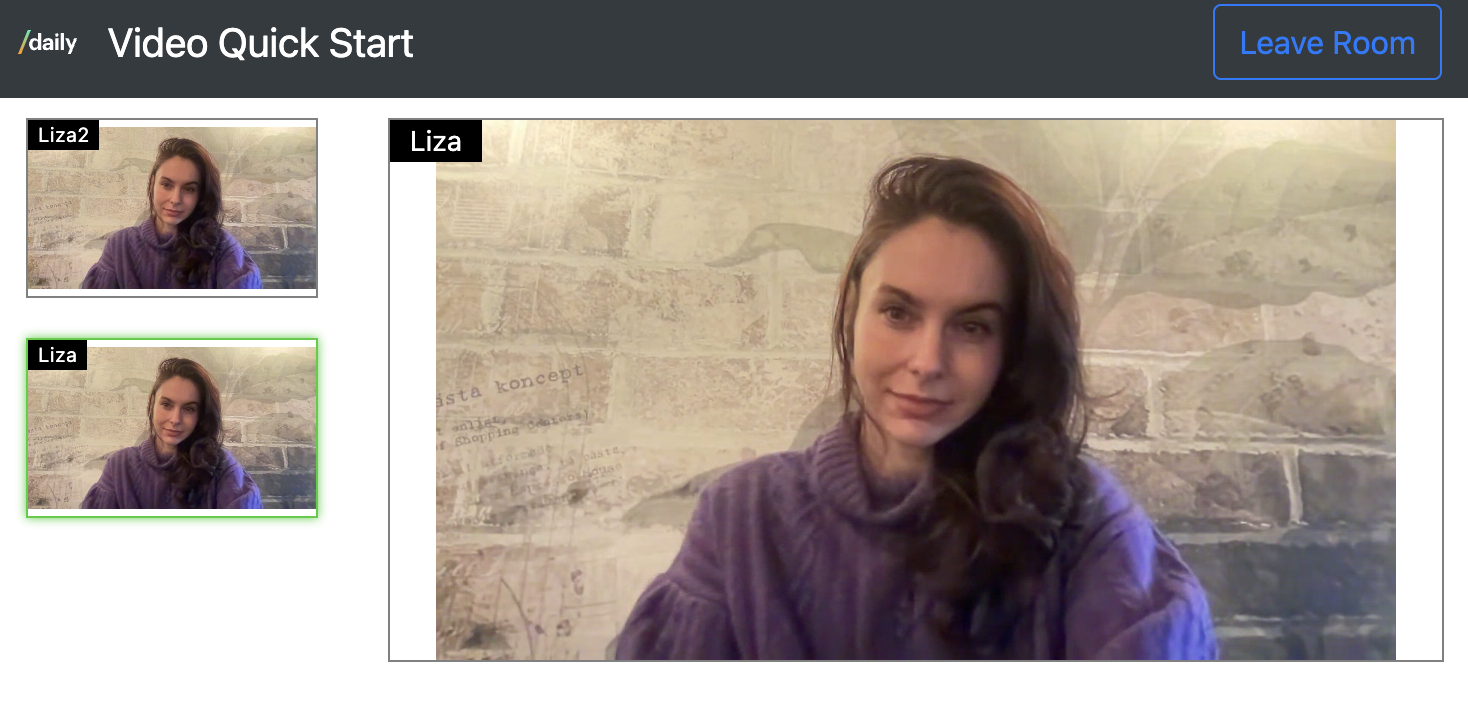
Once you enter your name and room, you’ll join the room with your microphone and camera enabled. If someone else is already in this room, you’ll be able to interact with them.
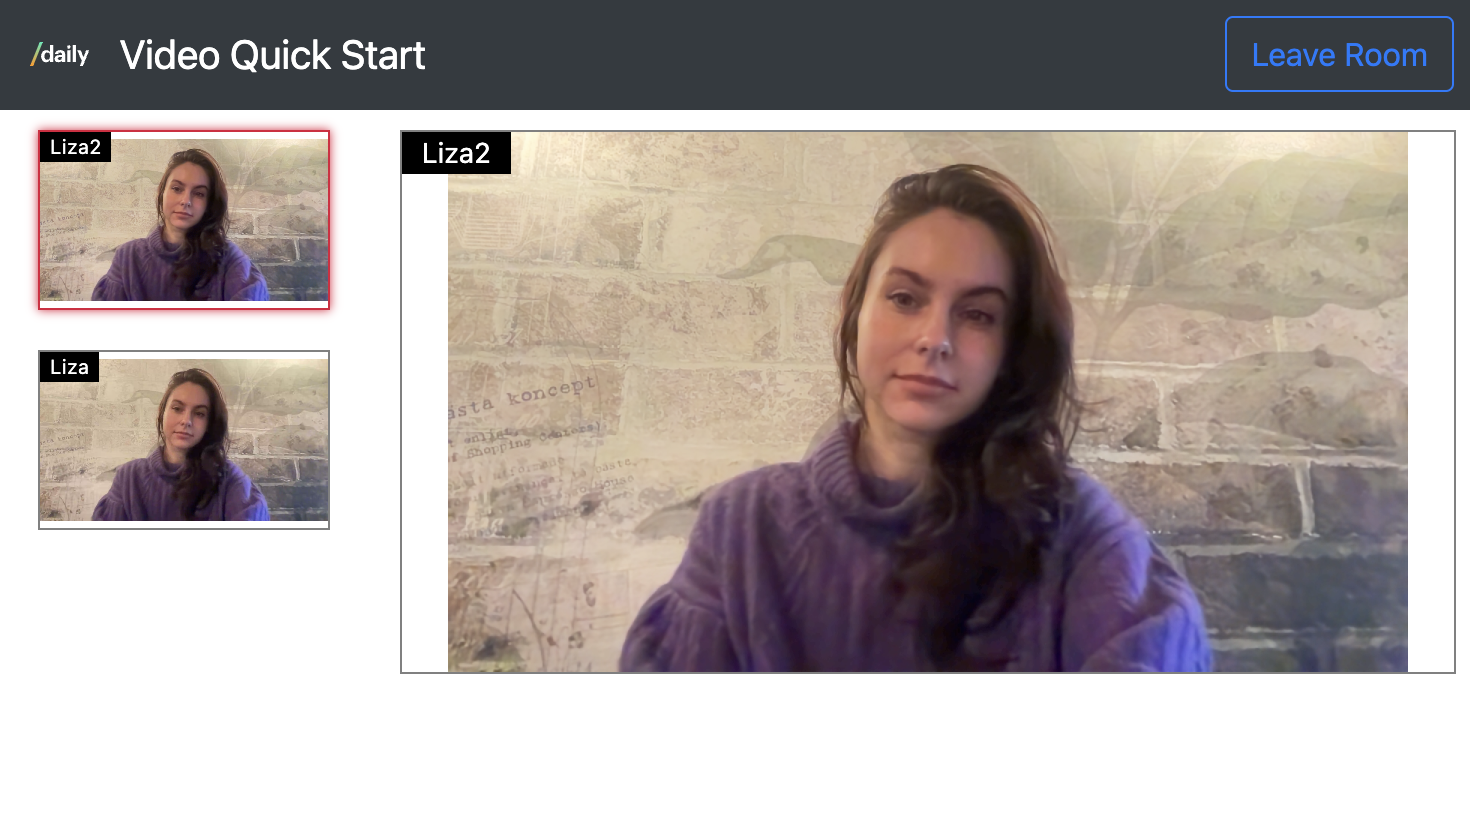
The currently active or pinned speaker is shown in the larger video element on the page, and everyone else gets a small tile. You can click on any participant to “pin” them into the active spot (and click them again to un-pin).
Now that we have the app up and running, let’s go through how I migrated the server-side functionality to Daily from Twilio.
Server-side migration
Twilio’s quick-start application contains a client and server component. In the server component, Twilio retrieves meeting tokens for a room name specified by the user.
Converting the server component to Daily involves the following operations utilizing Daily’s REST API:
- Checking if a room by a given name already exists.
- Creating a new room if it doesn’t already exist.
- Obtaining a meeting token for the given room.
The /token demo endpoint
The Twilio version
When a user enters their user name and room name, a GET request is sent to the demo app’s /token endpoint, with an identity query parameter containing the user’s chosen name. In Twilio’s version of the demo, an access token is then retrieved with Twilio’s twilio server-side library.
The Daily version
The Daily version of the /token endpoint takes one additional query parameter: roomName. This is the same room name the user entered into their call join form:
Daily logic for the client-side /token endpoint request URL:
const response = await fetch(
       `/token?identity=${identity}&roomName=${roomName}`
     );
On the server side, our converted /token endpoint handler will first attempt to retrieve an existing room with the given name. If the room doesn’t already exist, we’ll create one. Only then will we generate an access token, and it will work only for that specific room.
Daily logic for the /token endpoint handler:
app.get('/token', async function (request, response) {
  const query = request.query;
  const userName = query.identity;
  const roomName = query.roomName;

  // Check if room exists
  let roomData = await getRoom(roomName);
  if (!roomData) {
    // If not, create one
    roomData = await createRoom(roomName);
  }
  // Retrieve room-specific access token
  const token = await getMeetingToken(roomName, userName);
  const res = {
    token: token,
    roomURL: roomData.url,
  };
  response.send(JSON.stringify(res));
});
Let’s see exactly how we use Daily’s REST API to check if a room with the given name already exists.
Checking if a Daily video room exists
We can check whether a Daily room with the given name exists with a GET request to Daily’s /rooms/:name REST API endpoint.
You can check out the full implementation of this in the getRoom() function inside the server component.
You’ll note that if the response from the /rooms/:name endpoint is a 404, the function returns null, at which point the /token handler moves on to the next step: creating the desired room.
Creating a video call room with Daily
Creating a Daily video call room is done using a POST request to Daily’s /rooms endpoint. This is where things get interesting—a Daily room can have quite extensive configuration such as start time, expiry time, maximum participants, default device options, and more.
For the purposes of this Twilio conversion, I’m going to create a room with the following properties:
- The room will be private—this means only users with a valid meeting token will be able to join.
- The room will start right away in the SFU (Server Forwarding Unit) network topology. Check out our video call architecture guide if you want to learn more about WebRTC network topologies.
- The room will expire in 4 hours.
To define the above, our request body looks as follows:
Daily logic for room creation properties:
  // Prepare our desired room properties.
  const req = {
    name: roomName,
    privacy: 'private',
    properties: {
      exp: Math.floor(Date.now() / 1000) + MAX_ALLOWED_SESSION_DURATION,
      // Start right away in SFU mode
      sfu_switchover: 0.5,
    },
  };
You can see the full request and response handling in the createRoom() code on GitHub.
So we’ve got a room with the name the user wanted. It’s time for the final step the server component handles: retrieving a Daily meeting token for the user.
Obtaining a meeting token
Note that if this was a public room, a meeting token wouldn’t be required unless you want to grant someone extra special “owner” privileges for the room. You can read more about that in our meeting token guide.
So if this room was public, you could stop right here and return a successful response back to the demo client.
Here, I’m creating a private room to replicate Twilio behavior. This means it’s time to retrieve a meeting token. Meeting tokens can be retrieved via self-signing inside your server component, or making a POST request to our /meeting-tokens REST API endpoint. In this demo, I’m going with the POST request.
Just like the room, a meeting token can dictate its own configuration for the participant using it. Our meeting token will have the following properties:
- It will be valid only for the room we just retrieved or created.
- It’ll be active for 4 hours.
- It will set the user name of the participant joining with it.
So the request body will look as follows:
Daily logic for meeting token properties:
  const req = {
    properties: {
      room_name: roomName,
      user_name: userName,
      exp: Math.floor(Date.now() / 1000) + MAX_ALLOWED_SESSION_DURATION,
    },
  };
You can review all possible meeting token properties in our reference documentation.
Have a look at the rest of the token retrieval request implementation within the getMeetingToken() function source.
At the end of all this, the /token handler sends back two values to the demo client in a JSON object:
- The user’s new meeting token
- The full URL of the Daily room the user is about to join:
Daily logic for /token endpoint response:
const res = {
    token: token,
    roomURL: roomData.url,
  };
  response.send(JSON.stringify(res));
Now that we’re done with the server side of things, we’re ready to move on to the client-side logic.
Client-side migration
Daily offers several different client SDKs for different platforms and use cases. For this demo, we’ll use Daily’s daily-js library on the client.
Most of the client-side migration changes will span just two files:
quickstart/src/index.js, where initial call connection settings are defined.quickstart/src/joinroom.js, where all of the call connection, track handling, and other in-call functionality is defined.
First, let’s go through those call connection settings.
Configuring send and receive settings
The original connection options in this demo defined some Twilio-specific configuration, like a “bandwidth profile”, codec preference, video capture constraints, and a maximum subscription bitrate for mobile devices.
Daily offers powerful simulcast, media constraint, and other settings to help developers optimize their applications for the best call quality. They enable us to translate most of Twilio’s demo settings to Daily’s API. At the same time, we’re pretty confident that our simulcast layer defaults are more conducive than Twilio's to ensuring call participants get the best experience.
So after brainstorming through this with Dominic, one of our amazing Solutions Engineers, we ended up deciding to let Daily do what it does best: leaving our already optimized simulcast settings at their defaults and replicating Twilio’s behavior for just the configuration that we thought made the most sense. That ended up being:
- Configuring video capture constraints to capture a 1280x720 track at 24 FPS.
- Limiting users on mobile browsers to receiving a remote participant’s second simulcast layer at most (that being layer 1, since they’re zero-indexed).
Read more about scaling large calls and our default simulcast layer configuration in our large calls guide.
Here’s what the connection options object looks like with our new settings (you can also checkout the diff on GitHub:
Daily logic:
const connectOptions = {
  // https://docs.daily.co/reference/daily-js/instance-methods/update-receive-settings#main
  receiveSettings: {
    base: { video: { layer: 'inherit' } }
  },

  // Capture 720p video @ 24 fps.
  // https://docs.daily.co/reference/daily-js/instance-methods/set-bandwidth#main
  userMediaVideoConstraints: { height: 720, frameRate: 24, width: 1280 },
};

// For mobile browsers, limit the maximum received simulcast
// layer to layer 1.
if (isMobile) {
  connectOptions.receiveSettings.base.video.layer = 1;
};
Next, we need to add a couple more properties to the options object above: the user’s selected audio and video devices.
Configuring audio and video devices
By default, Daily handles retrieving the user’s audio and video devices for you. However, it’s common to have your own device selection logic for a pre-join UI.
In this demo, all of Twilio’s original microphone and camera selection flows remained exactly the same. The only difference is how we set the chosen device ID within our connection options in preparation for passing it to Daily. Instead of an object, Daily takes just the ID of the video and audio device.
Twilio logic:
connectOptions.audio = { deviceId: { exact: deviceIds.audio }
connectOptions.video.deviceId = { exact: deviceIds.video }
Daily logic:
connectOptions.audioDeviceId = deviceIds.audio;
connectOptions.videoDeviceId = deviceIds.video;
We’ve now got our connection options configured with our send and receive settings and our chosen devices. It’s time to join the actual video call.
Joining the video call
In this section, we’ll focus our attention to the /quickstart/src/joinroom.js file, where the video call is joined and managed.
Let’s jump straight into the joinRoom() function, where we create Daily’s call object (I'll go through what that is shortly) and join the video call.
Twilio’s version of this demo defined a room by connecting to it as follows:
Twilio logic:
const room = await connect(token, connectOptions);
Once the above awaited call returned, the user was considered connected to the room. From there, Twilio handled some connection logic, showed relevant DOM elements for other call participants, etc. This is also when Twilio set some event handlers on the room object created above, like this:
Twilio logic:
room.on('participantConnected', participant => {
     participantConnected(participant, room);
   });
I’m going to go through how to map Twilio events to Daily right after this. But first, let’s see what this call initialization looks like in Daily-land.
With Daily, instead of creating a room through a connect() call, we create a call object through a call to createCallObject():
Daily logic:
async function joinRoom(token, connectOptions) {
  const callObject = DailyIframe.createCallObject({
    url: connectOptions.roomURL,
    token: token,
    dailyConfig: {
      userMediaVideoConstraints: connectOptions.userMediaVideoConstraints,
      receiveSettings: connectOptions.receiveSettings,
    },
    audioSource: connectOptions.audioDeviceId,
    videoSource: connectOptions.videoDeviceId,
  });
  // ...The rest of the function below...
}
Above, I’m passing our call configuration options to Daily when instantiating the call object:
- The Daily room URL (retrieved from the server component we discussed earlier)
- The meeting token (also retrieved from that server component)
- Our video track constraints (setting us up to capture 1280x720 video at 24 FPS)
- The receive settings (specifying which maximum simulcast layer to receive from other participants)
- The audio and video device IDs
At this point, the call has not yet been joined. Before actually connecting to the video call, I define some Daily event handlers. Let’s take the equivalent of Twilio’s ”participantConnected” event above as an example:
Daily logic:
callObject.on('participant-joined', (ev) => {
      const p = ev.participant;
      participantConnected(p, callObject);
    })
This is a good time to go through how Twilio events used in this demo map to Daily’s video call API.
Mapping Twilio’s events to Daily
Twilio’s events are emitted by different types within their API. You’ll have some event handlers being set on the room, others on a track, others on the participant. With Daily, all events are emitted by the call object. Events relevant to a particular participant contain that participant (or their session ID) in the event payload.
Below is a list of all Twilio events used in this demo and Daily’s equivalents.
| Twilio event | Daily event |
|---|---|
| “participantConnected” (on room) | “participant-joined” |
| “participantDisconneced” (on room) | “participant-left” |
| “connected” (on room) | “joined-meeting” |
| “disconnected” (on room) | “left-meeting” |
| “dominantSpeakerChanged” (on room) | “active-speaker-change” |
| “subscribed” (on track) | “track-started” |
| “unsubscribed” (on track) | “track-stopped” |
| “trackPublished” (on participant) | “track-started” |
I encourage you to take a look at all of the handlers in detail in the demo repository. As an example, let’s take a look at one of the “meatier” handlers of one of the events above: handling active speaker changes.
Handling active speaker changes
Below is my handler for handling Daily’s "active-speaker-change" event (note the inline comments):
Daily logic for handling active speaker changes:
    .on('active-speaker-change', (ev) => {
      // Retrieve ID of the current speaker
      const sessionId = ev.activeSpeaker.peerId;

      // Update the active speaker global
      activeSpeakerId = sessionId;

      // If active speaker is not pinned, update
      // the active speaker tile.
      if (!isActiveParticipantPinned) {
        // Get all participants in the call
        const participants = callObject.participants();
        const p = participants[sessionId];
        setCurrentActiveParticipant(p, callObject);
      }
    })
Above, I retrieve the session ID of the new active speaker from the event payload. I then set my activeSpeakerId global to the retrieved session ID. The reason for this is to support falling back on showing the current active speaker if the local participant has someone else pinned and un-pins them.
Then, if the local user does not currently have anyone pinned, the handler retrieves the active speaker from all call participants using the participants() instance method and sets them as the current active speaker.
So what does setCurrentActiveSpeaker() actually do?
In Twilio’s version of the code, setCurrentActiveSpeaker() takes Twilio’s Room instance as the only argument.
Twilio logic:
function setCurrentActiveParticipant(room) {
   const { dominantSpeaker, localParticipant } = room;
   setActiveParticipant(dominantSpeaker || localParticipant);
 }
Twilio then extracts what they call the “dominant speaker” and local participant from the room and calls setActiveSpeaker() with whichever one of these exists, to make them the featured speaker in the larger video view.
Daily doesn’t have the dominant speaker retrievable through the call object, so I pass the active speaker I retrieved earlier to setCurrentActiveParticipant() along with the call object instance we’re working with:
Daily logic:
function setCurrentActiveParticipant(activeParticipant, callObject) {
  const lp = callObject.participants().local;
  setActiveParticipant(activeParticipant || lp, callObject);
}
Above, I retrieve the local participant from the call object and pass either that or the passed-in active participant to setActiveParticipant() (same as the Twilio version).
The difference here is that I pass the call object instance to setActiveParticipant() as well. I’ll be using the call object in that method to update the local participant’s receive settings in relation to the active speaker, enabling the local user to receive a higher-quality simulcast layer from the active participant. Check out the full implementation of setActiveParticipant() in the demo repository—this part remains pretty similar to Twilio's approach.
One core difference in managing the active speaker, as well as displaying participant tiles in general, is track handling.
Twilio vs Daily video API track handling
The participant tracks we are working with in the Twilio version of this demo are of types RemoteTrack and LocalTrack. For example, a remote participant’s video track would be an instance of RemoteVideoTrack. These tracks contain attach() and detach() methods, which attach the given track to an HTMLVideoElement.
As a concrete example, let’s take a look at Twilio’s attachTrack() function in this demo:
Twilio logic:
function attachTrack(track, participant) {
  // Attach the Participant's Track to the thumbnail.
  const $media = $(`div#${participant.sid} > ${track.kind}`, $participants);
  $media.css('opacity', '');
  track.attach($media.get(0));

  // If the attached Track is a VideoTrack that is published by the active
  // Participant, then attach it to the main video as well.
  if (track.kind === 'video' && participant === activeParticipant) {
    track.attach($activeVideo.get(0));
    $activeVideo.css('opacity', '');
  }
}
With Daily, each participant’s tracks are contained within a tracks property on the participant object. You retrieve video, audio, screen, and custom MediaStreamTracks from within each participant’s tracks object and work with them directly.
So with Daily, instead of using attach() or detach() as we would with Twilio, we’ll create our own DOM element for each participant along with the video (or audio) element for it. We’ll then update the MediaStream on each of those elements with updated tracks as needed when and if the user’s tracks change. Here’s what this looks like in the converted version of our Twilio demo:
Daily logic:
function attachTrack(track, participant, callObject) {
  // Attach the Participant's Track to the thumbnail.
  const query = `div#${participant.session_id} > ${track.kind}`;
  let $media = $(query, $participants);
  if ($media.length === 0) {
    setupParticipantContainer(participant, callObject);
    $media = $(query, $participants);
  }

  $media.css('opacity', '');
  const media = $media.get(0);

  updateTrackIfNeeded(media, track);

  // If the attached Track is a VideoTrack that is published by the active
  // Participant, then attach it to the main video as well.
  if (track.kind === 'video' && participant.session_id === activeParticipant?.session_id) {
    updateTrackIfNeeded($activeVideo.get(0), track);
    $activeVideo.css('opacity', '');
  }
}
The two main differences between Twilio and Daily above are:
- I’m setting up a DOM element for the participant if it does not already exist through
setupParticipantContainer(). - Instead of calling
track.attach(), I’m calling a new function:updateTrackIfNeeded().
Remember that with Daily, track is an instance of MediaStreamTrack. Let’s take a look at what updateTrackIfNeeded() does exactly:
Daily logic:
function updateTrackIfNeeded(mediaElement, newTrack) {
  const src = mediaElement.srcObject;
  if (!src) {
    mediaElement.srcObject = new MediaStream([newTrack]);
    return;
  }
  const existingTracks = src.getTracks();
  const l = existingTracks.length;
  if (l === 0) {
    src.addTrack(newTrack);
    return;
  }
  if (l > 1) {
    console.warn(`Unexpected count of tracks. Expected 1, got ${l}; only handling the first`);
  }
  const existingTrack = existingTracks[0];
  if (existingTrack.id !== newTrack.id) {
    src.removeTrack(existingTrack);
    src.addTrack(newTrack);
  }
}
Above, I first get the srcObject property from the media element passed to the function. If a source object does not exist, I create one with the given track and early-out of the function.
Next, I retrieve all current tracks assigned to the source object. If there are none, I add the new media track to the source object and early out. If there’s at least one track, I check its ID against that of the new track. If the ID differs, I replace the track. If not, I do nothing—tracks with the same ID are identical, so there’s no point doing that extra replacement operation.
I also log a warning if for some reason there is more than one existing track on a media element—if that happens, something dodgy is going on! In a production-level application I’d probably throw an exception here, logging and handling it appropriately, but for our demo purposes a warning is sufficient.
I recommend checking out my earlier blog post about working with video call participants’ media tracks for more information about track handling with Daily.
Now that we’ve covered the primary changes that went into migrating this Twilio video call demo to Daily’s video API, let’s look into a very important aspect of developing video applications: analyzing participants’ call quality.
Analyzing Daily video session call quality
If you’ve gone through the local setup and run this demo locally, you’ll have run a few sessions on your new Daily domain. Now, you can analyze how those sessions went through your Daily developer dashboard.
Go to your dashboard and click on “Sessions” in the left-hand sidebar. Here, you should see a table of your recent call sessions—these will likely be the sessions you started when running this demo on your machine:
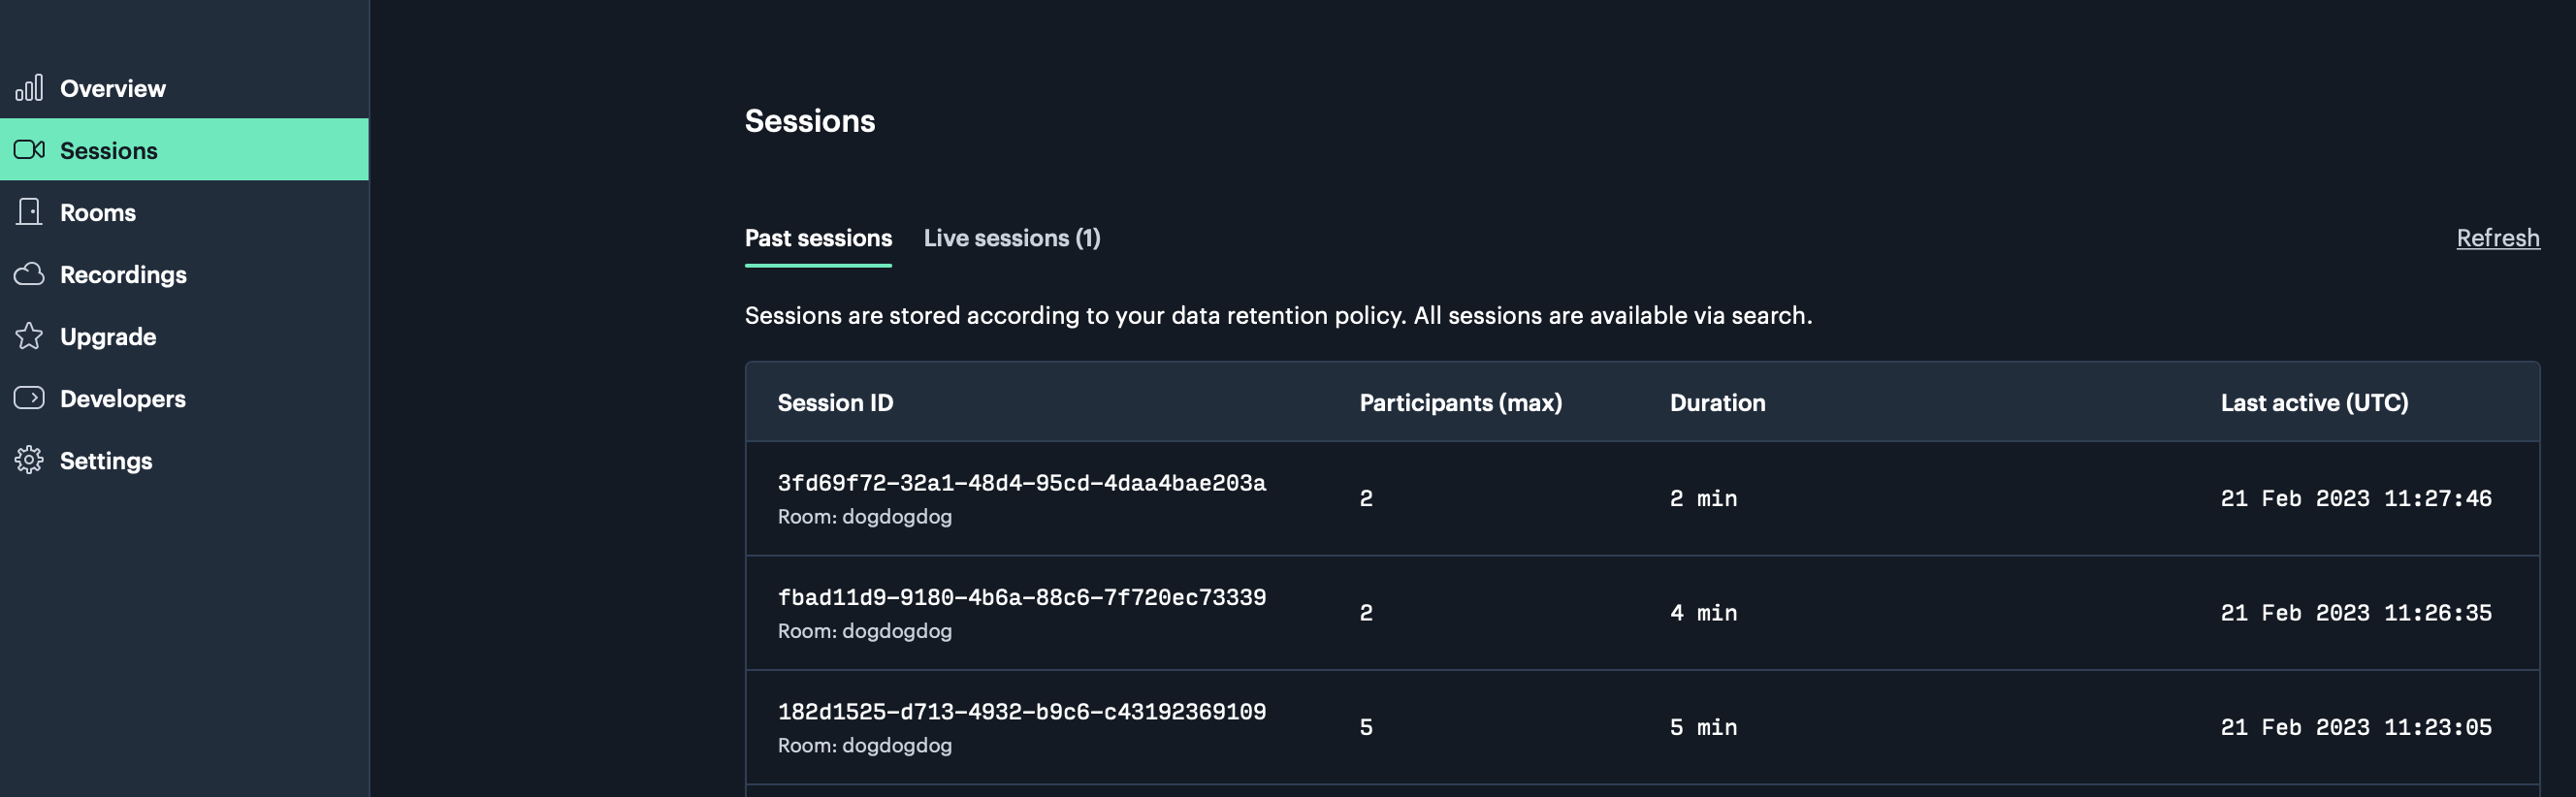
Click on the first session to enter the session details view. This view contains details about the room the session took place in, when the session started, whether it is ongoing or ended, how many participants the session had, and more:
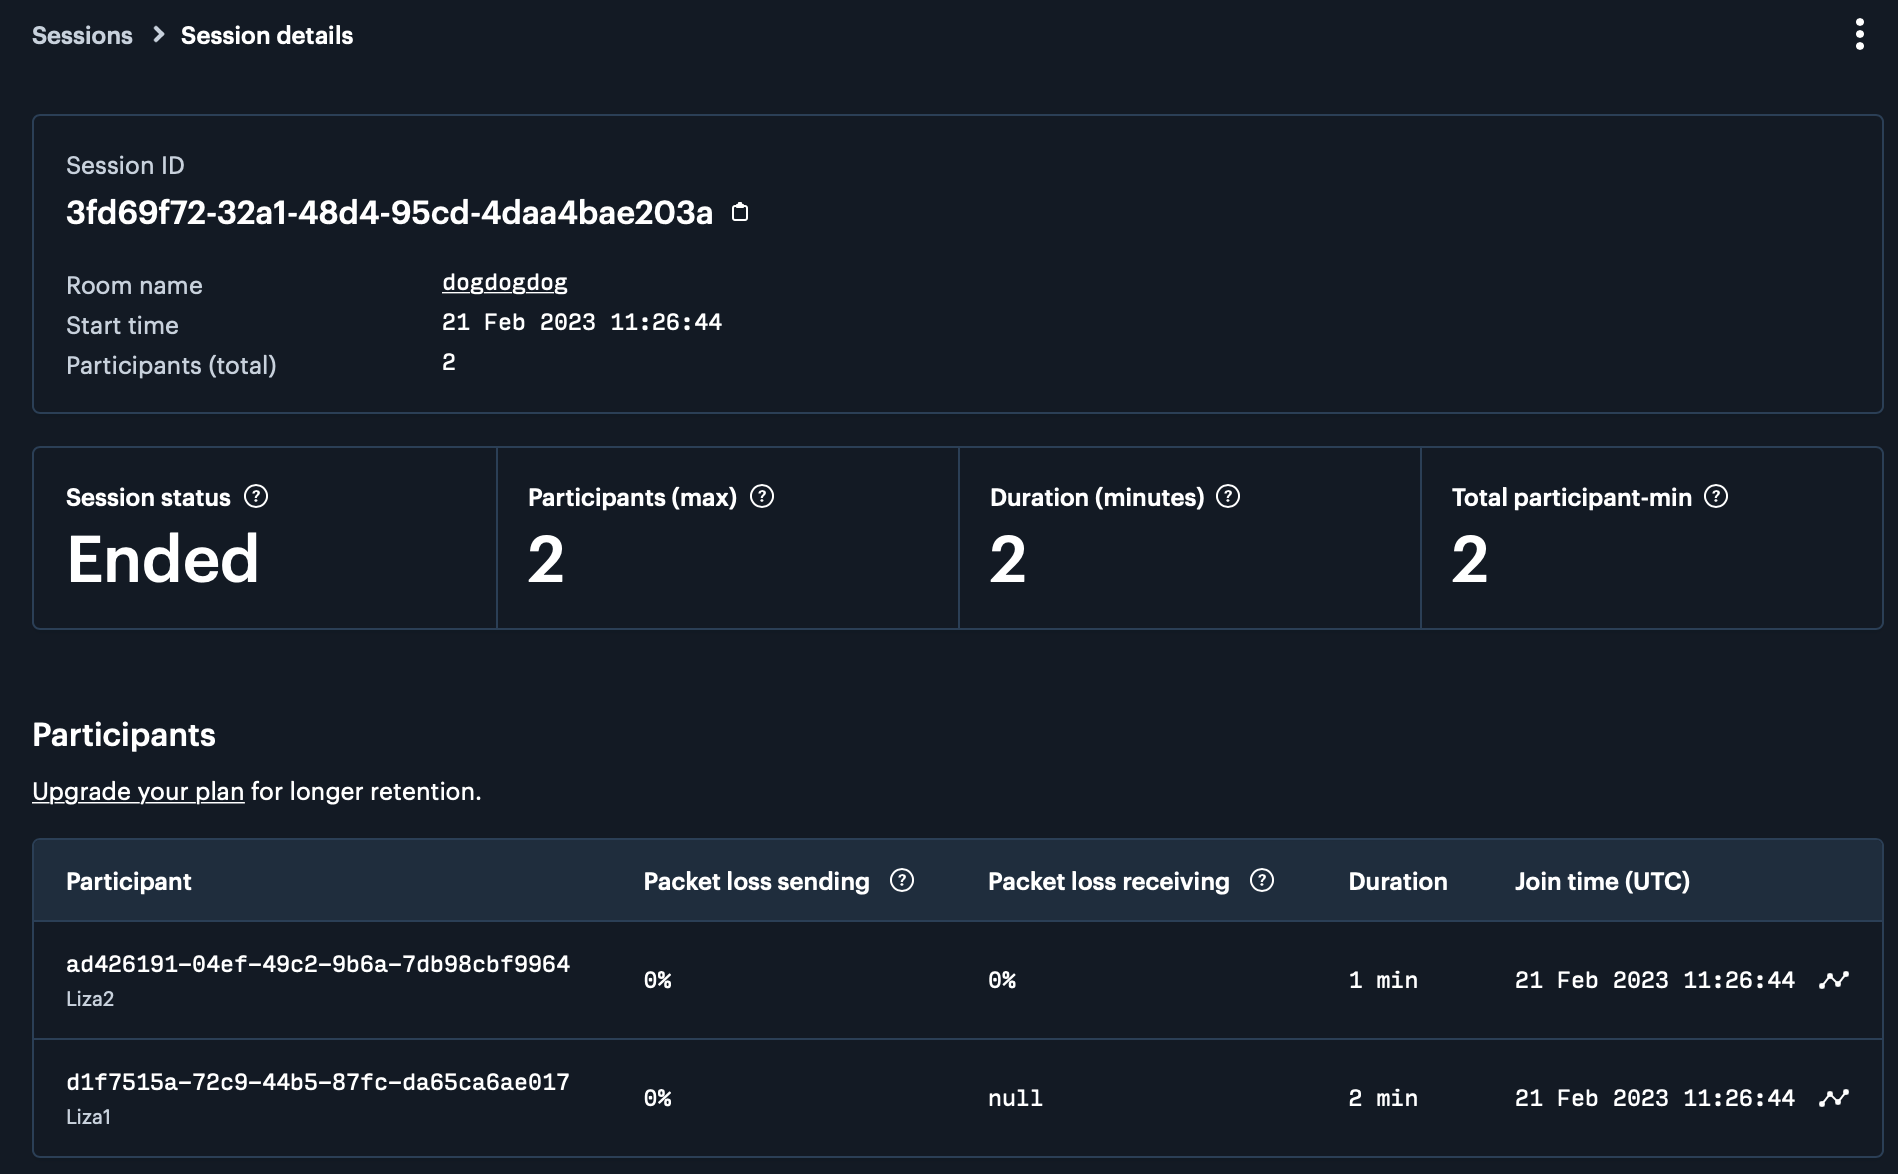
Click on the first participant in the session details view to drill down into their specific user session:

In this view you’ll find details about the participant’s browser, operating system, packet loss information, network information, and much more.
Take a look at our blog post about analyzing sessions through the dashboard and our guide about examining call quality for more details about how to leverage Daily’s powerful monitoring features to track and improve your users’ video call experience.
Conclusion
In this post, we migrated a Twilio demo to Daily’s video API. We covered server and client-side components, event mappings, and other core features of the video call conversion. We also went through the basics of utilizing Daily’s developer dashboard to monitor your participants’ video call quality. I strongly recommend reading our last post about higher-level Twilio concepts and how they map to Daily’s features if you haven’t yet. With these two resources, you should be all set to begin your migration.
Do you have any questions about switching to Daily? We’d love to help. Reach out to our support team or jump into our WebRTC community to get started.
Never miss a story
Get the latest direct to your inbox.