
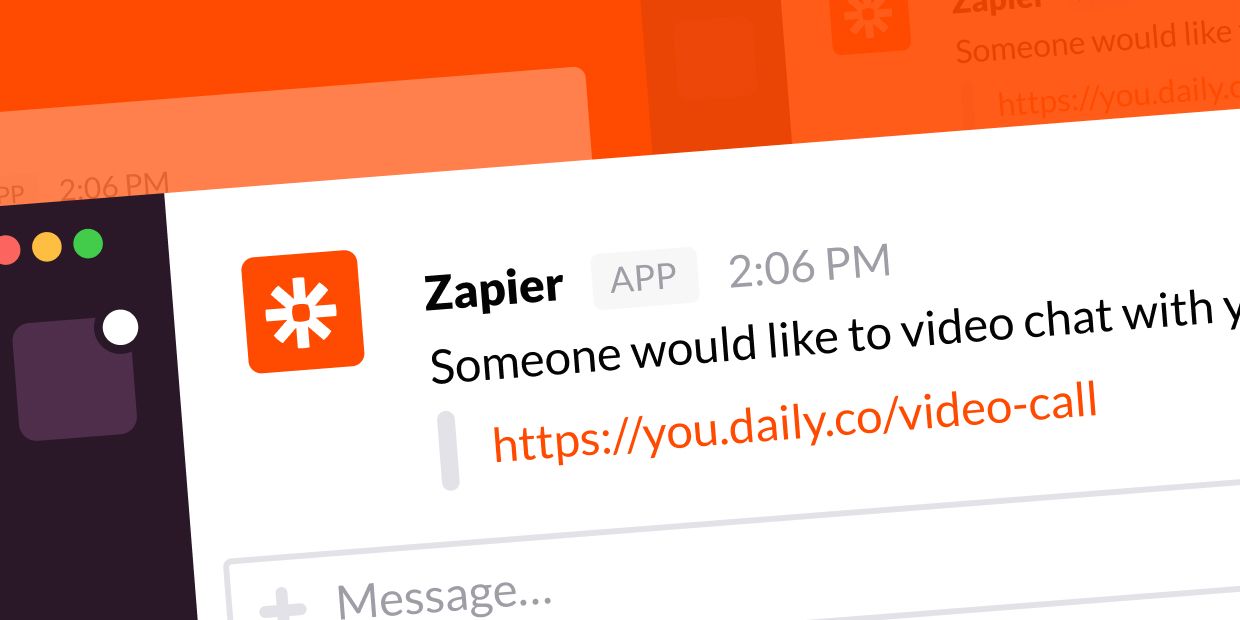
In just a few steps, you can use your API key — together with Zapier — to get notified when someone joins one of your Daily.co rooms.
Getting notified when someone joins a room is really helpful for a few scenarios:
- If you have rooms set to "private" or "team only", you might want to be notified when someone is attempting to join.
- If you'd like a reminder to join a call when someone else joins, first.
- Or, like in our latest tutorial, to get notified when someone is requesting to join a room that you've locked.
These are just a few examples! There's tons of flexibility here. You really just need a few things to accomplish this. A Daily.co account with some room links and a Zapier account.
With Zapier, you can create a 2-step Zap for free. Or you can create more intelligent, 3-step Zap — like the one in this post — by upgrading your Zapier plan.
To create your Zap, just follow these steps.
1. Sign in & Make a Zap!
- Sign in to your Zapier account
- Then click the "Make a Zap!" button at the top of the site
2. Create a Trigger
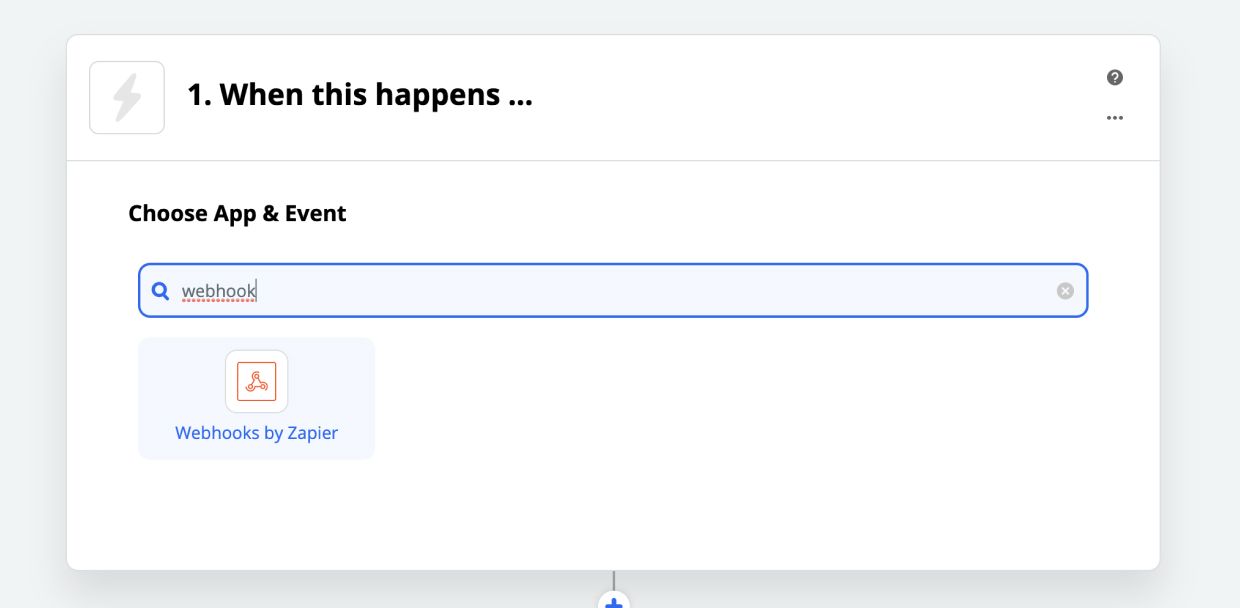
The first step for creating a Zap is to choose your trigger app.
- Search for "Webhooks by Zapier", as your app.
- Select "Catch Hook", for the "Choose Trigger Event" field.
- Click the Continue button.
- Zapier will create a custom webhook URL, copy and save this for later!
- Click the Continue button.
Note, if you see a "Zapier had trouble retrieving custom fields from Webhooks by Zapier." message, ignore it.
3. Set your webhook URL
- Open this tool we created — or use embedded version above.
- Paste the following information into their respective fields:
- Zapier Webhook URL: Paste the webhook URL you just copied from step 2, above
- Daily.co API Key: Input the API key from your Daily.co dashboard. This is under the Developers tab, you will need to generate your API key if you haven't already.
- Room URL field: Paste the room link you opened in Step 3, above.
- Once the form is filled out, click the blue, "Set Webhook URL for Room" button.
- If all goes well, the form will display some Query Successful tool tips and the "Current Webhook URL" row will change to the webhook URL you pasted into the form. Example screen shot, below.

4. Open your meeting link
Before we continue, you must open your Daily.co room link in a new tab, and join the meeting. This will associate the webhook URL with your room.
- Open your room link in a new browser tab. (Visit your Daily.co dashboard to create an account/room(s) for free)
- Join the call by clicking on the "Join on my computer" row.
- Click "Allow" if prompted by your browser for camera/mic permissions.
- Leave the meeting open.
- Return to Zapier and click the "Test & Continue" button.
If all goes well, in Zapier will animate you into the next step, "2. Do this…". You can confirm your data by clicking on "1. Catch Hook" and opening the "Find Data" toggle.
If Zapier is struggling to find data, try reloading your meeting link and clicking to test and continue again. You will need data to continue.
5. Add a filter (optional)
Now you'll want to add a filter so that you are only notified when someone other than you (someone who is not the room owner) joins your call. Adding a filter means that you'll be creating a 3-step Zap, which requires a paid Zapier plan. You can skip this step if you wish — and create a 2-step Zap. Just note that you'll be notified when you join the meeting, too. Let's continue.
- Search for, and select the "Filter by Zapier" app
- Filter Setup & Testing
- Select "Is Owner" from the first dropdown
- Select "(Boolean) Is false" from the second dropdown
- Click "Done editing" to continue.
6. Add an Action step
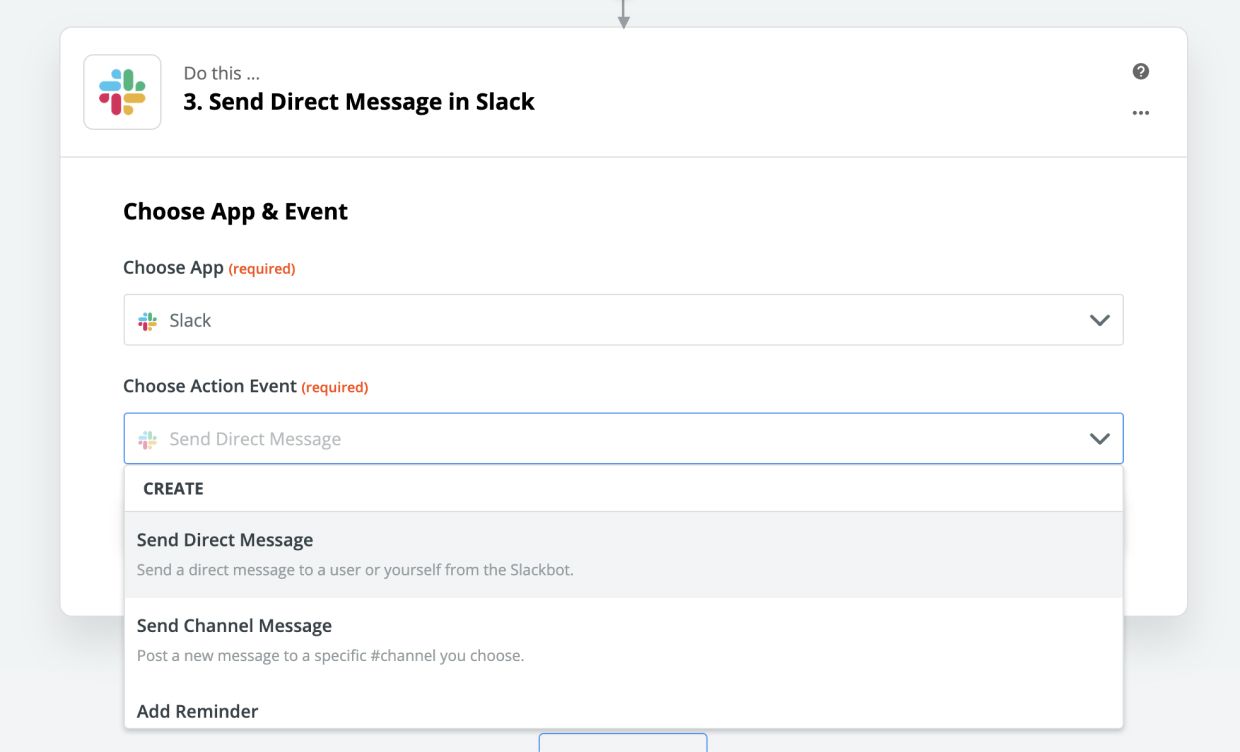
You can choose to get notified via your favorite channel. For this tutorial we will send a direct message to Slack.
- First, click on the plus icon to add another step and then search "Slack".
- Select "Send Direct Message" for the action event dropdown.
- Click "Continue".
- Click on the "Slack account" dropdown to chose your Slack account. If you have not authenticated Slack with Zapier in the past you must Sign in to Slack and follow the instructions in the popup.
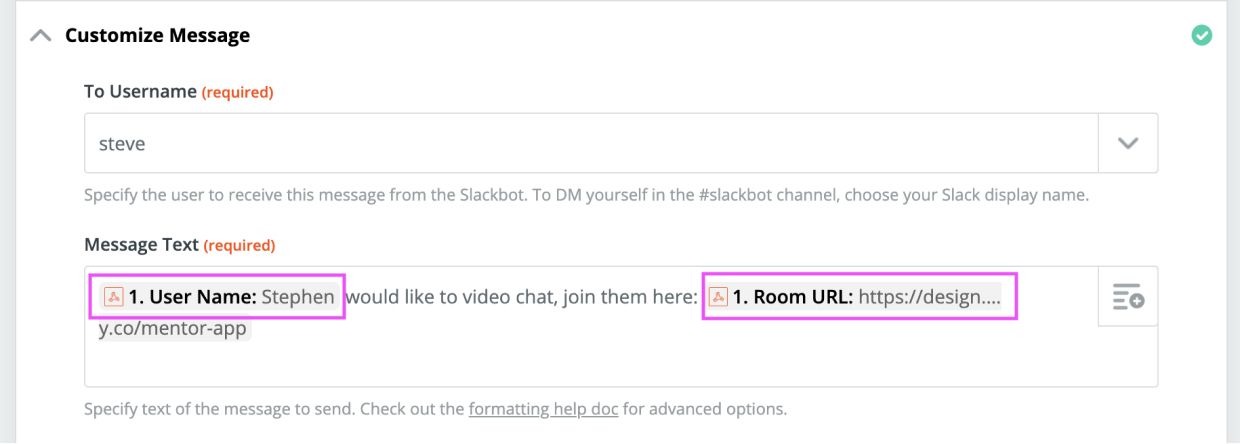
- Once you've auth'd Slack, click "Continue" and then follow these steps to craft your message:
- In the "To username" field, search for the user you'd like to message.
- In the "Message text" field, type the message you'd like sent.
- IMPORTANT: insert the Room URL into the "Message text" field by clicking the + icon in the top right of the form. Open the "Catch hook" toggle and choose "Room URL". The form should look like the screen shot, below.
- Similarly, you can insert the User Name — also via the + icon — in the message text field as well.
- Click the "Continue" button.
- Click the "Test & Continue" button. If all goes well you'll get a Slack message!
- Click the "Done Editing" button at the bottom of the Zapier interface.
7. Save your Zap!
If that works, you're all set. Now you just need turn on your Zap by clicking the toggle at the bottom of the page. You can choose to name it, back in the Zapier dashboard.
We hope that this post helps you use Zapier to get notified when someone is requesting to meet with you in one of your Daily.co meeting rooms. If you have any questions, do not hesitate to contact us. You can also visit Zapier's help site for help with debugging any issues.
Never miss a story
Get the latest direct to your inbox.