


Pauli Olavi Ojala is a Daily engineer and technical lead for Daily’s Video Component System (VCS). Read his post below introducing how to build your own VCS component to add a moving watermark to a Daily live stream or cloud recording.
Introduction
It is a tense time at MegaCorp headquarters. Perched high above the teeming streets of Neo-Metropolis, each seat in the mahogany-decked boardroom is occupied by a MegaCorp executive. At the end of the table, MegaCorp’s CEO demands an answer.
“Ladies and gentlemen, this is the third time in a month that our internal meetings have leaked to the internet. The press is having a field day. Worse, Twitter is laughing at my motivational dance performance.” The CEO takes a deep breath and regains composure. “We must take every step to assert our trade secrets and intellectual property. Can’t we watermark the videos, at least?”
The operations executive coughs uncomfortably. “Madam, we already do watermark the video recordings, but it seems these pirates simply crop out the watermark. You see, it is at the edge of—”
“Enough. Anyone have a solution? Dr Taeglich? Your advanced research department has cost us one billion dollars annually. Can’t you do anything?”
At the other end of the table, Dr Taeglich raises an eyebrow. “Jawohl, I do believe we may have a solution. It is based on our latest research into quantum randomness, and…”
“I don’t care. Can you deploy by the next corporate meeting on Tuesday?”
“Ja, that is eminently durchführbar, how say you, feasible.”
Back at her research lab, Dr Taeglich sits down at her PC and opens Daily’s API reference. She may not have been entirely forthcoming about the proposed solution. The billion dollars were spent on a particle accelerator that doesn’t quite work yet. Fortunately she had signed up for Daily the week before, and now at least everything video-related was under control. She hadn’t lied to the CEO: randomness would definitely play a part in this solution, and it would be up and running that same night.
This is the story of the MegaCorp moving watermark, how it was created and deployed within the hour using Daily’s Video Component System (VCS), and how you can repeat the feat in a few dozen lines of JavaScript code.
What is a watermark?
A video watermark is a familiar feature in online video. Some distribution platforms apply a watermark automatically to advertise themselves; other times it’s a signature for the content creator. The most basic kind of watermark is a grayscale static image at low opacity. A more advanced version is a “ticker” — a line of text that crawls across the screen. Both kinds of watermarks have the problem that they’re either unobtrusive and thus easy to remove, or they’re large and visible but also obscuring the content.
Let's see how MegaCorp's easily cropped video watermark:

Today’s agenda: Adding a moving watermark with Daily’s VCS
What if we made a watermark bounce around the screen with a randomized component to its position? That kind of watermark can’t be removed by simply cropping, and it can also be small enough to remain reasonably unobtrusive.
The algorithm for bouncing an object off the screen’s edges is quite simple. (It was used in the very first video game, Atari Pong in 1972, so it can’t be very complex!) Coding is theoretically the easy part here, but how can we deploy this kind of animated video layer? Let’s assume our video is a realtime call (like the MegaCorp all-hands meeting). Ideally we’d like to be able to run this watermark overlay program on both live streams and recordings while they’re in progress, without requiring any extra processing step to apply the watermark…
This is where Daily’s VCS (Video Component System) comes in. It lets you make “code injections” to modify video live streaming and recording. This code will run in the cloud, modifying the output in real time when a video call is in progress.
From the developer’s point of view, VCS is a video-oriented JavaScript graphics framework based on React, the popular front-end runtime. You can build custom video layouts and animated overlays in JavaScript, test them locally on your desktop using the VCS open source SDK (Software Development Kit), and then deploy your custom code to Daily’s cloud-based rendering pipeline with minimal fuss.
This tutorial will show how it works. We’ll build the bouncing video watermark from scratch, then try it out on a live video call recording on Daily.
Note: VCS is available through Daily live streaming and cloud recording, which are both pay-as-you-go features. Learn more about Daily pricing.
SDK and composition basics
To understand how the custom overlay code will be injected, we first need to talk a bit about Daily VCS’s baseline composition.
A “composition” is essentially a JavaScript program designed to be loaded by the VCS framework. It can run in the cloud on Daily’s media pipeline, or it can run in a client app. For this tutorial, we’re focusing exclusively on the first case — customizing a composition in the cloud.
To learn more about VCS, read our Core concepts section of the VCS reference docs.
The “baseline composition” is a standard collection of useful rendering features provided by Daily. It includes video layout modes (grid, split, etc.) as well as various graphics overlays. You can read more about the baseline composition in our VCS baseline composition guide
To inject our custom animated overlay, we’re going to override a component within the baseline composition. Not replace the whole thing — just overwrite one file. Everything about the baseline composition will remain functional, as we’re just adding one extra VCS component to perform the animated rendering.
To do this, we need access to the VCS library and development tools. They are provided in the VCS SDK which is open sourced and available on GitHub.
For development, we’ll use the VCS Simulator. It’s simply a local web server that loads up your code changes into a dedicated UI for testing video compositions. You can read about it in our VCS reference docs Tools section.
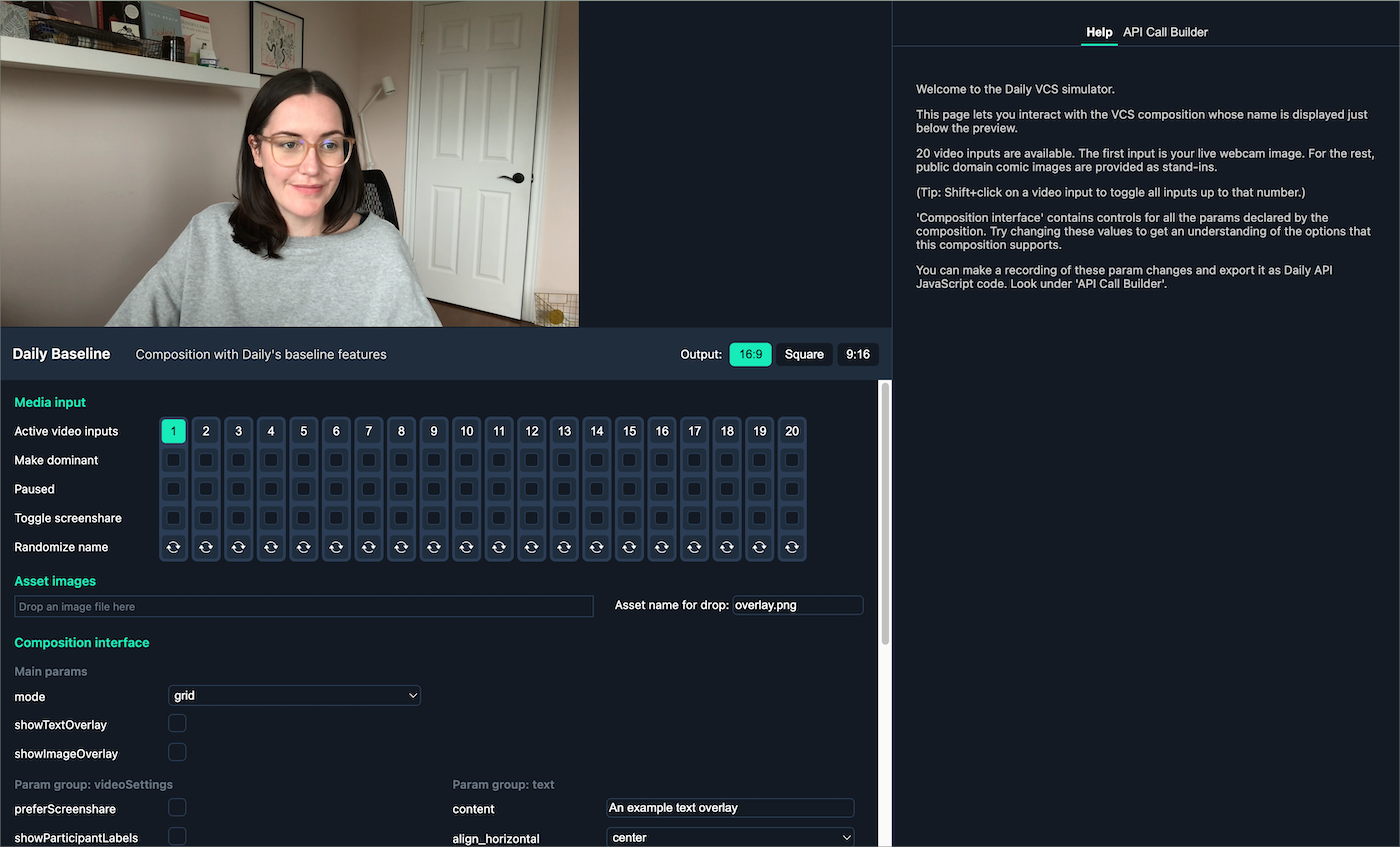
Getting started
To start off, you need to clone VCS SDK repo from GitHub. It’s a good idea to experiment a bit with the simulator running the baseline composition locally, so you have an idea of what the UI does. The instructions to do this are in the Installation guide.
The baseline composition contains a file named CustomOverlay.js in the components subfolder. It’s an empty component, and its sole purpose is to serve as an extension point for new overlays like our watermark.
So, the workflow will be:
- We’ll edit
CustomOverlay.jslocally to render the animated watermark. - The VCS simulator supports hot reload, so you can keep it open while editing the code and test your changes immediately.
- Once the watermark is ready, we need to deploy it using the Daily API. This is where we move from running code locally to running it in Daily’s cloud.
For the next steps, we’re assuming you have the simulator already running with this CLI command. If you haven’t already, run the following command from the repo’s /js directory:
yarn open-browser daily:baseline
Placing a custom overlay image
All our code editing will take place in one file:
daily-vcs/compositions/daily-baseline/components/CustomOverlay.js
When you open it, you’ll see the default is an empty React component:
export default function CustomOverlay() {
  return null;
}
Let’s replace this with something that draws an image.
First, import the VCS Image component at the top of the file:
import { Image } from '#vcs-react/components';
Then change the component to render a default test image at 50% opacity. We’ll add two props, src and blend, the latter of which takes an object with a property named opacity:
export default function CustomOverlay() {
  const src = 'test_square';
  const opacity = 0.5;
  return <Image src={src} blend={{ opacity }} />;
}
In the simulator, you will see a giant translucent “/D” icon on top of your camera image. (Why the D? It’s simply the first letter from Daily’s logo.)
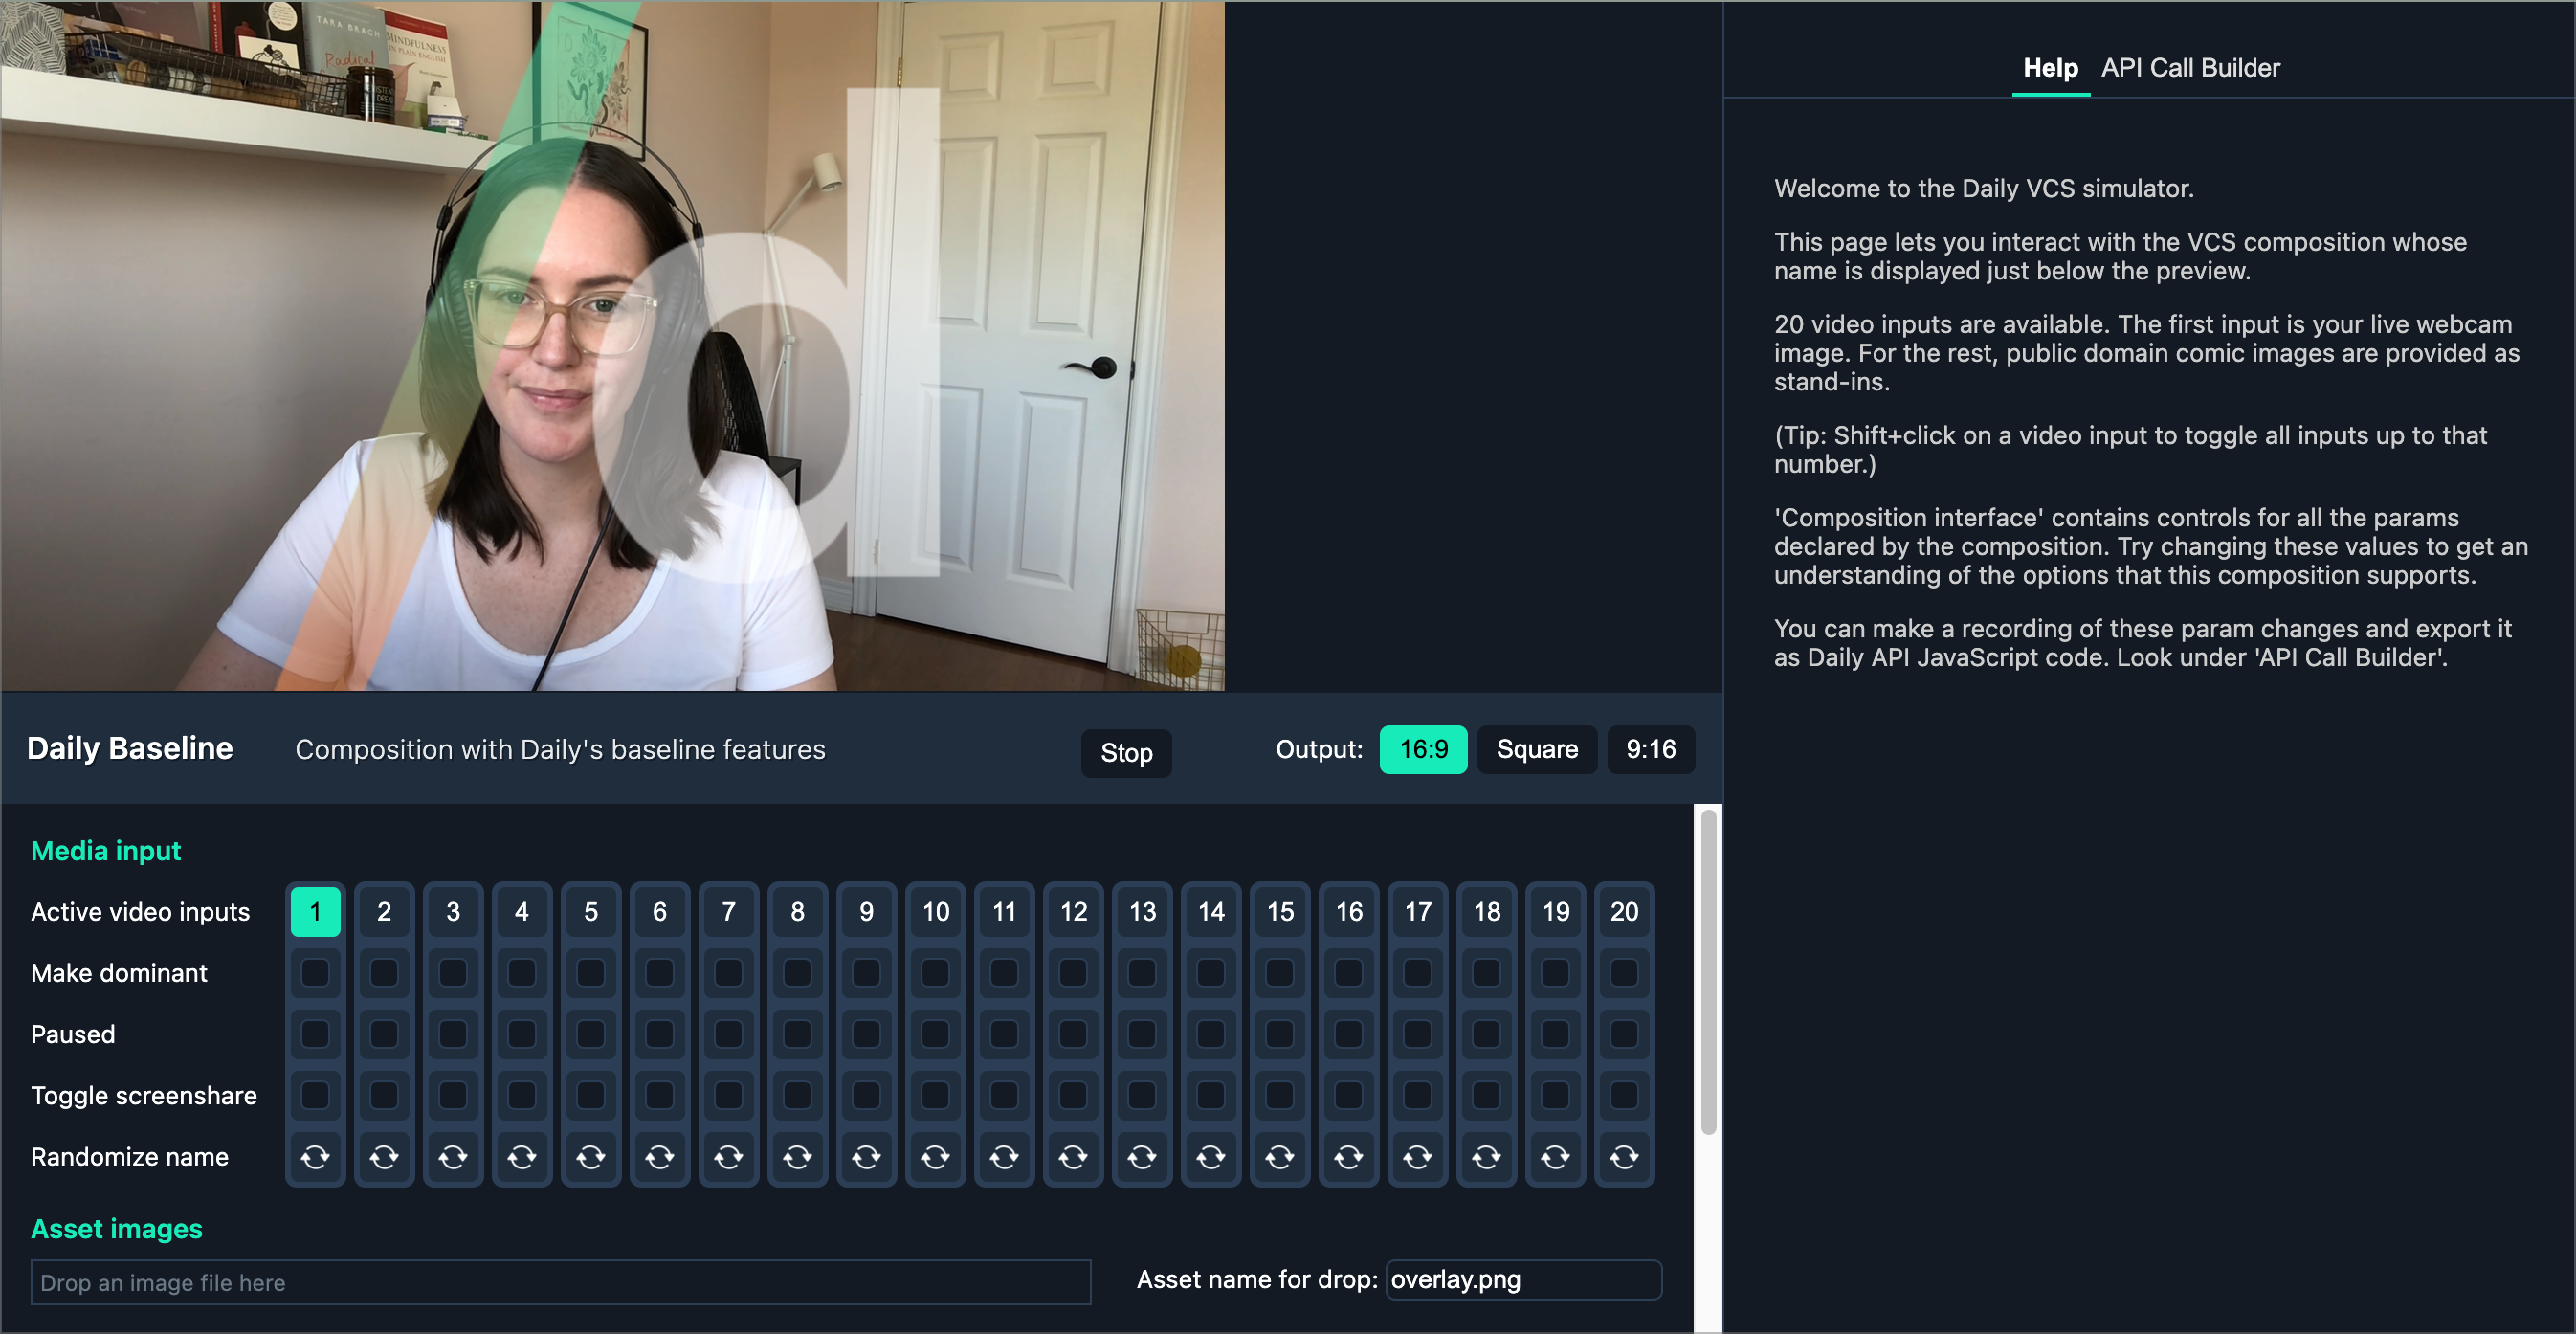
Well, now we have an image overlay, but it is very large! Because we didn’t specify a layout function, our custom overlay is defaulting to fill the entire viewport.
Although the VCS components bear a similarity to HTML, the VCS layout system isn’t based on CSS. Instead VCS uses a simpler system based on pure JavaScript functions, specifically designed for video layouts. You can read more about it in the VCS reference docs section on the Layout API.
To place this image on the screen, we thus need to write a layout function. (We could also look at reusing one of the layout functions that already exist in the baseline composition, but since this is a tutorial, it’s more educational to make a new one.) Let’s call it “placeImage”. I’ll give you the source here so we can get it working quickly, and we’ll analyze it a bit later.
function placeImage(parentFrame, params, layoutCtx) {
  let { x, y, w, h } = parentFrame;

  const imgAsp = 1; // for now, image aspect ratio fixed at square

  // image size is fixed at 20% of parent's height
  h = parentFrame.h * 0.2;
  w = h * imgAsp;

  // params x/y is a relative position with coords in range 0-1.
  // place the image so it's always inside the available space.
  x += params.x * (parentFrame.w - w);
  y += params.y * (parentFrame.h - h);

  return { x, y, w, h };
}
(You should place this function on the top level of the file, i.e. outside the React component.)
Our layout function has some configurability. It expects to receive a relative position value as the x, y properties on the params object. Other properties of the image placement are fixed for now: we’re specifying the image’s aspect ratio as square, and its target height will be 20% of the parent’s.
To use this function, we need to pass the x and y values from our component. Let’s just set them as constants for the moment so we’ll get something on screen:
export default function CustomOverlay() {
  const src = 'test_square';
  const opacity = 0.5;
  const x = 0.9, y = 0.2;

  return (
    <Image
      src={src}
      blend={{ opacity }}
      layout={[placeImage, { x, y }]}
    />
  );
}
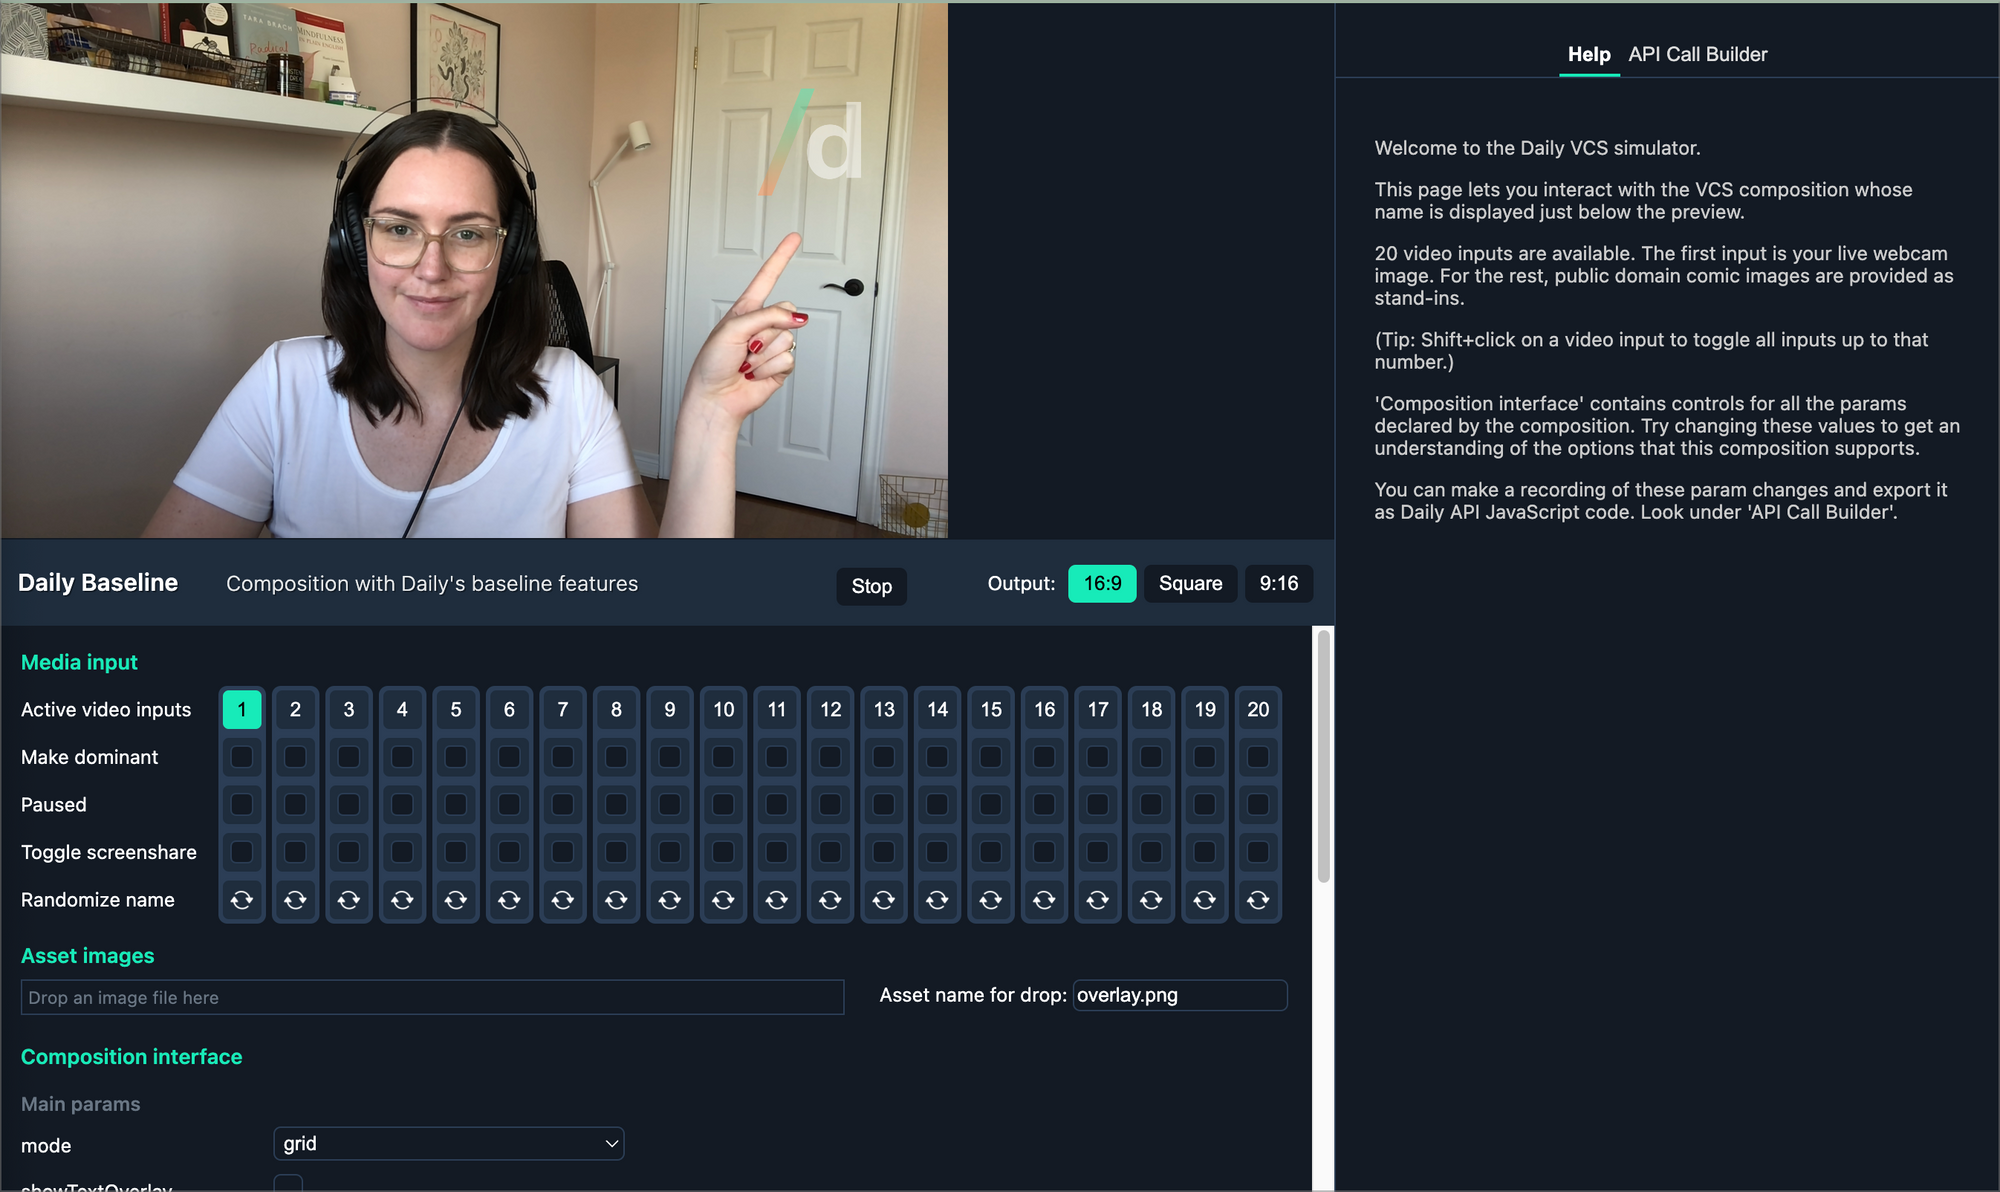
You should now see the D logo placed in the top-right corner, its height set at 20% of the parent. (You can verify this by switching the simulator view to portrait, i.e. 9:16 aspect ratio, and the image will scale accordingly.)
Let’s unpack a bit what happened here. We’re passing a new prop layout to the Image component instance. This prop takes an object with two values:
- The layout function,
placeImage; - A params object for the layout function, which we’re filling out with constant
xandyvalues.
Inside placeImage, we’re receiving a parentFrame argument which is a “frame object” — it simply describes a rectangle with x, y, w, h properties. And we’re returning a similar object, but with the x and y values changed based on the incoming relative values from params.
Seems like we’re on the right path to animating this image’s position: we just need to change the x and y values passed to the layout function.
In fact, you can try it with random numbers to get things animating:
const x = Math.random(), y = Math.random();
Animating the overlay
Ok, random is fun for a few seconds, then it becomes a headache. An entirely stateless animation like randomized coordinates clearly isn’t very useful. Let’s think about the data and state we’ll need to make this image bounce around the screen:
- We need to get the current video time as an input. The animation position should be derived from the current time so that it’s stable even if the frame rate changes.
💡 Tip: JavaScript’s familiar wall-clock timers like setInterval and setTimeout must never be used in VCS because there’s no guarantee that video time actually corresponds with the system clock. For example, your component might be running in a batch job which is rendering into a video file at 10x speed — we can’t know! See our docs to read more about VCS best practices.
VCS provides the current video time value using a React hook. We’ll see that in a second.
- For the bounce effect, we need a bit of component state. We have to track whether the image is moving left or right, up or down; and then flip that direction when it hits the screen edge.
We can store the image’s animation state in our component using React’s standard useRef hook.
A “ref” in React attaches a piece of data to the specific component instance. React then guarantees that whatever data we keep inside the ref won’t be reset as long as our component remains on screen. Whenever our component is called to render, we can simply update the ref-stored state based on the current video time.
Let’s add the useRef hook call, and also move x and y into a pos property within the object we store inside this new animation state ref:
export default function CustomOverlay() {
  // our animation state
  const animRef = React.useRef({
    t: -1,
    pos: {
      x: Math.random(),
      y: Math.random(),
    },
    dir: {
      x: 1,
      y: 1,
    },
  });

  const src = 'test_square';
  const opacity = 0.5;

  return (
    <Image
      src={src}
      blend={{ opacity }}
      layout={[placeImage, animRef.current.pos]}
    />
  );
}
In the simulator, you can now see that the logo is rendered at an initial random position, but doesn’t jump around anymore. (To re-randomize the position, you can restart the VCS session by clicking the Stop button which then changes into Restart.)
To plug in the video time input, we need the useVideoTime hook from VCS:
import { useVideoTime } from '#vcs-react/hooks';
Add this just below the animRef initialization in the component function:
  const t = useVideoTime();
  animRef.current = updateAnim(animRef.current, t);
Also add the updateAnim function outside the component:
function updateAnim(prev, t) {
  const pos = { ...prev.pos };
  pos.x += 1 / 1000;
  pos.y += 1 / 1000;
  return { ...prev, pos };
}
You’ll now see the D icon drifting serenely across the screen.
We’re updating animRef’s value at every render by calling the updateAnim function. It takes the previous animation state and the current time value, and returns a new animation state object. In this basic version, we’re incrementing the position at every iteration. But this is generally a bad idea — if the video rendering runs at a different frame rate, our animation would play back at a different speed. Instead we should use “videoTime” (the t argument) and derive x and y from that.
So, let’s turn up things a notch and do the full bounce. Replace updateAnim with this version:
const ANIM_SPEED = 0.1;

// computes new animation position with bounce at edges
function updateAnim(prev, t) {
  const dT = t - prev.t;
  const speed = ANIM_SPEED;
  const pos = {
    x: prev.pos.x + prev.dir.x * speed * dT,
    y: prev.pos.y + prev.dir.y * speed * dT,
  };
  const dir = { ...prev.dir };
  if (pos.x >= 1 || pos.x <= 0) {
    pos.x = Math.min(1, Math.max(0, pos.x));
    dir.x *= -1;
  }
  if (pos.y >= 1 || pos.y <= 0) {
    pos.y = Math.min(1, Math.max(0, pos.y));
    dir.y *= -1;
  }

  return {
    t,
    pos,
    dir,
  };
}
It’s quite a bit more code now, but you can hopefully work through the animation logic. The important point here is that we’re using the time delta dT to update the position value. We always store the previous time value in the animRef state object as the t property, and by subtracting that previous time from the new video time, we get the delta (i.e. time passed between render iterations). Since dT is used as a multiplier when calculating x and y, the math works out so that a zero dT would mean pos.x and pos.y are not changed at all. This means our component is re-render safe (i.e. if React renders it again, it won’t mess up the animation).
To implement the bounce, we simply check whether the newly computed position is at, or over, an edge. If so, we clamp the position coordinate to the edge and flip the movement direction stored in the dir property.
And that’s all there is to a randomized bouncing watermark. The content pirates have been foiled, MegaCorp is saved!
Dynamic image
But wait, maybe MegaCorp doesn’t want to have Daily’s “D” letter bouncing in their video streams? They probably want to use their own logo instead.
It’s time to do something about the src prop we’re passing to the Image component. We’ve been setting it to 'test_square' — let’s use something else instead. Replace the line with:
const src = 'watermark';
Now you’ll see the “D” replaced by a light-blue box that reads:
“Missing image: watermark.png”
Fortunately this is easy to fix. The simulator lets us drop in an image, and we can call it anything we want.
In the simulator, look for the UI element that reads: “Asset name for drop”.
There, type in: watermark.png
Next, choose any PNG image you have locally on your computer, and drag it from your desktop or file manager (Mac Finder, Windows Explorer) into the UI element that reads: “Drop an image file here.”
You’ll now see your custom image doing the fashionable bouncing watermark dance.
If your custom image happens to be square, everything is already peachy. However if you try with a wide or narrow image, you’ll notice a slightly annoying defect: the image appears to bounce already before it hits the actual edge of the viewport. This is because our layout function is assuming the image’s aspect ratio is square, and any non-square image is being rendered scaled down to fit within that square layout area, leaving some unwanted margin at the edges.
To fix this, we’ll make use of a layout hook. Replace the your placeImage function with this version:
function placeImage(parentFrame, params, layoutCtx) {
  let { x, y, w, h } = parentFrame;

  // get the source image aspect ratio using a layout system hook
  const imgSize = layoutCtx.useIntrinsicSize();
  const imgAsp = imgSize.h > 0 ? imgSize.w / imgSize.h : 1;

  // image size is fixed at 20% of parent's height
  h = parentFrame.h * 0.2;
  w = h * imgAsp;

  // params x/y is a relative position with coords in range [0-1[.
  // place the image so it's always inside the available space.
  x += params.x * (parentFrame.w - w);
  y += params.y * (parentFrame.h - h);

  return { x, y, w, h };
}
It’s the same as before, except we’re now computing imgAsp (the image’s aspect ratio) using a size value received from calling layoutCtx.useIntrinsicSize().
The layoutCtx object is the third argument passed to our layout function. It represents the current state of the layout engine as it’s calling our function. The useIntrinsicSize hook returns the intrinsic size of whatever element is currently being processed using this layout function. For an Image element, it’s the image’s original size in pixels. (We don’t actually care about what the size is, we just want the aspect ratio. But because the intrinsic size might be zero, we do check for imgSize.h > 0 before dividing the width by height, otherwise we might get a NaN as a result of dividing by zero, and that would break our layout function.)
Deploying and testing the custom component
Now we have the bouncing watermark with a custom image running locally in the simulator.
To use this in a live stream or recording on Daily, we’ll need to make our customized files available within Daily’s cloud pipeline. Specifically we need to deploy the following two files:
- Our custom version of
CustomOverlay.js - The
watermark.pngimage
We’ll be passing these files to Daily using the session assets API. When you start a live streaming / recording session, you can specify a list of asset URLs to be used by that session. Daily’s pipeline will then immediately download those assets and make them available. This is how we can add in an image file like watermark.png which isn’t already in the baseline composition.
Less obviously, the session asset API also lets you overwrite files in the baseline. If the name matches an existing file, it gets replaced. This is how we get to apply our own version of CustomOverlay.js — our asset will simply replace the empty default version of that file.
Because session assets must be URLs, you need to first make these two files available on a web server. The URL can of course be completely private to you. You can use any hosting service that lets you serve raw .js and .png files. The filenames can be anything, as long as the file extension matches the content.
For the sake of this example, let’s assume your files are hosted at these URLs:
https://example.com/assets/8923a94f.jshttps://example.com/assets/71dc32b5.png
(I’m using these random filenames to emphasize the point that an asset’s source URL truly doesn’t matter, as long as the file extension is correct.)
The Daily API call
This part assumes you already have a video call application that connects to a Daily room. (Here's a Daily live streaming tutorial if you could use some help getting set up.)
It doesn’t matter whether your app is a web app or React Native mobile app. The API to start a live stream or cloud recording is the same on both these platforms. (On Daily’s native mobile SDKs, the calls will look slightly different because they’re implemented in platform-specific languages, but the parameters you pass will be the same.)
Let’s assume you have the Daily API "call frame" object already available in a variable named call. To start a recording with the example session asset URLs described above, make this API call:
call.startRecording({
  layout: {
    preset: "custom",
    session_assets: {
      "components/CustomOverlay.js":
        "https://example.com/assets/8923a94f.js",
      "images/watermark.png":
        "https://example.com/assets/71dc32b5.png",
    }
  }
});
That’s all there is to it. The moving watermark will be automatically rendered in the recording. MegaCorp’s reputation may yet be saved, and Dr Taeglich may get to keep her billion-dollar research allocation.
For a live stream, the API call looks the same, you just need to pass a destination URL for the stream. (You can get this RTMP URL from whatever platform you’re using to stream; Twitch, YouTube, Facebook Live, Amazon IVS, etc. See our Live streaming guide for more information.)
call.startLiveStreaming({
  rtmpUrl: "YOUR_RTMP_URL",
  layout: {
    preset: "custom",
    session_assets: {
      "components/CustomOverlay.js":
        "https://example.com/assets/8923a94f.js",
      "images/watermark.png":
        "https://example.com/assets/71dc32b5.png",
    }
  }
});
Further ideas and next steps
One limitation of our current watermark implementation is that you can’t turn it off. We’re overriding CustomOverlay.js to always render, and we hardcoded the image opacity to 50% in your component code. Probably this custom component would be more useful if you could control the opacity — then you could just set opacity to zero if you want to turn it completely off.
VCS has an API called composition parameters which is meant for implementing exactly this kind of runtime controls. These params are declared in the composition’s index.jsx file. When you add a parameter there, it appears in the simulator GUI, so you can easily test out values. (This is how all those buttons and controls in the simulator are actually made: the baseline composition declares them as params.)
To implement this feature, you could add into index.jsx a param called watermarkOpacity (or whatever you want to call it). You can look at existing params like image.opacity and just copy the declaration.
Then, in your CustomOverlay.js, you’d consume the param value like this:
// at the start of the file, add this...
import { useParams } from '#vcs-react/hooks';

// ... and in your component code
// replace the existing "const opacity = 0.5"
// line with the following:
  const paramOpacity = useParams()['watermarkOpacity'];
  const opacity =
    Number.isFinite(paramOpacity) ? paramOpacity : 0.5;
Note that you want to check whether the param value received is actually a valid number (using Number.isFinite). This is good practice because the param value could be unset (null or undefined). If it’s not set, we default to 50% opacity.
To send the param value in your Daily-using app, you’d then do the following:
call.updateLiveStreaming({
  layout: {
    preset: "custom",
    composition_params: {
      "watermarkOpacity": 0.2
    }
  }
});
By the way, the VCS simulator can write this kind of param update call automatically for you! Just click “Record” in the API Call Builder tab, then change values in the UI.
More reading
To learn more about VCS, read:
- The VCS reference docs, especially the Core concepts section
- Our VCS announcement post
To learn more about the VCS baseline composition — our ready-to-use collection of compositions — review our VCS guide and baseline composition tutorials:
Never miss a story
Get the latest direct to your inbox.