


Introduction
At Daily, we love seeing what developers build in whatever way works best for them. We offer Daily Prebuilt – our embeddable video call UI – to get started with just a couple lines of code or you can build a totally custom experiences with Daily’s call object. Our goal is to support everyone’s use case and skill level by making browser-based video calls easy to integrate and customize.
As part of making the call experience better for everyone, we have introduced the ability to add live captions to Daily domains with our startTranscription() instance method in partnership with Deepgram.
This highly requested feature has many uses. They include being able to:
- Introduce wider accessibility options within calls
- Provide an “instant replay” (e.g. What did they just say?)
- Produce a great way to generate meeting notes
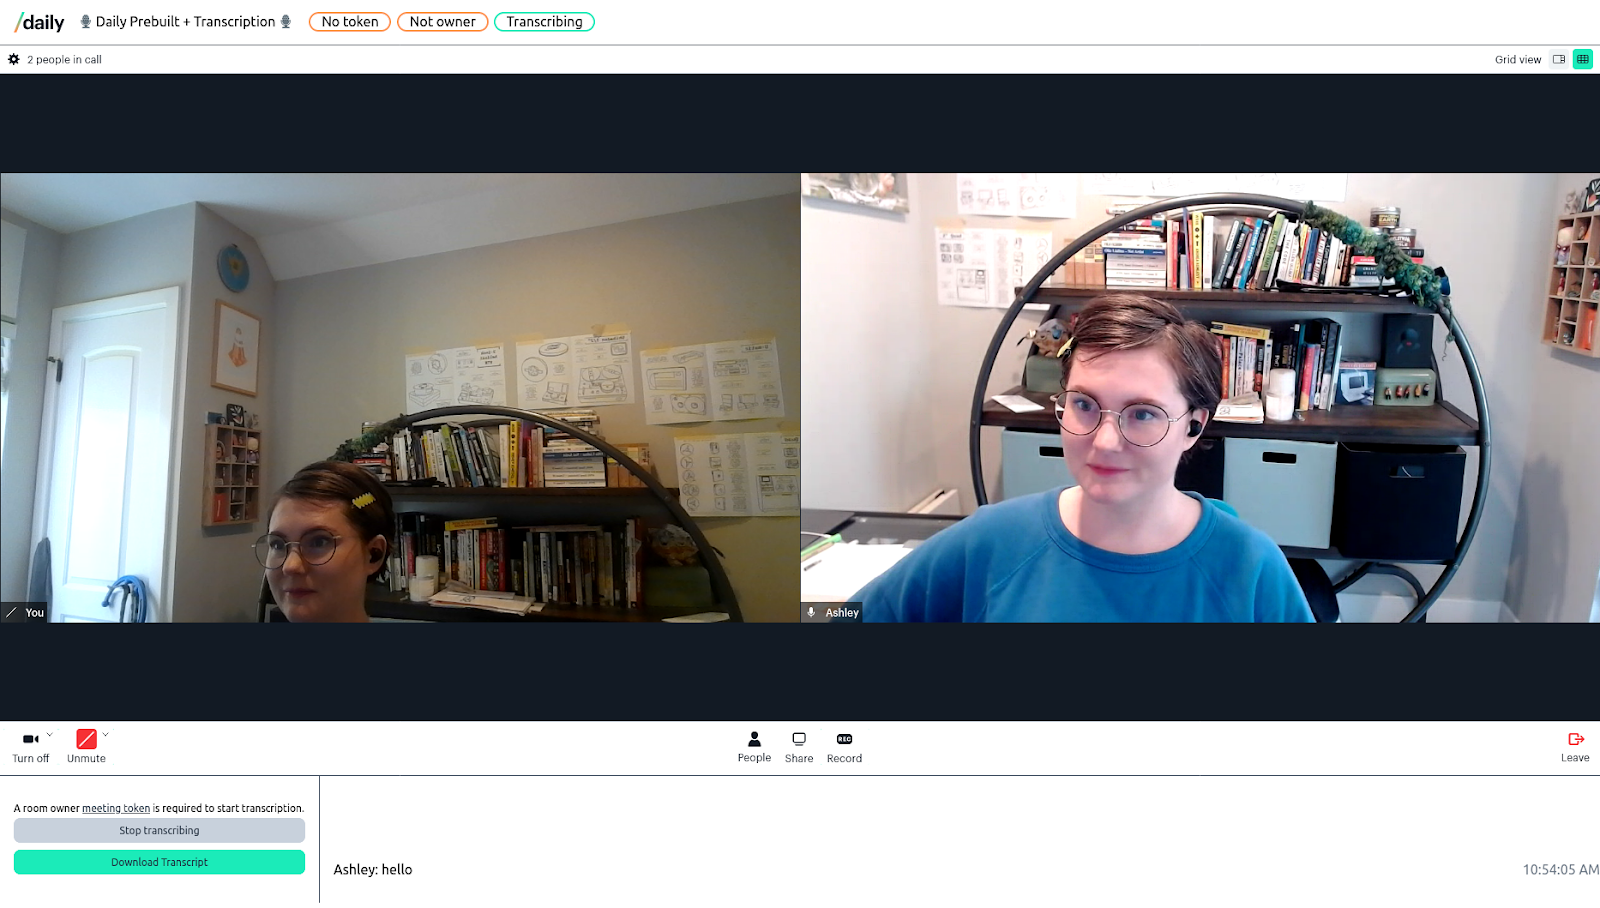
This tutorial focuses on pairing transcription with Daily Prebuilt. We already have a thorough tutorial on adding transcription to a custom Daily call, which you should definitely check out! Today’s tutorial includes a demo that walks through how to add transcription alongside a Daily Prebuilt call.
If you are like spoilers and want to see what we’re building today, you can jump straight into the prebuilt-transcription code and also try a live demo
Note: You will have to connect your Daily and Deepgram accounts, as outlined in the demo’s README and in this tutorial, to fully experience the live demo.
What’s the plan?
In this tutorial, we will cover:
- Getting set up with Daily and Deepgram
- Embedding Daily Prebuilt in a Next.js app
- Creating a transcription component
- Adding buttons to start and stop transcription methods
- Loading the live captions
- Optimizing the app for large amounts of text
- Downloading the transcript
Prerequisites
Because transcription is a shared service between Daily and Deepgram, there is a bit of set-up involved to get both services running with each other. But the good news is that you can set it and forget it, because it’s just a one-time step!
Note: Daily does not charge for transcription services and Deepgram offers a free $150 credit upon sign-up, so there is no cost associated with this tutorial.
To walk through this tutorial, you will first need to create a Daily account and a Deepgram account. Once you have an account and are logged into the Daily Dashboard, you can create a new Daily room or use our REST API.
To set up transcription, you will have to enable_transcription on your Daily domain.
Essentially, you'll need your Daily API key, available in the Daily dashboard, and your Deepgram API key to update your domain settings, like so:
curl --request POST \
    --url https://api.daily.co/v1/ \
    --header 'Accept: application/json' \
    --header 'Authorization: Bearer YOUR_DAILY_API_KEY' \
    --header 'Content-Type: application/json' \
    --data '{"properties": { "enable_transcription": "deepgram:YOUR_DEEPGRAM_API_KEY" }}'
Setting up the demo
Head on over to the prebuilt-transcription GitHub repository and fork the repo to follow along with the rest of this post.
After forking and navigating to the prebuilt-transcription folder, install the dependencies:
npm i
And run the dev server:
npm run dev
Locally, open http://localhost:3000 in your browser.
This demo is based on the Next.js React framework, starting with the create-next-app template builder. This tutorial also uses TypeScript. If you are new to TypeScript, no worries! Because it’s built on top of JavaScript, it looks very similar with a few additional features and syntax.
Staging the [room]
The most interesting part of our codebase lives in pages/[domain]/[room].tsx, so let’s start there. And yes, those brackets are part of the file names – this allows us to create URLs dynamically in Next.js.
When we load the page, we want to build and start the call right away with the parameters we retrieve from the page URL. To do this, we create a useCallback function:
/*
   Set up the Daily call and event listeners on page load
 */

 const startCall = useCallback(() => {
   const iframe = document.getElementById("callFrame");
   const newCallFrame = DailyIframe.wrap(iframe as HTMLIFrameElement, {
     showLeaveButton: true,
   });
   setCallFrame(newCallFrame);

   newCallFrame.join({
     url: url,
   });

   newCallFrame.on("joined-meeting", (ev) => {
     let ownerCheck = ev?.participants.local.owner as boolean;
     setIsOwner(ownerCheck);
   });

  // snip snip - some more event listeners here
  // we’ll come back to this section later!

 }, [url]);
The above startCall function loads when the page loads, via a React useEffect:
 useEffect(() => {
   startCall();
 }, [startCall]);
This creates and joins a call built from the URL parameters.
Incorporating the Daily Prebuilt iframe
Now that the app framework is up and running, let’s add Daily Prebuilt. Since Daily Prebuilt is an embeddable video call UI, Daily has already done most of the video-related work for you. That means this part will be short.
From the aforementioned [room].tsx page, we load the <CallFrame> component. The full component looks like this:
import styles from "../styles/CallFrame.module.css";

const CallFrame = () => (
 <div className={styles.callFrameContainer}>
   <iframe
     id="callFrame"
     className={styles.callFrame}
     allow="microphone; camera; autoplay; display-capture"
   ></iframe>
 </div>
);

export default CallFrame;
The few lines of styling imported from ../styles/CallFrame.module.css allow the Daily Prebuilt iframe to take up most of the screen:
.callFrameContainer {
 width: 100%;
 height: 80%;
}

.callFrame {
 width: 100%;
 height: 100%;
 min-height: 80vh;
 border: 0;
}
Without this styling for the <iframe> and its container, Daily Prebuilt defaults to taking up only a small amount of space on the page. You can change the styling however you like and Daily Prebuilt will fit within those constraints.
Note: We are using wrap() to add Daily Prebuilt to an existing <iframe>, but you could also use the createFrame method to make a new <iframe>, style that frame, and add it to the page.
Transcription component
Now that we have Daily Prebuilt loaded on the page, let’s start implementing transcription by adding a component to store our buttons and transcript.
From our [room].tsx, we reference the Transcription component and pass some managed state to the component:
callFrame: passes the Daily call frame object, which allows the component to start and stop transcriptionnewMsg: sends each new transcripted message to the component for showing the text in the transcript windowowner: this boolean tells the component whether the current user is or isn’t a room ownerisTranscribing: this boolean tells the component that Daily is or isn’t currently transcribing.
 <Transcription
   callFrame={callFrame}
   newMsg={newMsg}
   owner={isOwner}
   isTranscribing={isTranscribing}
 />
In our Transcription component (defined in components/Transcription.tsx), we have a button that toggles the option to start or stop transcription based on whether transcription is currently active according to Daily (we’ll come back to that in a second):
<button
 disabled={!owner}
 onClick={() => {
   isTranscribing ? stopTranscription() : startTranscription();
 }}
>
 {isTranscribing ? "Stop transcribing" : "Start transcribing"}
</button>
If the meeting participant is not an owner, this button will be disabled along with a message explaining that only meeting room owners can start transcription.
This button utilizes these two simple functions:
 async function startTranscription() {
   callFrame?.startTranscription();
 }

 async function stopTranscription() {
   callFrame?.stopTranscription();
 }
How do these functions know if transcription is happening or not? For that, we jump back to [room].tsx. Earlier in the post, we looked at the basic structure of the startCall function. In our demo, this function also has a few lines dedicated to Daily event listeners. We are listening to a few Daily-emitted events that help us shape the video call experience. Two of these events are transcription-started and transcription-stopped events.
When those events are emitted, we know to update the React state to set isTranscribing to its correct boolean value.
   newCallFrame.on("transcription-started", () => {
     setIsTranscribing(true);
   });

   newCallFrame.on("transcription-stopped", () => {
     setIsTranscribing(false);
   });
Note: You can also use our new Daily React Hooks library to more quickly connect your React-based app with Daily’s JavaScript API!
Adding transcription
Now that we are able to start and stop transcription, we need to add the transcripts to the page. Our transcripts come in from Daily via an ”app-message” event. For that, we need another event listener within our startCall function. This checks whether each ”app-message” came from the ID of “transcription” and whether it is a full sentence (that’s what data.is_final is doing below). When we have a message, we save the message as an object with the author’s username, the text transcription, and a timestamp.
   newCallFrame.on(
     "app-message",
     (msg: DailyEventObjectAppMessage | undefined) => {
       const data = msg?.data;
       if (msg?.fromId === "transcription" && data?.is_final) {
         const local = newCallFrame.participants().local;
         const name: string =
           local.session_id === data.session_id
             ? local.user_name
             : newCallFrame.participants()[data.session_id].user_name;
         const text: string = data.text;
         const timestamp: string = data.timestamp;

         if (name.length && text.length && timestamp.length) {
           setNewMsg({ name, text, timestamp });
         }
       }
     }
   );
We need some React state to hold messages, so we set up a const where we instantiate this state as an empty array to hold incoming message objects.
const [messages, setMessage] = useState<Array<transcriptMsg>>([]);This is essentially all that needs to be done to get transcription on the page. You can loop through this array of messages and add them to the screen, or you can add each new message to the screen as it arrives. However, there’s one extra step worth taking to optimize your app for all of these messages, and we’ll see how that works in the next section.
Note: Transcript messages are ephemeral. They are only available for the message the user has received while they are in the room. If you refresh your page, you’ll lose the transcripts. Similarly, new users will only see a transcript for conversations that have taken place since they’ve joined and not a history.
Optimize your window
Seeing transcripts appear on the screen is super fun, but it can quickly slow down browser windows with the addition of so many DOM elements getting added to the screen. Below, we’ll cover not just how we add transcript messages to our page, but also how to do it in a way that is efficient and not overwhelming to anyone’s browser.
To help with this, we need to add two dependencies to our app: react-window and react-virtualized-auto-sizer. These libraries help us by loading only the most recent messages. Instead of loading the entire array of message objects as HTML, the DOM only loads the small part of the data set visible in the window. This virtualization technique prevents poor performance caused by an overloaded browser tab holding too much data in memory. Users can still scroll up and see previous messages which are loaded as needed when requested.
We have established consts for the transcript list and rows that instantiate as empty objects.
 const listRef = useRef<any>({});
 const rowRef = useRef<any>({});
We add new messages received from the parent [room] page to an array. We also have a small function that keeps the array of messages moving to the bottom (most recent) element every time a message is received.
 useEffect(() => {
   setMessage((messages: Array<transcriptMsg>) => {
     return [...messages, newMsg];
   });
 }, [newMsg]);

 useEffect(() => {
   if (messages && messages.length > 0) {
     return () => {
       scrollToBottom();
     };
   }
 }, [messages]);
For each row, we call a formatting function. It structures the transcript in the style of “Message Author: Message Text” on the left and Timestamp trimmed to a local time only on the right (styled with CSS, the handy-dandy float:right).
 function Row({ index, style }: rowProps) {
   const rowRef = useRef<any>({});

   useEffect(() => {
     if (rowRef.current) {
       setRowHeight(index, rowRef.current.clientHeight);
     }
   }, [rowRef]);

   return (
     <div style={style}>
       {messages[index].name && (
         <div ref={rowRef}>
           {messages[index].name}: {messages[index].text}
           <span className={styles.timestamp}>
             {new Date(messages[index].timestamp).toLocaleTimeString()}
           </span>
         </div>
       )}
     </div>
   );
 }
Our rendered transcript block then looks like this, with each loaded row wrapped in the react-window List and react-virtualized-auto-sizer AutoSizer elements.
<AutoSizer>
 {({ height, width }) => (
   <List
     height={height}
     width={width}
     itemCount={messages.length}
     itemSize={getRowHeight}
     ref={listRef}
   >
     {Row}
   </List>
 )}
</AutoSizer>
Download
The transcripts collected in this app are not available after the call concludes, so downloading them is helpful if you want to use them later.
To do that, we need to prepare a chat file with all of the text, not just the text currently virtualized on the screen.
We have already seen that we are using React state to collect and set messages. For preparing a plain text file with the transcript inside, we will add a transcriptFile state that instantiates as an empty string.
const [transcriptFile, setTranscriptFile] = useState<string>("");Next, let’s set up a useEffect to style the transcript in a way that works best for reviewing later. Unlike the live transcript where we have the timestamp on the right and set to local time only, this includes the full timestamp and date for every message.
 /*
   Allow user to download most recent full transcript text
 */

 useEffect(() => {
   setTranscriptFile(
     window.URL.createObjectURL(
       new Blob(
         messages.map((msg) =>
           msg.name
             ? `${msg.timestamp} ${msg.name}: ${msg.text}\n`
             : `Transcript\n`
         ),
         { type: "octet/stream" }
       )
     )
   );
 }, [messages]);
This link will get the most recent full transcript and by default save it as a file called transcript.txt, although this can be changed later by the user.
<a href={transcriptFile} download="transcript.txt">
  Download Transcript
</a>
Conclusion
And there you have it! Using Daily Prebuilt and our new Transcription API with Deepgram, it’s not too much work to add a live transcript to your meetings. From what we’ve shown in this demo, you can easily add different styles (including to the Daily Prebuilt window itself by customizing with your own color themes)
We would love to see what you’ve built using Daily. Reach out to us anytime at help@daily.co!
Never miss a story
Get the latest direct to your inbox.